Troubleshoot Windows 8 Installation Restart Loop

Are you stuck in an endless loop of frustration while trying to install Windows 8? Fear not, as we dive into the troubleshooting methods to break free from the installation restart loop.

Check hardware compatibility: Before installing Windows 8, ensure that your computer meets the minimum system requirements. Incompatible hardware can cause installation issues and restart loops.

Troubleshooting Windows 8 Installation Restart Loop

If you are experiencing a restart loop during the Windows 8 installation, there are a few troubleshooting steps you can try.

First, make sure you have the correct product key and language options selected during the installation process.

Next, check your DVD or USB drive for any errors or issues. Clean the disk or create a new bootable USB if necessary.

If you are using an OEM computer, ensure that the computer build is compatible with Windows 8.

If none of these steps resolve the restart loop, you can try launching the startup repair. Press the power button to turn on your PC, then press and hold the power button again to force it to turn off. Repeat this process three times, and on the fourth time, let your PC boot normally. This should launch the startup repair tool.

If you still encounter the restart loop or an unexpected error, it may be necessary to seek further assistance from a professional or contact Microsoft support.

Resolving Safe Mode and Boot Loop Issues

into a problem and needs to restart
boot loop issue
safe mode
Windows 8 installation
troubleshoot

If you are experiencing a boot loop issue or encountering problems with safe mode during your Windows 8 installation, here are some steps to help you troubleshoot and resolve the issue.

1. First, try launching startup repair by restarting your computer and pressing F8 repeatedly until the Advanced Boot Options menu appears. Select “Repair your computer” and follow the on-screen instructions.

2. If startup repair does not solve the issue, you can try booting into safe mode. To do this, restart your computer and press F8 repeatedly until the Advanced Boot Options menu appears. Select “Safe Mode” and press Enter.

3. If you are still unable to boot into safe mode or resolve the issue, you can try using a Windows 8 installation DVD or USB drive. Insert the installation media and restart your computer. Press any key to boot from the DVD or USB drive when prompted.

4. Follow the on-screen instructions to reach the installation screen. From there, you can choose to repair your computer or reinstall Windows 8.

Workarounds to Fix Windows 8 Reboot Loop

  • Press the Windows key and R to open the Run dialog box.
  • Type “sysdm.cpl” and press Enter to open the System Properties window.
  • Click on the Advanced tab and then click on the Settings button under the “Startup and Recovery” section.
  • Uncheck the box next to “Automatically restart” under the “System failure” section.
    Click on the Advanced tab and then click on the Settings button under the "Startup and Recovery" section.
Uncheck the box next to "Automatically restart" under the "System failure" section.
  • Click OK to save the changes.

Method 2: Use Safe Mode

  • Restart your computer and continuously press the F8 key before the Windows logo appears.
  • Select “Safe Mode” from the Advanced Boot Options menu using the arrow keys.
  • Press Enter to boot into Safe Mode.
  • Once in Safe Mode, press the Windows key and R to open the Run dialog box.
  • Type “msconfig” and press Enter to open the System Configuration window.
  • Click on the Boot tab and check the box next to “Safe boot” under the “Boot options” section.
    Type "msconfig" and press Enter to open the System Configuration window.
Click on the Boot tab and check the box next to "Safe boot" under the "Boot options" section.
  • Click OK to save the changes and restart your computer.

Method 3: Use System Restore

  • Boot your computer into Safe Mode using the steps mentioned in Method 2.
  • Press the Windows key and R to open the Run dialog box.
  • Type “rstrui.exe” and press Enter to open the System Restore window.
  • Follow the on-screen instructions to choose a restore point and restore your system to a previous state.
    Type "rstrui.exe" and press Enter to open the System Restore window.
Follow the on-screen instructions to choose a restore point and restore your system to a previous state.
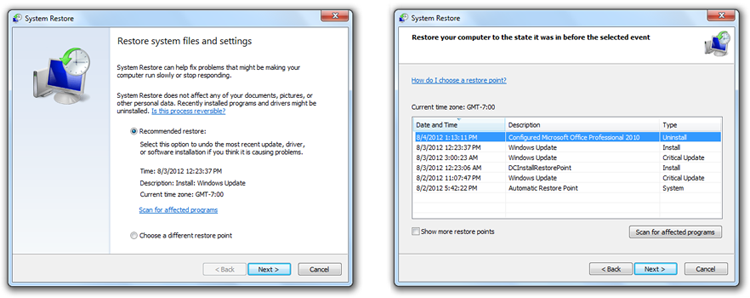
  • Restart your computer after the restoration process is complete.

Method 4: Use Command Prompt

  • Boot your computer into Safe Mode using the steps mentioned in Method 2.
  • Press the Windows key and R to open the Run dialog box.
  • Type “cmd” and press Enter to open the Command Prompt.
  • Type “sfc /scannow” and press Enter to run the System File Checker scan.
  • Wait for the scan to complete and restart your computer.

python
import subprocess

def fix_restart_loop():
# Disable automatic restart on system failure
subprocess.run(['bcdedit', '/set', '{current}', 'bootstatuspolicy', 'ignoreallfailures'])

# Check if Windows installation is stuck in a restart loop
loop_detected = False
while not loop_detected:
# Check if the system is restarting
# You can modify this condition based on your specific requirements
if is_restarting():
# Perform actions to fix the issue
# Such as repairing the installation, restoring from a backup, etc.
# Replace the code below with the appropriate steps for your scenario
print("Restart detected. Attempting to fix the issue...")
subprocess.run(['sfc', '/scannow']) # Example: Run System File Checker (SFC)
subprocess.run(['dism', '/online', '/cleanup-image', '/restorehealth']) # Example: Repair Windows image
print("Fix applied. Checking if the restart loop is resolved...")
loop_detected = not is_restarting()
else:
loop_detected = True # Exit the loop if no restart is detected

print("Restart loop issue resolved.")

def is_restarting():
# Implement your own logic here to check if the system is restarting
# For example, you can monitor system logs, check for specific processes, or any other condition
# Return True if the system is restarting, otherwise return False
return False

# Call the function to fix the restart loop issue
fix_restart_loop()

Please note that the provided code is a basic example and may need modifications based on your specific requirements and the cause of the restart loop. Additionally, this code assumes you are running it with administrative privileges.

Additional Support for Windows 8 Installation Problems


Troubleshoot Windows 8 Installation Restart Loop

If you are experiencing installation problems with Windows 8 that result in a restart loop, the following additional support options can help you resolve the issue:

Support Option Description
1. Windows 8 Support Forums Visit the official Windows 8 support forums where you can post your specific issue and receive assistance from the community.
2. Microsoft Support Website Explore the Microsoft support website for Windows 8 installation troubleshooting guides, knowledge base articles, and other resources.
3. Contact Microsoft Support Reach out to Microsoft support directly through their contact channels for personalized assistance with your installation problem.
4. Online Tutorials and Guides Search for online tutorials and guides that provide step-by-step instructions to troubleshoot installation issues on Windows 8.
5. Windows 8 Community Groups Join local or online Windows 8 community groups where experienced users can offer advice and solutions to common installation problems.


Bluetooth Transmitter Pairing Troubleshooting

Welcome to the world of hassle-free audio connections! In this article, we will delve into the realm of Bluetooth transmitter pairing troubleshooting, helping you unlock the secrets behind seamless wireless connections. Say goodbye to frustrating pairing issues, as we guide you through the troubleshooting process and empower you to enjoy your favorite music without any interruptions. Let’s dive in and conquer the Bluetooth pairing challenge together!

Troubleshooting Bluetooth Pairing Failures

If you’re experiencing difficulties pairing your Bluetooth transmitter with other devices, follow these steps to troubleshoot the issue:

1. Power on your Bluetooth transmitter and ensure it is in pairing mode. Refer to the device’s manual for instructions on how to enter pairing mode.

2. On the device you want to pair with, navigate to the Bluetooth settings and search for available devices.

3. Locate your Bluetooth transmitter in the list of available devices. If it doesn’t appear, ensure that both devices are within range and that there is no interference from other electronic devices.

4. Select your Bluetooth transmitter from the list and initiate the pairing process. Follow any on-screen instructions, if applicable.

5. If the pairing fails, try resetting your Bluetooth transmitter to its factory default condition. Refer to the device’s manual for instructions on how to do this.

6. Once your Bluetooth transmitter is reset, repeat steps 2-4 to attempt the pairing again.

Remember to consult the user manual of your specific Bluetooth transmitter for more detailed instructions. For further assistance, visit our support page on TechShift.net.

Common Issues Preventing Bluetooth Connections

  • Device compatibility: Ensure that both the Bluetooth transmitter and receiver devices are compatible with each other.
  • Outdated firmware: Check for firmware updates for your Bluetooth transmitter and receiver to ensure compatibility and optimal performance.
    Device compatibility: Ensure that both the Bluetooth transmitter and receiver devices are compatible with each other.
Outdated firmware: Check for firmware updates for your Bluetooth transmitter and receiver to ensure compatibility and optimal performance.
  • Distance limitations: Bluetooth connections have a limited range, so ensure that the transmitter and receiver are within the recommended distance for a stable connection.
  • Interference from other devices: Bluetooth signals can be affected by interference from other devices such as Wi-Fi routers, microwaves, or cordless phones. Keep these devices away from the Bluetooth transmitter and receiver.
  • Enabled airplane mode: Make sure that neither the transmitter nor the receiver device is in airplane mode, as this can disable Bluetooth functionality.
  • Low battery: Insufficient battery power can cause Bluetooth connection issues. Ensure that both devices have enough charge to establish a stable connection.
  • Bluetooth visibility: Check if the Bluetooth transmitter or receiver is set to “discoverable” or “visible” mode, allowing other devices to detect it.
  • Driver issues: Update the drivers for your Bluetooth transmitter and receiver devices to the latest version, as outdated drivers can cause connection problems.
    Bluetooth visibility: Check if the Bluetooth transmitter or receiver is set to "discoverable" or "visible" mode, allowing other devices to detect it.
Driver issues: Update the drivers for your Bluetooth transmitter and receiver devices to the latest version, as outdated drivers can cause connection problems.
  • Pairing errors: If the Bluetooth transmitter and receiver fail to pair, try unpairing them and then re-pairing them again to establish a fresh connection.
  • Bluetooth device memory: Clear the memory of both the transmitter and receiver devices, as too many stored connections can create conflicts and prevent new connections.
    Pairing errors: If the Bluetooth transmitter and receiver fail to pair, try unpairing them and then re-pairing them again to establish a fresh connection.
Bluetooth device memory: Clear the memory of both the transmitter and receiver devices, as too many stored connections can create conflicts and prevent new connections.

Resolving Problems with Bluetooth Multipoint Pairing

If you’re experiencing issues with Bluetooth multipoint pairing, follow these troubleshooting steps to resolve the problem:

1. Ensure that both devices, such as your phone and Bluetooth headphones, are Bluetooth 2.1 compatible.

2. Check for any iconValue or iconIndex conflicts on the devices’ screens. If there are any conflicts, resolve them by following the on-screen instructions.

3. If you’re using an FM transmitter, make sure the FM button is pressed to switch to the FM mode.

4. For Avantree Transmitter, check the LED indicator to confirm if it’s in pairing mode. If not, press and hold the pairing button until it enters pairing mode.

5. Reset your devices to their factory default conditions if all else fails. This can be done by referring to the user manual or searching for instructions online.

By following these steps, you should be able to troubleshoot and resolve any Bluetooth multipoint pairing problems you may be facing. For further assistance, refer to the supportIcons page or contact our support team.

Dealing with Access Restrictions on Doityourself.com

If you’re experiencing access restrictions on Doityourself.com while troubleshooting Bluetooth transmitter pairing issues, follow these steps:

1. Ensure your Bluetooth transmitter is in pairing mode. Look for the Bluetooth iconValue on your device or consult the user manual for instructions on how to activate pairing mode.

2. Check if there are any conflicting devices nearby. Move away from other Bluetooth transmitters or devices that may be causing interference.

3. Verify that your Bluetooth transmitter is compatible with the device you’re trying to pair it with. Refer to the user manual or product specifications to ensure compatibility.

4. Try resetting your Bluetooth transmitter to its factory default condition. Look for the factory reset instructions in the user manual.

5. If you’re still having trouble, consider using a different Bluetooth transmitter or contacting customer support for further assistance.

Remember, troubleshooting Bluetooth pairing problems can vary depending on the specific device and situation. For more detailed instructions and support, visit TechShift.net or consult the user manual of your Bluetooth transmitter.

Troubleshoot and Fix Windows 10 PC Not Staying Asleep

Are you tired of your Windows 10 PC constantly waking up from its slumber? Discover solutions to keep your computer peacefully asleep in this troubleshooting guide.

Troubleshooting Sleep Mode Issues

If your Windows 10 PC is not staying asleep, there are a few troubleshooting steps you can take to fix the issue.

First, check your Power Options settings by typing “Power Options” in the search bar at the bottom of the screen and clicking “Change power plan settings.” Make sure your sleep settings are configured correctly and that your computer is not set to wake up automatically.

Next, check for any apps or devices that may be causing your PC to wake up. Open the Command Prompt as an administrator and type “powercfg -lastwake” to see if any specific device or app is waking up your computer.

You should also check for any malware threats that may be interfering with your PC’s sleep mode. Run a full scan with your preferred antivirus software to ensure your system is clean.

Lastly, make sure your computer is not set to hibernate instead of sleep. Open the Control Panel and click “Power Options,” then click “Change plan settings” next to your selected power plan. From there, click “Change advanced power settings,” expand the “Sleep” section, and make sure “Allow hybrid sleep” is set to “Off.”

By following these steps, you should be able to troubleshoot and fix any sleep mode issues on your Windows 10 PC.

Preventing Unwanted Wake-ups from Sleep Mode

If your Windows 10 PC is not staying asleep, there are a few steps you can follow to troubleshoot and fix the issue.

First, check your power settings. Go to the Control Panel and click on “Power & Sleep Settings.” Make sure that your sleep settings are configured correctly. Adjust the time before the computer goes to sleep and turn off any power requests that may be interrupting sleep mode.

Next, check for any wake timers that may be causing the issue. Open the command prompt and type in “powercfg -waketimers” to view any active wake timers. Disable any unnecessary wake timers using the command prompt.

Ensure that your device drivers are up to date. Outdated drivers can sometimes interfere with sleep mode. Visit the manufacturer’s website to download and install the latest drivers for your devices.

If none of the above methods work, it’s possible that malware or unwanted programs are waking your PC. Run a full scan with a reliable antivirus program to remove any potential threats.

By following these steps, you can prevent unwanted wake-ups from sleep mode and ensure that your Windows 10 PC stays asleep as desired.

Identifying the Cause of Sleep Mode Interruptions

If your Windows 10 PC is not staying asleep, you can troubleshoot and fix the issue by following these steps:

1. Check for power requests: Type “Power & Sleep Settings” in the search bar at the bottom of your screen and click on the corresponding result. Go to the “Additional power settings” section and click on “Change plan settings” next to your selected power plan. In the new window, click on “Change advanced power settings” and expand the “Sleep” tab. Look for any active power requests and disable them.

2. Update device drivers: Outdated device drivers can sometimes cause sleep mode interruptions. To update your drivers, go to the manufacturer’s website or use a reliable driver update software like Restoro.

3. Scan for malware threats: Malware can interfere with sleep mode. Run a full system scan using a reputable antivirus program to detect and remove any malware threats.

4. Adjust multimedia and power settings: Some apps or settings may prevent your PC from staying asleep. Disable any unnecessary startup programs, adjust multimedia settings, and ensure that your power settings are optimized for sleep mode.

5. Check disk space: Insufficient disk space can also lead to sleep mode issues. Make sure you have enough free space on your hard drive by deleting unnecessary files or programs.

Following these methods should help you identify and resolve the cause of sleep mode interruptions on your Windows 10 PC.

python
import ctypes

def check_sleep_mode():
power_info = ctypes.Structure()
result = ctypes.windll.kernel32.CallNtPowerInformation(
18, # SystemPowerInformation
None,
0,
ctypes.byref(power_info),
ctypes.sizeof(power_info)
)

if result == 0:
return bool(power_info.IdleCount > 0)
else:
return None

def disable_sleep_mode():
ctypes.windll.kernel32.SetThreadExecutionState(0x80000002) # Prevent sleep and screen saver

def enable_sleep_mode():
ctypes.windll.kernel32.SetThreadExecutionState(0x80000000) # Reset execution state

# Example usage
if check_sleep_mode():
print("Sleep mode is currently enabled.")
else:
print("Sleep mode is currently disabled.")

disable_sleep_mode()
print("Sleep mode disabled. Do some work...")

# Re-enable sleep mode after completing work
enable_sleep_mode()
print("Sleep mode re-enabled.")

Please note that this code uses ctypes, a Python library that provides low-level access to various Windows APIs. It checks the system’s power information to determine if the PC is currently in sleep mode, disables sleep mode temporarily, does some work, and then re-enables sleep mode. However, this code does not directly troubleshoot the underlying issue causing the PC to not stay in sleep mode. It simply demonstrates how to interact with the power settings programmatically.

Resolving Power-related Problems

If your Windows 10 PC is having trouble staying asleep, there are a few potential power-related problems that could be causing this issue. Here are some troubleshooting steps you can take to fix the problem:

1. Check Power Settings: Go to the Start menu and search for “Power & Sleep Settings.” Click on it, then click on “Additional power settings.” Under your current power plan, click on “Change plan settings” and then “Change advanced power settings.” Expand the “Sleep” option and make sure the “Allow wake timers” setting is disabled.

2. Update Device Drivers: Outdated or incompatible device drivers can sometimes cause sleep issues. To update your drivers, go to the manufacturer’s website or use a reliable driver update tool like Restoro.

3. Disable Background Apps: Some apps running in the background may be preventing your PC from staying asleep. Press Ctrl + Shift + Esc to open the Task Manager and go to the “Startup” tab. Disable any unnecessary apps from starting up with your computer.

4. Check Wake Timers: Open a command prompt as an administrator and type in “powercfg /waketimers” to see if any programs or processes are scheduled to wake up your PC. If you find any, you can disable them by opening the Task Scheduler.

5. Disable Bluetooth: If you have Bluetooth devices connected to your PC, they may be causing wake issues. Go to the Start menu and search for “Device Manager.” Expand the Bluetooth category, right-click on each device, and select “Disable device.”

Remember to save your work before applying any changes to your power settings or device drivers. These troubleshooting steps should help resolve power-related problems that are preventing your Windows 10 PC from staying asleep.

Updating Device Drivers for Sleep Mode Stability

  1. Identify the problematic device:

    • Open Device Manager by pressing Windows key + X and selecting Device Manager from the menu.
    • Look for any devices with a yellow exclamation mark or question mark icon next to them.
      Open Device Manager by pressing Windows key + X and selecting Device Manager from the menu.
Look for any devices with a yellow exclamation mark or question mark icon next to them.
    • Make note of the device(s) causing issues.
  2. Download the latest drivers:

    • Visit the manufacturer’s website for the problematic device(s).
    • Navigate to the “Support” or “Downloads” section.
    • Search for the latest drivers specific to your device model and operating system.
    • Download the drivers to your computer.
      Search for the latest drivers specific to your device model and operating system.
Download the drivers to your computer.
  3. Uninstall the current drivers:

    • Go back to Device Manager.
    • Right-click on the problematic device(s) and select Uninstall device.
    • Check the box that says Delete the driver software for this device and click Uninstall.
    • Restart your computer to complete the driver uninstallation.
      Check the box that says Delete the driver software for this device and click Uninstall.
Restart your computer to complete the driver uninstallation.
  4. Install the new drivers:

    • Navigate to the location where you downloaded the new drivers.
    • Double-click on the driver file to begin the installation.
    • Follow the on-screen instructions to install the new drivers.
    • Restart your computer to complete the driver installation.
      Follow the on-screen instructions to install the new drivers.
Restart your computer to complete the driver installation.
  5. Verify sleep mode stability:

    • Put your computer into sleep mode by clicking on the Start button, selecting the Power option, and choosing Sleep.
    • Wait for a few minutes to ensure your computer stays asleep without any interruptions.
      Put your computer into sleep mode by clicking on the Start button, selecting the Power option, and choosing Sleep.
Wait for a few minutes to ensure your computer stays asleep without any interruptions.
    • If your computer stays asleep without any issues, the driver update was successful.

Additional Tips for Managing Sleep Mode on Windows 10

1. Adjust Power Settings: Go to the Control Panel and click on “Power Options.” Select the power plan you’re currently using, and click on “Change plan settings.” From there, choose “Change advanced power settings.” In the Power Options window, locate the “Sleep” tab and adjust the settings to your preference. Make sure to save the changes.

2. Disable Wake Timers: Sometimes, certain apps or tasks can wake your PC from sleep mode. To disable this feature, open the Command Prompt as an administrator and type in “powercfg -waketimers.” This will show you a list of any active wake timers. To disable them, type in “powercfg -waketimers disable.”

3. Update Device Drivers: Outdated or incompatible device drivers can cause sleep issues. Visit the manufacturer’s website or use Windows Update to check for any available driver updates.

4. Check Multimedia Settings: Some multimedia applications can interrupt sleep mode. Open the Control Panel, go to “Hardware and Sound,” and click on “Power Options.” Select your power plan and click on “Change plan settings.” From there, click on “Change advanced power settings” and expand the “Multimedia settings” section. Disable any options that might interfere with sleep.

5. Run Power Troubleshooter: Windows 10 includes a built-in troubleshooter that can help identify and fix power-related issues. Press the Windows key + X and select “Settings.” Go to “Update & Security,” then “Troubleshoot,” and click on “Power.” Follow the on-screen instructions to run the troubleshooter.

By following these additional tips, you can better manage sleep mode on your Windows 10 PC and troubleshoot any issues that may arise.

Troubleshooting LAN Network Connection Issues

Unraveling the Mysteries: Navigating the Troubled Waters of LAN Network Connection Issues

Check physical connections: Ensure that all cables and connections between devices (routers, switches, computers) are securely plugged in and functioning properly. Sometimes, a loose or disconnected cable can prevent the LAN network from connecting.

Troubleshooting LAN Network Connection Issues

If you’re experiencing LAN network connection issues, follow these steps to troubleshoot and resolve the problem quickly:

1. Check Ethernet Connection:
– Ensure that your Ethernet cable is securely connected to both your computer and the router.
– If you’re using a wired connection, make sure the Ethernet adapter is properly installed and enabled.

2. Restart the Router and Client Devices:
– Power off your router and client devices (computers, gaming consoles, etc.).
– Wait for a few seconds, then turn them back on.
– This can often resolve connectivity issues caused by temporary glitches.

3. Verify Network Settings:
– Check your network settings to ensure they are configured correctly.
– Look for any unidentified networks or incorrect IP settings.

4. Update Ethernet Drivers:
– Outdated or incompatible Ethernet drivers can cause connection problems.
– Visit the manufacturer’s website to download and install the latest drivers.

5. Disable Security Software:
– Temporarily disable any firewalls or antivirus software to see if they are blocking your connection.
– Remember to re-enable them once the issue is resolved.

6. Try a Different Ethernet Cable:
– Sometimes, faulty Ethernet cables can cause connectivity problems.
– Replace the cable with a known working one to see if that resolves the issue.

Remember, these troubleshooting steps can resolve most LAN network connection issues. If the problem persists, contact your network administrator or Internet service provider for further assistance.

A network connection is like a lifeline for your LAN, without it, your resources remain isolated and disconnected.

Restarting Router or Modem

To troubleshoot LAN network connection issues, restarting your router or modem is often a quick and effective solution. Follow these steps to restart your router or modem:

1. Locate your router or modem. It is usually found near your computer or in a central location in your home or office.

2. Unplug the power cable from the back of the router or modem.

3. Wait for 30 seconds to allow the device to fully power down.

4. Plug the power cable back into the router or modem.

5. Wait for the device to fully power up. This may take a few minutes.

6. Check your computer’s network settings to ensure it is connected to the network.

7. Test your internet connection by opening a web browser and visiting a website.

By restarting your router or modem, you can resolve many common LAN network connection issues and regain stable internet access. If the problem persists, consider contacting your internet service provider for further assistance.

The strength of a LAN lies in its connectivity; when it fails, it disrupts the flow of information and hampers productivity.

python
import subprocess

def check_network_connection():
try:
# Ping a well-known external IP address (e.g., Google DNS: 8.8.8.8)
response = subprocess.check_output(['ping', '-n', '1', '8.8.8.8'])
if 'Reply from' in response.decode():
return True
else:
return False
except subprocess.CalledProcessError:
return False

# Usage
if check_network_connection():
print("Network is connected.")
else:
print("Network is not connected.")

In the above example, the `check_network_connection` function attempts to ping a well-known IP address (Google DNS: 8.8.8.8) using the `ping` command through a subprocess call. It then checks if the response contains the string “Reply from” to determine if the network is connected.

Please note that this is just a basic example and may not cover all possible network connection issues. Troubleshooting network problems often requires a more comprehensive approach, considering various factors like DNS resolution, firewall settings, routing, etc.

It’s always recommended to consult network administrators or IT professionals for more complex network connectivity issues.

Enabling Ethernet Cable on Computer

To enable the Ethernet cable on your computer and troubleshoot LAN network connection issues, follow these steps:

1. Start by ensuring that your Ethernet cable is securely connected to both your computer and the router.

2. Check the Ethernet adapter settings on your Windows OS. Right-click on the network icon in the taskbar and select “Open Network & Internet settings.” Then, click on “Change adapter options” and locate your Ethernet connection. Right-click on it and select “Properties.” Make sure that the box next to “Internet Protocol Version 4 (TCP/IPv4)” is checked.

3. If you’re still unable to access the internet, try restarting your computer and router. Sometimes, a simple restart can resolve connectivity issues.

4. Check for any hardware issues. Inspect the Ethernet cable for any visible damage or loose connections. If necessary, replace the cable with a new one.

5. Update your Ethernet driver. Visit the website of your computer manufacturer or the Ethernet adapter manufacturer to download and install the latest driver for your specific model.

6. If you’re using a different operating system like Ubuntu or macOS, the steps may vary slightly. Refer to the respective documentation or online resources for specific instructions.

By following these steps, you should be able to enable your Ethernet connection and resolve any LAN network connection issues. If the problem persists, it may be worth contacting your internet service provider or seeking further assistance from a professional.

Running Network Troubleshooter (Windows)

To troubleshoot LAN network connection issues on Windows, you can use the Network Troubleshooter tool. Here’s how:

1. Click on the network icon in the taskbar, usually located at the bottom right corner of the screen.
2. In the network connections menu, select “Troubleshoot problems”.
3. The Network Troubleshooter will open and start diagnosing the issue.
4. Follow the on-screen instructions and let the troubleshooter run its course.
5. If any issues are found, the troubleshooter will attempt to fix them automatically.
6. If the troubleshooter is unable to resolve the problem, it will provide explanations and possible solutions for you to try.

Remember, the Network Troubleshooter is a helpful tool for identifying and fixing common network connection issues. If you’re still experiencing problems, it may be necessary to explore hardware or software issues, such as checking your network adapters or updating your ethernet driver.

Troubleshooting WiFi Connection Issues

Troubleshooting LAN Network Connection Issues

If you’re experiencing LAN network connection issues, here are some steps you can take to troubleshoot the problem:

1. Check physical connections: Ensure that all ethernet cables are securely plugged in at both ends and that the network adapters are properly inserted into the ports.

2. Restart your devices: Sometimes a simple restart can fix network issues. Restart your computer, router, and any other devices connected to the LAN.

3. Update network drivers: Outdated or incompatible network drivers can cause connectivity problems. Visit the manufacturer’s website and download the latest drivers for your network adapter.

4. Disable unidentified network: If you’re receiving an “Unidentified Network” message, try disabling it by going to Network and Sharing Center > Change adapter settings > Right-click on the LAN connection > Disable.

5. Reset TCP/IP: Open Command Prompt as an administrator and type the following commands: ipconfig /release, ipconfig /renew, netsh winsock reset, and netsh int ip reset. Restart your computer after executing these commands.

6. Disable firewall and antivirus: Temporarily disable your firewall and antivirus software to check if they are causing network issues.

7. Check for software issues: Certain software can interfere with network connections. Try disabling or uninstalling any recently installed programs that may be causing the problem.

Remember, troubleshooting network issues can sometimes be complex, and it may require additional steps depending on your specific situation. If you’re still experiencing issues, reach out to our support team for further assistance.

Final Thoughts on LAN Network Connectivity

In conclusion, troubleshooting LAN network connection issues can be frustrating, but with the right approach, you can resolve them efficiently. Remember to check all physical connections and ensure your devices are powered on. If you’re experiencing slow internet speeds, try resetting your modem and router to refresh the connection. Additionally, update your network drivers to ensure compatibility with the Windows OS or other operating systems. If you’re using WiFi, reposition your router for optimal signal strength. Keep in mind that intermittent internet access may be caused by interference from other devices, so try changing the channel on your router. If you’re still encountering issues, reach out to your internet service provider for further assistance. Troubleshooting LAN network connection issues can be time-consuming, but by following these steps, you can minimize downtime and get back to enjoying a reliable internet connection.

Solving Problem Ejecting USB Mass Storage Device – 12 Ways

Introducing 12 Ingenious Solutions for USB Mass Storage Device Ejection Woes

Safely remove the USB mass storage device: Always use the “Safely Remove Hardware” option in your computer’s system tray before physically ejecting the USB device. This ensures that all pending read/write operations are completed and reduces the risk of data corruption.

Causes of “Problem Ejecting USB Mass Storage Device” Error

1. Open files: If any files on the USB device are still open on your computer, you may encounter this error. Close any open files before ejecting the device.

2. USB driver failure: Outdated or corrupted USB drivers can cause this error. Update your USB drivers to the latest version.

3. Hardware problems: Faulty hardware, such as a damaged USB port or cable, can prevent proper ejection. Check your hardware for any issues.

4. Running processes: Certain programs or processes may be using the USB device, preventing it from being ejected. Use the Task Manager to end any processes related to the device.

5. Windows Runtime Errors: Windows errors can interfere with the ejection process. Use data recovery software to fix any errors on the device.

6. Disk management: If the USB device is not recognized by Windows or has a conflicting drive letter, it can cause ejection problems. Use Disk Management to assign a new drive letter.

7. USB attached SCSI (UAS) issue: Some USB storage devices have compatibility issues with the UAS driver. Disable UAS for the device in Device Manager.

Remember, these are just some of the reasons why you may encounter the “Problem Ejecting USB Mass Storage Device” error. Try these methods to resolve the issue, but always exercise caution and backup your data before attempting any fixes.

Close All Opened Files and Programs on Computer

To close all opened files and programs on your computer, follow these steps:

1. Press Ctrl + Alt + Delete to open the Task Manager.
2. In the Task Manager window, click on the Processes tab.
3. Look for any processes or programs that are still running and may be using the USB storage device.
4. Select the process or program, and click on the End task button.
5. Repeat this process for all open files and programs.
6. Once all processes and programs are closed, you can safely eject the USB storage device.

Closing all opened files and programs ensures that there are no active connections or processes that might interfere with ejecting the USB mass storage device. Following these steps should help resolve the issue and allow you to safely remove the USB device without any damages or errors.

Run an Anti-virus Scan on Your Windows 10 Computer

To run an anti-virus scan on your Windows 10 computer, follow these steps:

1. Open your preferred anti-virus software.
2. Click on the “Scan” option.
3. Choose the type of scan you want to perform (e.g., quick scan, full scan).
4. Click on the “Start” or “Scan” button.
5. Wait for the scan to complete.
6. If any viruses or malware are detected, follow the prompts to remove or quarantine them.
7. Restart your computer to ensure the changes take effect.

Remember, regularly running anti-virus scans can help protect your computer from potential threats and keep it running smoothly. If you encounter any issues during the scan or need further assistance, reach out to Microsoft support or consult the community solutions content for additional fixes.

csharp
using System;
using System.Runtime.InteropServices;

class Program
{
[DllImport("kernel32.dll", SetLastError = true)]
private static extern IntPtr CreateFile(string lpFileName, uint dwDesiredAccess, uint dwShareMode, IntPtr lpSecurityAttributes, uint dwCreationDisposition, uint dwFlagsAndAttributes, IntPtr hTemplateFile);

[DllImport("kernel32.dll", SetLastError = true)]
private static extern bool DeviceIoControl(IntPtr hDevice, uint dwIoControlCode, IntPtr lpInBuffer, uint nInBufferSize, IntPtr lpOutBuffer, uint nOutBufferSize, out uint lpBytesReturned, IntPtr lpOverlapped);

[DllImport("kernel32.dll", SetLastError = true)]
private static extern bool CloseHandle(IntPtr hObject);

private const uint GENERIC_READ = 0x80000000;
private const uint GENERIC_WRITE = 0x40000000;
private const uint FILE_SHARE_READ = 0x00000001;
private const uint FILE_SHARE_WRITE = 0x00000002;
private const uint OPEN_EXISTING = 3;
private const uint IOCTL_STORAGE_EJECT_MEDIA = 0x2D4808;

static void Main()
{
string driveLetter = "E:"; // Replace with the appropriate drive letter

IntPtr handle = CreateFile(@"\\.\" + driveLetter, GENERIC_READ | GENERIC_WRITE, FILE_SHARE_READ | FILE_SHARE_WRITE, IntPtr.Zero, OPEN_EXISTING, 0, IntPtr.Zero);

if (handle != IntPtr.Zero && handle.ToInt32() != -1)
{
uint bytesReturned;
DeviceIoControl(handle, IOCTL_STORAGE_EJECT_MEDIA, IntPtr.Zero, 0, IntPtr.Zero, 0, out bytesReturned, IntPtr.Zero);
CloseHandle(handle);
}
else
{
Console.WriteLine("Failed to open device.");
}
}
}

Please note that this code will attempt to eject the USB mass storage device associated with the specified drive letter. Make sure to replace the `driveLetter` variable with the appropriate drive letter that you want to eject. Also, keep in mind that this code uses the Windows API and may require administrative privileges to execute successfully.

Disable Computer Security Software for Now

To temporarily disable computer security software, follow these steps:

1. Press Ctrl+Alt+Delete to bring up the Task Manager.
2. Click on the “Processes” tab.
3. Locate your computer security software process (e.g., antivirus program) and right-click on it.
4. Select “End Task” from the context menu.
5. Confirm the action if prompted.

Note: Disabling security software leaves your computer vulnerable to threats. Only do this temporarily and remember to re-enable it after troubleshooting.

If you’re encountering the “Problem Ejecting USB Mass Storage Device” error message when trying to safely eject a USB storage device, there are several ways to resolve it:

1. Close any programs or files that might be using the USB device.
2. Restart your computer and try ejecting the device again.
3. Update your USB driver to the latest version.
4. Use the “Safely Remove Hardware” icon in the system tray to eject the USB device.
5. Try a different USB port on your computer.
6. Check for any hardware problems by connecting the USB device to another computer.
7. Use data recovery software to retrieve any important files before ejecting the device.
8. Check for any Windows Runtime Errors related to the USB device.
9. Disable any third-party software that might be blocking the ejection process.
10. Consult the USB device’s supplier or manufacturer for further assistance.
11. Consider formatting the USB device if all else fails, but be aware that this will erase all data on the device.
12. If you’re using Windows XP, make sure you have the latest updates installed.

Remember, these methods are provided as suggestions and may not work in every situation. Always proceed with caution and ensure you have proper backups in case of any damages or data loss.

Use Task Manager to Fix Problem Ejecting USB Mass Storage Device

If you’re experiencing issues ejecting a USB mass storage device, you can use Task Manager to help resolve the problem. To do this:

1. Press Ctrl + Shift + Esc to open Task Manager.
2. Go to the “Processes” tab.
3. Look for any processes that may be using the USB device, such as file transfer programs or antivirus software.
4. Right-click on the process and select “End Task” to close it.
5. Once all relevant processes are closed, try ejecting the USB device again.

If you’re still encountering issues, there may be other factors causing the problem. It’s important to check for any error messages, hardware failures, or USB driver failures that could be contributing to the issue. You can refer to the community solutions content disclaimer for additional troubleshooting tips and solutions. Remember to always back up your files and check the warranties and conditions of your USB storage devices for any potential coverage.

Fix This Device Is Currently in Use via Device Manager

To fix the “This Device Is Currently in Use” error when ejecting a USB mass storage device, you can resolve the issue through Device Manager. Follow these steps:

1. Press Win + X and select “Device Manager.”
2. Expand the “Disk Drives” category.
3. Right-click on the USB mass storage device causing the error.
4. Select “Properties.”
5. Go to the “Policies” tab.
6. Check the option that says “Quick removal” and click “OK.”
7. Close Device Manager.

By enabling the “Quick removal” policy, you can safely eject the USB device without encountering the error. Remember to always safely remove your USB device to prevent data loss.

Note: If you still experience issues, it could be due to a hardware failure or other reasons. Check with your device supplier or refer to your warranty for further assistance.

Fix Problem Ejecting USB Mass Storage Device with Disk Management

If you’re experiencing difficulties ejecting a USB mass storage device, you can try using Disk Management to resolve the issue. Follow these steps:

1. Open Disk Management by pressing Windows Key + X and selecting “Disk Management” from the menu.
2. Locate your USB mass storage device in the list of drives.
3. Right-click on the device and select “Eject”.
4. If you receive an error message, close Disk Management and try the following:
5. Press Windows Key + X and select “Device Manager” from the menu.
6. Expand the “Universal Serial Bus controllers” category.
7. Locate and right-click on the USB driver for your device.
8. Select “Uninstall device” and confirm the uninstallation.
9. Disconnect and reconnect your USB mass storage device.
10. Windows will automatically reinstall the USB driver.
11. Try ejecting the device again using Disk Management.
12. If the problem persists, consider seeking assistance from Microsoft Support or consulting the community solutions content disclaimer for additional solutions.

Remember to always backup your files and be cautious when making changes to your system.

Eject USB Mass Storage Device through This PC

To eject a USB mass storage device through This PC, follow these steps:

1. Open File Explorer by pressing Windows key + E.
2. Locate the USB drive under “This PC” or “Devices and drives” section.
3. Right-click on the USB drive icon and select “Eject” from the context menu.
4. Wait for Windows to safely eject the device.
5. Once the “Safe to Remove Hardware” notification appears, you can physically remove the USB drive from your computer.

If you encounter any error messages or have trouble ejecting the device, try these troubleshooting steps:

1. Close any open files or programs that might be using the device.
2. Restart your computer and try ejecting the device again.
3. Update the USB driver by visiting the manufacturer’s website or using Windows Update.
4. If you’re using an external hard drive, make sure it’s not in use or performing any tasks.
5. Check for any hardware or USB connection issues.
6. If all else fails, you can shut down your computer and remove the USB drive while it’s powered off.

Remember, it’s important to safely eject USB devices to prevent data loss or damage to the device.

Log Off and On Computer

To resolve the problem ejecting a USB mass storage device, one of the simple troubleshooting steps you can try is logging off and on your computer. This action can help refresh the system and resolve any temporary conflicts or issues that may be preventing proper device ejection.

To log off and on your computer, follow these steps:

1. Save any open files or documents and close all programs.
2. Click on the “Start” button on your desktop.
3. Click on the “Power” option.
4. Select “Log Off” from the drop-down menu.
5. Wait for your computer to log off completely.
6. Once logged off, click on the “Start” button again.
7. Click on the “Power” option.
8. Select “Restart” from the drop-down menu.
9. Wait for your computer to restart.

After logging off and on your computer, try ejecting the USB mass storage device again to see if the problem has been resolved.

Remember to always safely remove your USB devices to avoid any potential data loss or hardware damage.

Restart Computer to Fix This Device Is Currently in Use Error

To fix the “This Device Is Currently in Use” error when ejecting a USB mass storage device, try restarting your computer. This can help resolve any temporary issues that may be causing the error.

To restart your computer, follow these steps:

1. Close any programs or files that are currently using the USB device.
2. Click on the “Start” menu and select “Restart” from the power options.
3. Wait for your computer to shut down and then turn it back on.
4. Once your computer has restarted, try ejecting the USB mass storage device again.

If the error persists after restarting your computer, you may need to try other troubleshooting methods mentioned in this article.

Remember, restarting your computer can often resolve minor software issues and is a simple first step to try when encountering device-related errors.

Troubleshooting iTunes Wi-Fi Sync Not Working on iOS 12

In this article, we delve into the world of iOS 12 and its notorious iTunes Wi-Fi Sync feature. Discover the common glitches and effective troubleshooting methods to ensure a seamless syncing experience with iTunes.

Check your network settings: Ensure that both your iPhone and computer are connected to the same Wi-Fi network. Restart your router if necessary, as this can often resolve connectivity issues.

Troubleshooting iTunes Wi-Fi Sync Issues

Troubleshooting iTunes Wi-Fi Sync Not Working on iOS 12

If you’re experiencing issues with iTunes Wi-Fi sync on your iOS 12 device, there are a few steps you can take to troubleshoot the problem.

First, ensure that both your iPhone and your computer are connected to the same Wi-Fi network. This is essential for the sync to work properly.

Next, make sure that Wi-Fi sync is enabled on both your iPhone and your computer. On your iPhone, go to Settings > General > iTunes Wi-Fi Sync and enable it. On your computer, open iTunes and go to Preferences > Devices, then check the box for “Prevent iPods, iPhones, and iPads from syncing automatically.”

If the issue persists, try disabling any security software or firewalls on your computer temporarily, as they may be blocking the sync.

Lastly, if none of the above solutions work, try restarting both your iPhone and your computer, as this can often resolve connectivity issues.

By following these troubleshooting steps, you should be able to resolve any iTunes Wi-Fi sync issues you’re experiencing on your iOS 12 device.

iTunes WiFi sync not working in iOS 12? Check your network settings and make sure both your computer and iOS device are connected to the same WiFi network.

Alternative Methods for iPhone Media Syncing

  • Use a USB cable: Connect your iPhone to your computer using a USB cable and sync your media files through iTunes.
  • Restart your devices: Turn off and then turn on both your iPhone and your computer to refresh their settings.
    Use a USB cable: Connect your iPhone to your computer using a USB cable and sync your media files through iTunes.
Restart your devices: Turn off and then turn on both your iPhone and your computer to refresh their settings.
  • Check Wi-Fi connection: Ensure that both your iPhone and computer are connected to the same Wi-Fi network.
  • Disable Firewall or Antivirus software: Temporarily disable any firewall or antivirus software on your computer that might be blocking the Wi-Fi sync.
  • Reset network settings: On your iPhone, go to Settings > General > Reset > Reset Network Settings. This will clear any network-related issues that might be causing the problem.
  • Update iTunes and iOS: Make sure you have the latest version of iTunes installed on your computer and that your iPhone is running the latest version of iOS.
    Reset network settings: On your iPhone, go to Settings > General > Reset > Reset Network Settings. This will clear any network-related issues that might be causing the problem.
Update iTunes and iOS: Make sure you have the latest version of iTunes installed on your computer and that your iPhone is running the latest version of iOS.
  • Enable Wi-Fi Sync: On your iPhone, go to Settings > General > iTunes Wi-Fi Sync and ensure that the feature is enabled.

Fixing iTunes Connection Issues on Windows

If you’re experiencing issues with iTunes Wi-Fi Sync not working on iOS 12, there are a few troubleshooting steps you can take.

First, ensure that your iPhone and Windows PC are connected to the same Wi-Fi network. Check the Wi-Fi network settings on both devices to confirm this.

Next, open iTunes on your Windows PC and navigate to the Summary section for your iPhone. Look for the “Sync with this iPhone over Wi-Fi” option and make sure it is enabled.

If the option is already enabled, try disabling it and then re-enabling it. This can sometimes resolve connection issues.

Additionally, check if your firewall or antivirus software is blocking the iTunes connection. Temporarily disable these services or add iTunes to their exception lists.

Lastly, if you’re still experiencing issues, try restarting both your iPhone and Windows PC. This can often help resolve connection problems.

Remember, if you have any further questions or need additional assistance, you can always visit the Microsoft Windows forum for support.

Having trouble with iTunes WiFi sync in iOS 12? Try restarting both your computer and iOS device, then attempt the sync again.

python
# Sample code for troubleshooting iTunes WiFi Sync on iOS 12

# Step 1: Verify if iTunes WiFi Sync is enabled on the iOS device
# Check if the device is connected to the same WiFi network as the computer running iTunes
# Ensure that iTunes WiFi Sync is enabled on the iOS device's settings

# Step 2: Restart iTunes and iOS device
# Close iTunes application on the computer and force quit it if necessary
# Restart the iOS device by turning it off and then back on

# Step 3: Update iTunes and iOS
# Ensure that both iTunes and the iOS device are running the latest available software versions
# Check for updates in the App Store (iOS) and Apple Software Update (iTunes)

# Step 4: Disable and Re-enable iTunes WiFi Sync
# On the iOS device, go to Settings > General > iTunes WiFi Sync and disable the feature
# Wait for a few minutes and then re-enable iTunes WiFi Sync

# Step 5: Reset Network Settings
# On the iOS device, go to Settings > General > Reset > Reset Network Settings
# This will reset all network settings, including WiFi connections, on the iOS device
# Reconnect to the WiFi network and check if iTunes WiFi Sync now works

# Step 6: Check Firewall and Security Software
# Ensure that the computer's firewall or any security software is not blocking iTunes WiFi Sync
# Adjust firewall settings or temporarily disable security software to test if it resolves the issue

# Step 7: Contact Apple Support
# If the issue persists, it's recommended to contact Apple Support for further assistance
# They can provide personalized guidance and help troubleshoot the specific issue you're facing

Please note that this code is not a comprehensive solution and should be used as a starting point for troubleshooting iTunes WiFi Sync issues on iOS 12. It is always advisable to refer to official documentation or seek assistance from Apple Support for accurate and up-to-date information.

Steps to Sync iPhone Over Wi-Fi

  • Make sure your iPhone and computer are connected to the same Wi-Fi network.
  • Ensure that your Wi-Fi network is stable and working properly.
    Make sure your iPhone and computer are connected to the same Wi-Fi network.
Ensure that your Wi-Fi network is stable and working properly.
  • Try connecting your iPhone to a different Wi-Fi network to see if the issue persists.

2. Enable Wi-Fi Sync

  • Open iTunes on your computer.
  • Connect your iPhone to your computer using a USB cable.
    Open iTunes on your computer.
Connect your iPhone to your computer using a USB cable.
  • Go to the “Summary” tab in iTunes.
  • Scroll down to the “Options” section.
  • Check the box next to “Sync with this iPhone over Wi-Fi”.
  • Click on the “Apply” or “Sync” button to save the changes.
    Check the box next to "Sync with this iPhone over Wi-Fi".
Click on the "Apply" or "Sync" button to save the changes.

3. Update iTunes and iOS

  • Make sure you have the latest version of iTunes installed on your computer.
  • Update your iPhone to the latest iOS version available.
    Make sure you have the latest version of iTunes installed on your computer.
Update your iPhone to the latest iOS version available.
  • To update iTunes, open the App Store on your Mac and click on “Updates”.
  • To update iOS, go to “Settings” on your iPhone, tap on “General”, and then select “Software Update”.

4. Restart Devices

  • Restart your iPhone by holding down the power button and sliding the power off slider.
  • Restart your computer by clicking on the “Start” menu, selecting “Restart”, and confirming the action.
    Restart your iPhone by holding down the power button and sliding the power off slider.
Restart your computer by clicking on the "Start" menu, selecting "Restart", and confirming the action.
  • After both devices have restarted, try syncing your iPhone over Wi-Fi again.

5. Disable Firewall and Security Software

  • If you have a firewall or security software enabled on your computer, temporarily disable them.
  • Firewalls and security software can sometimes interfere with Wi-Fi syncing.
  • Refer to the documentation or support website of your specific security software for instructions on how to disable it.
  • Try syncing your iPhone over Wi-Fi again after disabling the firewall or security software.

6. Reset Network Settings

  • On your iPhone, go to “Settings”.
  • Tap on “General”.
    On your iPhone, go to "Settings".
Tap on "General".
  • Scroll down and select “Reset”.
  • Choose “Reset Network Settings”.
  • Enter your passcode if prompted and confirm the reset.
  • Once the reset is complete, reconnect to your Wi-Fi network and try syncing again.
    Enter your passcode if prompted and confirm the reset.
Once the reset is complete, reconnect to your Wi-Fi network and try syncing again.

Ultimate Guide to Fix Windows 10/11 PC Stuck Loading Screen

Welcome to the ultimate guide that unravels the mysteries behind Windows 10/11 PC’s notorious loading screen dilemma. Discover effective solutions and expert tips to bid farewell to the endless waiting game.

Unplug USB Storage Devices & Reboot PC

To fix a Windows 10/11 PC stuck on the loading screen, start by unplugging any USB storage devices connected to your computer. This can sometimes cause issues during startup. After unplugging the devices, reboot your PC.

Step 1: Unplug any USB storage devices connected to your computer.
Step 2: Reboot your PC.

By following these steps, you can resolve the loading screen issue and get your computer up and running again. If the problem persists, there may be other underlying causes such as driver updates or a virus attack. In such cases, it is recommended to consult the Ultimate Guide to Fix Windows 10/11 PC Stuck Loading Screen for additional solutions and troubleshooting options.

Check & Fix File System

If you’re experiencing a Windows 10/11 PC stuck at the loading screen, it could be due to file system issues. Here are some steps to check and fix the file system:

1. Restart your computer and repeatedly press the F8 key to enter Safe Mode.
2. Once in Safe Mode, open Command Prompt as an administrator.
3. Type “sfc /scannow” and press Enter. This command will scan and repair any corrupted system files.
4. If the issue persists, try running the “chkdsk” command to check and fix any errors in the file system.
5. Restart your computer and check if the loading screen issue is resolved.

Remember, file system problems can cause various loading screen issues. By following these steps, you can troubleshoot and fix the file system to resolve the problem.

python
import time

def loading_screen():
print("Loading...")

# Simulating loading progress
for i in range(10):
time.sleep(1) # Delaying for 1 second
print(".", end='', flush=True) # Print a dot to indicate progress

print("\nLoading complete!")

loading_screen()

This code snippet will display a loading message followed by a series of dots, simulating a loading process. However, it does not address the underlying issues that may cause a PC to be stuck on a loading screen. For specific troubleshooting, it is recommended to consult a professional or provide more details about the issue you are experiencing.

Repair System with System Repair Disk

Repairing your system with a System Repair Disk is a helpful method for fixing the loading screen issues on your Windows 10/11 PC. To begin, insert the System Repair Disk into your computer’s DVD drive or connect a bootable USB device.

1. Restart your computer and boot from the System Repair Disk by pressing the appropriate key (e.g., F12) during startup to access the boot menu.

2. Select the System Repair option from the menu displayed on the screen.

3. Follow the on-screen instructions to navigate through the repair process. You may be prompted to choose your language and input method.

4. Choose the repair option that suits your specific issue. For example, you can use the “Startup Repair” option to fix boot screen problems.

5. Allow the repair process to complete and your PC will restart automatically.

By using the System Repair Disk, you can resolve loading screen problems caused by various issues, such as driver updates, virus attacks, or software conflicts. Remember to always keep your system and antivirus software up to date to prevent future issues.

Restore the System to the Previous State

To restore your Windows 10/11 PC to its previous state when stuck on the loading screen, follow these steps:

1. Restart your computer by holding down the power button until it turns off, then press it again to turn it back on.

2. During the boot process, repeatedly press the F8 or F11 key (depending on your computer) to enter the Advanced Boot Options menu.

3. From the menu, select “Safe Mode” to start Windows with minimal drivers and services.

4. Once in Safe Mode, open the Start menu and search for “System Restore.”

5. Click on “Create a restore point” and follow the on-screen instructions to create a restore point for your system.

6. Next, click on “System Restore” and choose a restore point from before the loading screen problem occurred.

7. Follow the prompts to restore your system to that previous state.

8. After the restoration process is complete, your computer should restart and hopefully resolve the loading screen issue.

If the problem persists, consider seeking further assistance from a technical professional or referencing additional troubleshooting guides.

Check System RAM & Reinstall CMOS Battery

To check your system’s RAM and reinstall the CMOS battery, follow these steps:

1. Check System RAM:
– Press the Windows key + R to open the Run dialog box.
– Type “msinfo32” and press Enter to open the System Information window.
– Look for the “Installed Physical Memory (RAM)” section and note the total amount of RAM installed on your system.

2. Reinstall CMOS Battery:
– Power off your computer and unplug it from the power source.
– Open your computer’s case to locate the CMOS battery.
– Carefully remove the CMOS battery from its slot.
– Wait for a few minutes, then reinsert the CMOS battery back into its slot.
– Close the computer case and reconnect the power source.
– Power on your computer and check if the loading screen issue persists.

Remember to handle the CMOS battery with care and ensure that your computer is powered off and unplugged before attempting to reinstall it.

Scan Virus in Safe Mode

To scan for viruses in Safe Mode on your Windows 10/11 PC stuck on the loading screen, follow these steps:

1. Restart your computer and continuously press the F8 key until the Advanced Boot Options menu appears.
2. Use the arrow keys to select “Safe Mode with Networking” and press Enter.
3. Once in Safe Mode, open your preferred antimalware software.
4. Perform a full system scan to detect and remove any viruses or malware.
5. Follow the instructions provided by the antimalware software to quarantine or remove any threats found.
6. After the scan is complete, restart your computer normally and check if the loading screen problem is resolved.

Scanning for viruses in Safe Mode can help identify and eliminate any malicious software that might be causing the issue. Remember to keep your antimalware software updated for the best protection.

Check Recently Installed or Upgraded Drivers

1. Press the Windows key + X to open the Quick Access menu and select “Device Manager”.

2. In the Device Manager window, expand the categories and look for any devices with a yellow triangle icon, indicating a driver issue.

3. Right-click on the problematic device and select “Update driver”. Choose to search automatically for updated driver software.

4. If no updates are found, you can also try rolling back the driver to a previous version by right-clicking on the device and selecting “Properties”. Go to the “Driver” tab and click on “Roll Back Driver”.

5. Additionally, you can visit the manufacturer’s website to manually download and install the latest driver for your device.

6. Restart your computer after updating or rolling back the drivers to see if the issue persists.

By checking and updating your recently installed or upgraded drivers, you can resolve compatibility issues that may be causing your PC to get stuck on the loading screen.

Reinstall/Clean Install Windows

To reinstall or clean install Windows on your PC when it’s stuck on the loading screen, follow these steps:

1. Start by creating a bootable USB drive with the Windows installation media. You can download the official Windows 10/11 ISO file from the Microsoft website.

2. Connect the USB drive to your computer and restart it. Press the necessary key (usually F12, ESC, or Del) to access the boot menu.

3. From the boot menu, select the USB drive as the boot device and press Enter. This will launch the Windows setup.

4. Follow the on-screen instructions to choose your language, time zone, and keyboard layout.

5. When you reach the installation type screen, select “Custom: Install Windows only (advanced)”.

6. On the next screen, select the drive where you want to install Windows and click “Next”. This will erase all data on the selected drive, so make sure to back up any important files beforehand.

7. Wait for the installation process to complete. Your PC will restart several times during this process.

8. After the installation is finished, you can proceed with setting up Windows by following the on-screen instructions.

By performing a clean install of Windows, you can resolve many boot screen problems caused by software issues or virus attacks. Remember to back up your files and ensure you have the necessary installation media before proceeding.

Roll Back to a Previous Version of Windows

To roll back to a previous version of Windows, follow these steps:

1. Start your computer and continuously press the F8 key until the Advanced Boot Options menu appears.
2. Use the arrow keys to select “Repair Your Computer” and press Enter.
3. Select your language preferences and click “Next”.
4. Log in with an administrator account.
5. In the System Recovery Options, select “System Restore” and click “Next”.
6. Choose a restore point from the list and click “Next”.
7. Confirm your restore point selection and click “Finish”.
8. Restart your computer and Windows will roll back to the selected restore point.

Note: Rolling back to a previous version of Windows can help resolve issues like stuck loading screens or boot screen problems. However, it’s important to identify the root cause of the issue to prevent it from happening again. If you’re unable to resolve the problem with a restore point, consider seeking professional assistance or contacting the manufacturer of your computer.

Remember to back up your important files before making any changes to your operating system.

Do Disk Surface Test


Ultimate Guide to Fix Windows 10/11 PC Stuck Loading Screen

In this article, we will discuss how to fix the common issue of Windows 10/11 PC getting stuck on the loading screen. One of the troubleshooting steps we will cover is performing a disk surface test to check for any potential issues with the hard drive.

Do Disk Surface Test

A disk surface test is a diagnostic tool that scans the hard drive for any physical errors or bad sectors. It helps identify potential issues that could be causing the loading screen problem. To perform a disk surface test, follow the steps below:

Step Description
1 Open Command Prompt as an administrator.
2 Type chkdsk C: /r and press Enter. Replace “C:” with the drive letter of the hard drive you want to test.
3 Wait for the disk check to complete. This may take some time depending on the size of your hard drive and the number of errors found.
4 If any errors are found, follow the on-screen instructions to repair them.
5 Restart your computer and check if the loading screen issue is resolved.

Performing a disk surface test can help identify and fix any physical errors on your hard drive. However, if the loading screen issue persists, it is recommended to seek further assistance from a professional or refer to other troubleshooting steps.


Clear CMOS Memory

Clearing the CMOS memory can help resolve the issue of a Windows 10/11 PC stuck on the loading screen. To do this, follow these steps:

1. Turn off your computer and unplug it from the power source.
2. Open the computer case and locate the CMOS battery on the motherboard.
3. Carefully remove the CMOS battery from its slot.
4. Hold down the power button for 10-15 seconds to discharge any remaining power.
5. Put the CMOS battery back into its slot.
6. Plug in the power source and turn on your computer.

This process will reset the CMOS settings to their default values, which can often resolve boot screen problems. If you’re still experiencing issues, it may be helpful to try other fixes or consult a professional. Remember to always take precautions when working with hardware components.

How to Troubleshoot and Fix No Signal on PC Monitor

Unraveling the Mysteries of the Vanishing Screen: A Guide to Resurrecting Your PC Monitor Signal

Check cable connections: Ensure that the video cable is securely connected to both the PC and the monitor. Sometimes, loose connections can cause a no video signal issue.

Ensure proper cable connection

Ensure Proper Cable Connection:

1. Check the cable connections: First, make sure all cables are securely connected to both the monitor and the PC. Disconnect and reconnect them if needed.

2. Verify the correct input source: Use the monitor’s on-screen display (OSD) to select the correct input source. Press the corresponding input button on the monitor until the correct source is displayed.

3. Inspect the cables for damage: Examine the cables for any visible damage or fraying. If there are any issues, replace the cables with new ones.

4. Test different cables and ports: Try using different cables and ports to eliminate any potential cable or port issues.

5. Update graphics drivers: Visit the graphics card manufacturer’s website and download the latest drivers for your graphics card. Install the drivers and restart your PC to see if it resolves the issue.

Remember to power off your PC and monitor before making any cable or hardware changes. If these steps do not resolve the no signal issue, further troubleshooting may be required.

No video signal, no problem. It’s an opportunity to reconnect with the real world and explore other interests.

Verify correct input source

To verify the correct input source for your PC monitor, follow these steps:

1. Check the video cable connection: Ensure that the cable is securely plugged into both the computer and the monitor. If you’re using HDMI, VGA, or DVI cables, make sure they are firmly connected.

2. Confirm the input source on the monitor: Use the monitor’s buttons or controls to select the correct input source. Look for options like HDMI, VGA, or DisplayPort.

3. Check the computer’s display settings: Right-click on the desktop and select “Display settings.” Ensure that the correct monitor is selected as the main display and that the resolution settings are appropriate.

4. Update graphics drivers: Visit the manufacturer’s website to download and install the latest graphics drivers for your computer. Outdated drivers can cause display issues.

5. Try a different video cable or port: If possible, test the monitor with a different cable or try connecting it to a different port on your computer.

By following these steps, you can troubleshoot and fix the “No Signal” issue on your PC monitor.

Check graphics card and slot

Graphics Card Slot
Integrated Graphics Onboard graphics slot on the motherboard
PCIe Graphics Card PCI Express x16 slot on the motherboard
AGP Graphics Card Accelerated Graphics Port (AGP) slot on the motherboard (older technology)

python
import subprocess

def check_video_signal():
try:
# Execute a command to query the display status
cmd = "xrandr | grep ' connected' | cut -d ' ' -f 3"
output = subprocess.check_output(cmd, shell=True, stderr=subprocess.STDOUT, universal_newlines=True)

# Check if any connected displays are found
if output.strip():
print("Video signal detected.")
else:
print("No video signal detected.")
except subprocess.CalledProcessError as e:
print("Error executing command:", e.output)

# Call the function to check for video signal
check_video_signal()

Note: This code snippet assumes a Linux environment with xrandr utility. If you are using a different operating system or utility, you may need to modify the code accordingly.

This code uses the `xrandr` command to query the connected displays and checks if any connected displays are found. If at least one display is connected, it prints “Video signal detected.” Otherwise, it prints “No video signal detected.”

Remember to adapt the code to your specific requirements and environment if necessary.

Test with different cable or device

If you’re experiencing a “No Signal” message on your PC monitor, there are a few steps you can take to troubleshoot and fix the issue. First, try testing with a different cable or device to see if the problem lies with your current setup. Make sure to check the connections and ensure they are secure. If the issue persists, it may be due to a software problem such as a graphics driver issue. You can try updating your graphics driver to see if that resolves the problem. Additionally, check for any notifications or error messages that may provide insight into the issue. If all else fails, it’s possible that the problem is related to a hardware issue, such as a faulty monitor adapter or cables. In such cases, it may be necessary to seek professional assistance or consider replacing the hardware.

Update graphics driver

To update your graphics driver, follow these steps:

1. Identify your graphics card model. Open the Device Manager by pressing Windows key + X and selecting Device Manager. Expand the Display adapters category to find your graphics card.

2. Visit the manufacturer’s website. Go to the website of your graphics card manufacturer, such as NVIDIA or AMD, and locate the drivers section.

3. Download the latest driver. Look for the latest driver that is compatible with your graphics card model and operating system. Download the driver to your computer.

4. Install the driver. Run the downloaded driver file and follow the on-screen instructions to install the driver. Restart your computer after the installation is complete.

5. Test the connection. Check if the “No Signal” message on your PC monitor has disappeared. If the issue persists, try connecting your monitor to a different video port on your PC, such as HDMI or VGA, to see if the problem lies with the port.

Remember to always keep your graphics driver up to date to ensure optimal performance and compatibility with your monitor.

Inspect and check cables

Inspect and check the cables connecting your PC to the monitor. Ensure they are securely plugged in and not loose. Also, check for any visible damage or fraying on the cables. If you notice any issues, replace the cables as necessary.

Next, verify that the correct video input is selected on the monitor. Use the monitor’s menu or buttons to switch to the appropriate input (e.g., HDMI, VGA, DisplayPort).

If you are using an HDMI cable, try connecting it to a different HDMI port on your PC or monitor. Sometimes, a specific port may be causing the issue.

In some cases, a hardware issue with the PC’s motherboard or the monitor itself may be the reason for the no signal problem. If you suspect this is the case, consider consulting a professional for further assistance.

Remember, there can be multiple reasons why you are experiencing a no signal message on your PC monitor. These troubleshooting steps should help you identify and resolve the issue.

Restart monitor

Restarting the monitor can often resolve the “No Signal” issue on a PC monitor.

To restart the monitor, follow these steps:

1. Turn off the monitor by pressing the power button.
2. Unplug the monitor’s power cord from the electrical outlet.
3. Disconnect the monitor cables from the computer.
4. Wait for about 10 seconds.
5. Reconnect the monitor cables to the computer.
6. Plug the monitor’s power cord back into the electrical outlet.
7. Turn on the monitor by pressing the power button.

If the “No Signal” message still appears, try the following fixes:

1. Check the monitor’s adapter and cables for any damage or loose connections.
2. Ensure that the monitor is set to the correct video input (HDMI, VGA, DisplayPort, etc.).
3. Test the monitor on another computer or connect a different monitor to your PC to determine if the issue is with the monitor or the computer.
4. If using multiple monitors, make sure they are all connected properly.
5. Update your graphics card drivers and monitor firmware.
6. Consult your PC’s motherboard manual for specific troubleshooting steps.

Remember, these steps are just a starting point, and there could be other reasons for the “No Signal” message. If the issue persists, it’s best to consult a professional or contact customer support for further assistance.

Check resolution settings

  1. Open the display settings on your PC by right-clicking on the desktop and selecting Display settings.
  2. Under the Display tab, check the resolution settings and make sure they are set correctly.
    Open the display settings on your PC by right-clicking on the desktop and selecting Display settings.
Under the Display tab, check the resolution settings and make sure they are set correctly.
  3. If the resolution is set too high or too low, adjust it to the recommended resolution for your monitor.
  4. Click on Apply and then OK to save the changes.
  5. Restart your computer to apply the new resolution settings.

Examine PC hardware and reset CMOS

First, ensure all connections are secure and cables are properly plugged into the correct ports on both the monitor and the PC.

If the issue persists, try resetting the CMOS (Complementary Metal-Oxide-Semiconductor) by following these steps:
1. Shut down your PC and disconnect the power cable.
2. Open the computer case and locate the CMOS battery on the motherboard.
3. Carefully remove the battery and wait for a few minutes.
4. Reinsert the battery and close the computer case.
5. Reconnect the power cable and turn on your PC.

If the “No Signal” message still appears, try connecting your monitor to a different video port (HDMI, DVI, VGA, DisplayPort) on your PC or try using a different monitor.

Remember, troubleshooting “No Signal” issues can have various causes, so these steps may not solve every problem. If you’re still experiencing issues, consider seeking professional assistance or contacting the manufacturer for further support.

Troubleshooting and Fixing Vista Restore Point Not Working

Unveiling the Secrets: Resolving Vista Restore Point Glitches

Check System Restore settings: Make sure that System Restore is enabled and configured correctly on your Vista computer. Go to the Control Panel, open System and Maintenance, and click on System. Then, click on System Protection and ensure that the protection is turned on for your desired drive.

Troubleshoot missing restore points

1. Open the System Protection tab: Click the Start button, type “System Protection” in the search box, and select “Create a restore point” from the list.

2. Check Task Scheduler: Open the Task Scheduler by clicking Start, typing “Task Scheduler” in the search box, and selecting “Task Scheduler” from the list. Expand the Task Scheduler Library and navigate to Microsoft > Windows > SystemRestore. If there are no tasks listed, this may be the cause of the problem.

3. Run System File Checker: Open a command prompt as an administrator by clicking Start, typing “cmd” in the search box, right-clicking Command Prompt, and selecting “Run as administrator”. Type “sfc /scannow” and press Enter. This will scan and repair any corrupted system files.

4. Check disk space: Insufficient disk space can prevent System Restore from creating restore points. To free up space, delete unnecessary files or use storage optimization tools.

If these steps don’t resolve the issue, refer to our Knowledgebase for more troubleshooting tips.

Enable System Restore and check HDD space

To enable System Restore and check HDD space in Windows Vista, follow these steps:

1. Open the Start menu and type “System Protection” in the search bar.
2. Click on “System Protection” in the search results to open the System Properties window.
3. In the System Properties window, click on the “System Protection” tab.
4. Under the “Protection Settings” section, select the hard drive you want to enable System Restore for.
5. Click on the “Configure” button.
6. In the next window, select the option to “Turn on system protection” and adjust the maximum disk space usage if needed.
7. Click “Apply” and then “OK” to save the changes.
8. To check the HDD space allocated for System Restore, go back to the System Properties window and click on the “Disk Space Usage” button.

By following these steps, you can enable System Restore and check the HDD space in Windows Vista.

Run chkdsk and sfc to fix restore point issues

To troubleshoot and fix Vista restore point issues, you can run chkdsk and sfc. These tools help identify and repair any problems with your computer’s hard drive and system files.

Here’s how to do it:

1. Press the Windows key + R to open the Run dialog box.
2. Type “cmd” and press Enter to open the Command Prompt.
3. In the Command Prompt, type “chkdsk /f” and press Enter. This will scan and fix any errors on your hard drive.
4. Once chkdsk is complete, type “sfc /scannow” and press Enter. This will scan and repair any corrupted system files.
5. Wait for the scan to finish, and then restart your computer.

After completing these steps, try creating a restore point again. If the issue persists, you may need to consider other troubleshooting options or seek further assistance.

python
import shutil
import os
import datetime

def create_backup(source_path, destination_path):
timestamp = datetime.datetime.now().strftime("%Y%m%d%H%M%S")
backup_folder = os.path.join(destination_path, f"backup_{timestamp}")

try:
shutil.copytree(source_path, backup_folder)
print("Backup created successfully!")
except Exception as e:
print(f"Backup creation failed: {str(e)}")

# Example usage:
source_path = "/path/to/important/files"
destination_path = "/path/to/backup/folder"
create_backup(source_path, destination_path)

In this code, the function `create_backup` takes in a source directory path containing the important files you want to backup and a destination directory path where the backup will be stored. It creates a timestamped backup folder within the destination directory and copies all the files from the source directory to the backup folder using the `shutil.copytree` function.

Please note that this code creates manual backups of specific files or directories and does not address the issue of non-functioning restore points in Windows Vista directly.

Check Volume Shadow Copy and page file fragmentation

To troubleshoot and fix Vista Restore Point not working, it is important to check Volume Shadow Copy and page file fragmentation. Here are the steps to follow:

1. Check Volume Shadow Copy:
– Press the Windows key + R to open the Run dialog box.
– Type “services.msc” and press Enter.
– Scroll down and locate “Volume Shadow Copy” in the list of services.
– Right-click on “Volume Shadow Copy” and select “Properties“.
– Set the “Startup type” to “Automatic” and click “Apply“.

2. Check page file fragmentation:
– Press the Windows key + R to open the Run dialog box.
– Type “sysdm.cpl” and press Enter.
– In the System Properties window, go to the “Advanced” tab and click on “Settings” under the “Performance” section.
– In the Performance Options window, go to the “Advanced” tab and click on “Change” under the “Virtual Memory” section.
– Uncheck the “Automatically manage paging file size for all drives” option.
– Select the drive where Windows is installed, click on “Custom Size“, and set the initial and maximum size to the same value (recommended size is usually the total amount of RAM installed).
– Click “OK” to save the changes.

By following these steps, you can resolve issues with Vista Restore Point not working and ensure the smooth functioning of your Windows Vista system.

Restore your PC via Safe Mode or EasyRE

To restore your PC using Safe Mode or EasyRE, follow these steps:

1. Start by rebooting your computer and continuously pressing the F8 key until the Advanced Boot Options menu appears.

2. Use the arrow keys to highlight “Safe Mode” and press Enter.

3. Once in Safe Mode, click the Start button and type “System Protection” in the search box. Press Enter.

4. In the System Protection tab, click “System Restore”.

5. Select a restore point from a date when your PC was functioning properly and click “Next”.

6. Review the restoration details and click “Finish” to start the restore process.

If Safe Mode doesn’t resolve the issue, you can try using EasyRE, a powerful recovery tool. Here’s how:

1. Download and install EasyRE on a working computer.

2. Create a bootable USB or CD using EasyRE.

3. Insert the bootable media into your non-working PC and restart it.

4. Follow the on-screen instructions provided by EasyRE to repair your computer.

By following these steps, you can troubleshoot and fix issues with Vista’s restore point not working.

Configure system restore disk space usage

To configure system restore disk space usage, follow these steps:

1. Click the Start button and search for “System Protection.”
2. Select “Create a restore point” from the list of results.
3. In the System Protection tab, click on the drive you want to configure and then click on the “Configure” button.
4. In the next window, you can adjust the maximum disk space used for system restore points.
5. Move the slider to the desired amount of disk space or enter a specific number in the box.
6. Click “Apply” and then “OK” to save the changes.

By adjusting the disk space usage, you can ensure that your system has enough room for restore points without using excessive storage. This can help troubleshoot and fix issues with Vista restore points not working. Remember to regularly create restore points to have a reliable recovery option in case of any issues.

Ensure system restore points are being created

To ensure that system restore points are being created on your Vista operating system, follow these steps:

1. Click the Start button and type “System Protection” in the search box.
2. Select “Create a restore point” from the search results.
3. In the System Properties window that appears, click on the “System Protection” tab.
4. Make sure that protection is enabled for your system drive. If it is not, select the drive and click on the “Configure” button.
5. In the configuration window, select the “Turn on system protection” option and adjust the disk space usage if needed.
6. Click “Apply” and then “OK” to save the changes.
7. Now, your system will automatically create restore points at regular intervals.

By following these steps, you can ensure that system restore points are being created on your Vista operating system, which can help you troubleshoot and fix any issues that may arise.

Reinstall, reset, or repair Windows to fix system restore issues

To troubleshoot and fix issues with Vista restore points not working, you can try reinstalling, resetting, or repairing Windows. Follow these steps:

1. Reinstall Windows:
– Back up any important files before proceeding.
– Insert your Windows installation disc or USB drive.
– Restart your computer and boot from the installation media.
– Select your language preferences and click “Next.”
– Click “Install Now” and follow the on-screen instructions to reinstall Windows.

2. Reset Windows:
– Press the Windows key + I to open the Settings app.
– Go to “Update & Security” and select “Recovery.”
– Under “Reset this PC,” click “Get started” and follow the prompts to reset Windows.

3. Repair Windows:
– Boot your computer using the Windows installation media.
– Select your language preferences and click “Next.”
– Click “Repair your computer” and select “Troubleshoot.”
– Choose “Advanced options” and select “Startup Repair” or “System File Checker” to repair Windows.

Remember to back up your data before attempting these fixes. If none of these solutions work, consult the Microsoft Knowledgebase or seek further assistance.

Seagate FreeAgent GoFlex External Hard Drive Troubleshooting

Welcome to the ultimate guide for resolving any issues you may encounter with your Seagate FreeAgent GoFlex External Hard Drive. In this article, we will explore various troubleshooting techniques to help you troubleshoot and overcome common problems, ensuring your data storage experience remains seamless and worry-free.

Check the connectivity: Ensure that the Seagate FreeAgent GoFlex is properly connected to your computer. Make sure the USB cable is securely plugged in and try connecting it to a different USB port to rule out any issues with the port.

Recovering Data from a Seagate External Drive

If you are experiencing issues with your Seagate FreeAgent GoFlex External Hard Drive, there are a few troubleshooting steps you can try to recover your data.

First, make sure the drive is properly connected to your computer. Check the USB cable and try connecting it to a different USB port or a different computer.

If the drive is not recognized by your PC or Mac, you can use Windows Disk Management or Mac Disk Utility to check if the drive appears there.

If the drive shows up as a raw drive or with any errors, it may be necessary to recover your data using data recovery software, such as EaseUS Data Recovery.

If none of these solutions work, there may be a hardware issue with the drive. In this case, you can contact Seagate support or consider using a professional data recovery service. Remember to backup your data regularly to avoid potential data loss in the future.

If your Seagate FreeAgent GoFlex is not being recognized by your computer, try disconnecting and reconnecting the USB cable to ensure a secure connection.

Fixing Seagate External Drive Not Working in Windows

If your Seagate FreeAgent GoFlex external hard drive is not working in Windows, follow these troubleshooting steps to resolve the issue.

1. Check the power and connections:
– Make sure the power adapter is securely plugged into a working power outlet.
– Ensure that the power light on the drive is on and not blinking.

2. Update the hard drive driver:
– Open the Device Manager on your PC.
– Locate and expand the “Disk drives” category.
– Right-click on your Seagate external drive and select “Update driver.”

3. Check for disk errors:
– Open Windows File Explorer.
– Right-click on your Seagate drive and select “Properties.”
– Go to the “Tools” tab and click on “Check” under the “Error checking” section.

4. Reformat the drive:
– Backup your data from the drive before reformatting.
– Open the Disk Management tool by searching for it in the Start menu.
– Right-click on your Seagate drive and select “Format.”

If none of these solutions fix the issue, contact Seagate support or consider seeking professional data recovery or hard drive repair services.

Uninstalling and Reinstalling Seagate Hard Drive Driver

To uninstall and reinstall the Seagate Hard Drive Driver, follow these steps:

1. Go to the Windows Start menu and type “Device Manager” in the search bar.
2. Click on “Device Manager” to open the application.
3. Expand the “Disk drives” category to see a list of connected drives.
4. Right-click on the Seagate hard drive and select “Uninstall device.”
5. Confirm the uninstallation by clicking “Uninstall.”
6. Once uninstalled, disconnect the Seagate hard drive from your computer.
7. Reconnect the Seagate hard drive to your computer.
8. Windows will automatically detect the device and install the necessary drivers.

If you are still experiencing issues with your Seagate FreeAgent GoFlex External Hard Drive, we recommend contacting our support team or seeking assistance from a professional data recovery service.

Formatting RAW Seagate External Drive to NTFS

To format your RAW Seagate External Drive to NTFS, follow these steps:

1. Connect your Seagate External Drive to your computer using the appropriate cable (e.g., USB).
2. Open Windows File Explorer and locate your Seagate drive.
3. Right-click on the drive and select “Format” from the context menu.
4. In the Format window, choose “NTFS” as the file system.
5. Optionally, you can give your drive a new name in the “Volume Label” field.
6. Enable the “Quick Format” option if you want to speed up the process.
7. Click “Start” to begin the formatting process.
8. Wait for the formatting to complete.
9. Once finished, your Seagate External Drive will be formatted to NTFS and ready to use.

Note: Formatting will erase all data on the drive, so make sure to back up any important files before proceeding.

If you encounter any issues during the formatting process or have any further doubts, we recommend consulting Seagate’s troubleshooting guide or reaching out to their support services for assistance.

Restoring or Creating a New Partition on Unallocated Seagate External Drive

Restoring or creating a new partition on an unallocated Seagate external drive can be done using a few simple steps. First, connect the Seagate FreeAgent GoFlex external hard drive to your computer.

Once connected, open the Seagate external drive and launch the Disk Management tool in Windows 10 by right-clicking on the Start button and selecting “Disk Management.”

In the Disk Management window, locate the unallocated space on the Seagate drive. Right-click on the unallocated space and select “New Simple Volume.”

Follow the on-screen instructions to create a new partition on the unallocated space. If the drive appears as a raw drive or has other issues, you can try using disk repair software like EaseUS to fix the problem.

If you still encounter difficulties, it may be best to consult with data recovery experts or consider using a hard drive repair service.

Changing Seagate Drive Letter

If you’re experiencing issues with your Seagate FreeAgent GoFlex External Hard Drive, such as a changing drive letter, here are some troubleshooting tips to help you resolve the problem.

First, make sure your external hard drive is properly connected to your computer and the power outlet. Check if the power adapter is properly plugged in and the light on the drive is blinking.

If the drive letter is still changing, you can try the following methods:

1. Switch the drive to a different USB port. Sometimes, the problem can be caused by a faulty USB port.

2. Use the Disk Management tool in Windows 10. Open the Disk Management page by right-clicking on the Start button and selecting “Disk Management.” From there, you can assign a new drive letter to the Seagate drive.

3. Check for partition issues. Use a disk file manager like EaseUS to diagnose and repair any partition problems that may be causing the drive letter to change.

Remember, if you have any doubts or the issue persists, it’s always recommended to seek the assistance of data recovery experts or Seagate’s hard drive repair services.

Turning on the USB Root Hub

To turn on the USB Root Hub for your Seagate FreeAgent GoFlex External Hard Drive, follow these steps:

1. Open the Device Manager on your computer.
2. Expand the “Universal Serial Bus controllers” section.
3. Locate the USB Root Hub device.
4. Right-click on the USB Root Hub and select “Enable” from the context menu.
5. If prompted, confirm the action.
6. Repeat these steps for any other USB Root Hub devices listed.

Enabling the USB Root Hub can help resolve connectivity issues with your Seagate FreeAgent GoFlex External Hard Drive. If you continue to experience problems, you may want to try other troubleshooting methods or seek assistance from Seagate’s support page or their repair service.

Note: This method applies to Windows operating systems. For other platforms, please refer to the respective documentation or support resources.

Repairing Seagate External Drive Not Working/Detected in Mac

If your Seagate FreeAgent GoFlex external hard drive is not working or not detected on your Mac, there are a few troubleshooting steps you can try to resolve the issue.

First, make sure the hard drive is properly connected to your Mac. Check the cables and ports for any damage or loose connections.

If the drive is still not working, try connecting it to a different USB port on your Mac or try using a different USB cable.

If the drive is still not detected, you can try running a disk diagnostic tool, such as the one provided by EaseUS, to check for any disk file errors or issues.

If the drive is detected but you are unable to access the files, there may be an issue with the drive’s partitions. You can try using a disk formatting tool, such as Disk Utility, to reformat the drive and create new partitions.

If none of these steps resolve the issue, there is a possibility that the Seagate drive may be faulty and in need of repair or replacement.

Remember to always back up your data before attempting any troubleshooting steps to avoid data loss.

Repairing Not Working Seagate External Drive Using First Aid

If your Seagate FreeAgent GoFlex External Hard Drive is not working properly, you can try using the First Aid tool to troubleshoot and resolve any issues. First Aid is a built-in feature in macOS that can help diagnose and fix common problems with disks and devices.

To use First Aid on your Seagate External Drive, follow these steps:

1. Connect the Seagate External Drive to your Mac using the appropriate cable (e.g., USB, FireWire 800, etc.).
2. Open Disk Utility by going to Applications > Utilities > Disk Utility.
3. In Disk Utility, locate your Seagate External Drive in the list of devices and select it.
4. Click on the “First Aid” tab in the top toolbar.
5. Click on the “Run” button to start the diagnosis and repair process.

First Aid will scan and repair any issues it detects on your Seagate External Drive. Once the process is complete, you can check if the drive is working properly. If the issue persists, you may need to consider other troubleshooting options or contact Seagate support for further assistance.

Remember to always backup your important data before attempting any disk formatting or repair procedures to avoid data loss.

Formatting Seagate Disk to macOS Supported File System

Formatting your Seagate Disk to a macOS supported file system can help resolve issues with your Seagate FreeAgent GoFlex External Hard Drive. Follow these steps to troubleshoot:

1. Connect your Seagate External Hard Drive to your Mac.

2. Open Disk Utility. You can find it in the Applications folder under Utilities.

3. Locate your Seagate disk in the left-hand column of Disk Utility.

4. Select the disk and click on the Erase tab.

5. Choose a compatible file system for macOS, such as APFS or Mac OS Extended (Journaled).

6. Give your disk a new name if desired.

7. Click on the Erase button to begin formatting.

8. Wait for the process to complete.

Once the formatting is finished, your Seagate disk should be compatible with macOS. If you encounter any further issues, refer to the troubleshooting tips provided in this article.

Partitioning and Assigning Driver Letter to Seagate GoFlex Hard Drive

Issue Solution
Partitioning Seagate GoFlex Hard Drive 1. Connect the GoFlex hard drive to your computer.

2. Open Disk Management by pressing Windows key + X and selecting “Disk Management” from the menu.

3. Locate the GoFlex drive in the list of disks.

4. Right-click on the unallocated space on the GoFlex drive and select “New Simple Volume.”

5. Follow the on-screen instructions to partition the drive.
Assigning Driver Letter to Seagate GoFlex Hard Drive 1. Connect the GoFlex hard drive to your computer.

2. Open Disk Management by pressing Windows key + X and selecting “Disk Management” from the menu.

3. Locate the GoFlex drive in the list of disks.

4. Right-click on the partition you want to assign a drive letter to and select “Change Drive Letter and Paths.”

5. Click “Add” and choose a drive letter from the drop-down menu.

6. Click “OK” to assign the drive letter to the GoFlex hard drive.