Are you experiencing the frustrating constant blue circle spinning issue on Windows 10? Let’s find a fix for this annoying problem.
Change Mouse Settings and Processes
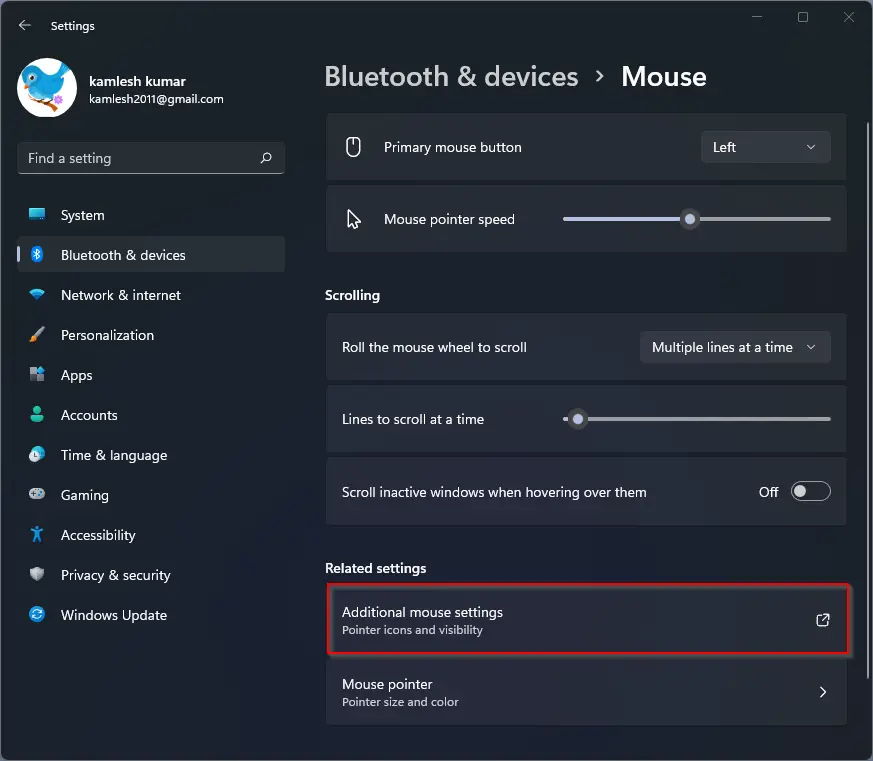
If you are experiencing constant blue circle spinning issues on Windows 10, it may be helpful to check for any background processes that are using up system resources. Open the Task Manager by pressing Ctrl + Shift + Esc, then go to the “Processes” tab and look for any programs that are using a high amount of CPU or memory. You can end these processes by right-clicking on them and selecting “End task”.
Another potential solution is to run CHKDSK to check for any bad sectors on your hard drive. To do this, open a Command Prompt window as an administrator by pressing the Windows key and typing “cmd”. Then, type “chkdsk /f” and press Enter. This will scan your hard drive for errors and fix any issues it finds.
Perform System and Software Checks
- Check for Windows updates
- Open Settings by pressing Windows key + I
- Click on Update & Security
- Click on Check for updates
- Install any available updates
- Run a system scan
- Open Command Prompt as an administrator by searching for it in the start menu, right-clicking, and selecting Run as administrator
- Type sfc /scannow and press Enter
- Wait for the scan to complete and follow any instructions given
- Check for software conflicts
- Open Task Manager by pressing Ctrl+Shift+Esc
- Go to the Startup tab
- Disable any unnecessary startup programs
- Restart your computer
Update or Uninstall Drivers and Software
To fix the constant blue circle spinning issue on Windows 10, you can try updating or uninstalling drivers and software that may be causing the problem.
To update drivers, go to Device Manager and right-click on the device you want to update. Select “Update driver” and follow the on-screen instructions.
If updating drivers doesn’t work, you can try uninstalling them. Right-click on the device in Device Manager and select “Uninstall device.” Restart your computer and Windows will reinstall the driver automatically.
For software, go to Control Panel and select “Uninstall a program.” Find the software causing the issue, right-click on it, and select “Uninstall.”
After updating or uninstalling drivers and software, restart your computer to see if the blue circle spinning issue has been resolved.
Execute System File and Virus Scans
Running a system file check can help repair corrupted system files that may be contributing to the spinning blue circle. To do this, open Command Prompt as an administrator by searching for it in the Start menu, right-clicking on it, and selecting “Run as administrator.” Then, type “sfc /scannow” and hit Enter.
Additionally, performing a virus scan can help detect and remove any malware that might be causing the issue. Use a reliable antivirus software to scan your computer thoroughly and remove any malicious files it finds.
By executing system file and virus scans, you can troubleshoot and potentially resolve the constant blue circle spinning issue on Windows 10.
Utilize Windows Recovery and Command Prompt Tools
Once in Command Prompt, you can run various commands to fix the issue. First, try running the System File Checker tool by typing “sfc /scannow” and pressing Enter. This will scan and repair any corrupted system files that may be causing the problem.
If the System File Checker tool doesn’t resolve the issue, you can also try running the Deployment Image Servicing and Management tool by typing “DISM /Online /Cleanup-Image /RestoreHealth” and pressing Enter. This tool will scan and repair any Windows image corruption that may be causing the spinning blue circle problem.
If these steps don’t work, you can also try using the Bootrec tool to repair the master boot record. Type “bootrec /fixmbr” and “bootrec /fixboot” one at a time and press Enter after each command.
After running these commands, restart your computer and see if the spinning blue circle issue has been fixed. If not, you may need to consider other troubleshooting steps or seek further assistance.
Adjust or Reset System Hardware
Additionally, you can restart your computer to see if that clears up the spinning blue circle. If that doesn’t work, you can try resetting the hardware settings on your computer to default by going to the Control Panel and selecting the System and Security option.
If the issue persists, you may need to update your drivers or BIOS to ensure compatibility with Windows 10. You can do this by going to the manufacturer’s website for your hardware and downloading the latest drivers.
Another option is to run a disk check to see if there are any bad sectors on your hard drive causing the issue. You can do this by opening File Explorer, right-clicking on your hard drive, selecting Properties, going to the Tools tab, and clicking on Check.
Explore Advanced Repair or Reset Options
If the problem persists, you can try repairing corrupted system files using the System File Checker tool. Open Command Prompt as an administrator and run the command “sfc /scannow”. You can also reset your PC to its factory settings by going to Settings > Update & Security > Recovery > Reset this PC.
FAQ
How do I fix a blue loading circle that keeps spinning on Windows 10?
To fix a blue loading circle that keeps spinning on Windows 10, you can try disabling the Mouse Pointer Location feature.
How do I get rid of the blue circle on my computer?
To get rid of the blue circle on your computer, access the ScreenPad Control Panel settings, navigate to Window Control, and toggle off Cursor Locator. This should make the circle disappear.
Why does blue circle keep spinning?
The blue circle keeps spinning because something is happening in the background that is not visible.
Why does the little circle keeps spinning on my computer?
The little circle keeps spinning on your computer because it is a visual indicator that your computer is busy processing a task. This typically occurs when the computer is performing a task that requires a significant amount of resources.