In this article, I will discuss how to fix an external hard drive that is not showing all files.
Understanding the Issue of Missing Files
When your external hard drive is not showing all files, it can be frustrating and concerning. One common reason for missing files is accidental deletion or moving them to the trash. Check your trash folder to see if the missing files are there before taking further action.
Another reason for missing files could be a computer virus or malware. Scan your external hard drive with antivirus software to ensure that it is not infected. It’s also possible that the files are hidden or in a different directory. Use File Explorer to search for the missing files and make sure they are not located in a different folder.
If your external hard drive is not showing all files, it could be a problem with the file system or disk partitioning. Run a disk check or repair tool to fix any errors on the external hard drive. It’s also important to check the connection between the hard drive and your computer. Make sure the USB cable is securely connected and try using a different USB port.
In some cases, the missing files may be due to a corrupted file system or disk partition. Consider formatting the external hard drive, but be aware that this will erase all data on the drive. If you have important files on the drive, it’s a good idea to back them up before proceeding with the format.
Reconnecting and Checking the Connection
- Unplug the external hard drive from the computer
- Inspect the USB cable for any damage or fraying
- Try using a different USB port on the computer
- Plug the external hard drive back in to the computer
- Listen for any sounds indicating the drive is powering on
- Check the device manager to see if the external hard drive is recognized
Show Hidden Files and Folders
To do this on a Windows computer, open File Explorer and navigate to the external hard drive. Then, click on the “View” tab at the top of the window.
Next, check the box that says “Hidden items” in the Show/hide section. This will reveal any files or folders that are hidden on the external hard drive.
If you still don’t see all the files you’re looking for, you may need to check for any system files that are hidden.
To do this, go back to the View tab in File Explorer and click on the “Options” button. In the Folder Options window that appears, click on the “View” tab.
Then, uncheck the box that says “Hide protected operating system files”. Click “Apply” and then “OK” to save your changes.
This should reveal any hidden system files on the external hard drive that may be causing the missing files to not show up.
Restart Your Computer: A Simple Fix
Restart Your Computer: Sometimes a simple fix is all you need to get your external hard drive to show all files. If you’re experiencing this issue, try restarting your computer first. This can help reset any temporary glitches that may be causing the problem.
How to Restart Your Computer: Simply click on the Start menu, select the Power button, and choose Restart. Wait for your computer to fully shut down and then turn it back on. Once your computer has restarted, check if your external hard drive is now showing all files.
Additional Steps: If restarting your computer doesn’t solve the issue, you may need to troubleshoot further. Check the connection between your external hard drive and your computer to ensure it’s secure. You can also try connecting the hard drive to a different USB port or using a different USB cable.
Updating Device Drivers
To update your device drivers, first, open the Device Manager by pressing the Windows key + X and selecting Device Manager from the menu. Look for any devices with a yellow exclamation mark next to them, indicating that the driver needs updating. Right-click on the device and select Update driver. Choose to search automatically for updated driver software. If this doesn’t work, you can manually download the latest driver from the manufacturer’s website.
Install the driver by following the on-screen instructions. After updating the drivers, restart your computer to apply the changes.
Using Built-in Recovery Tools
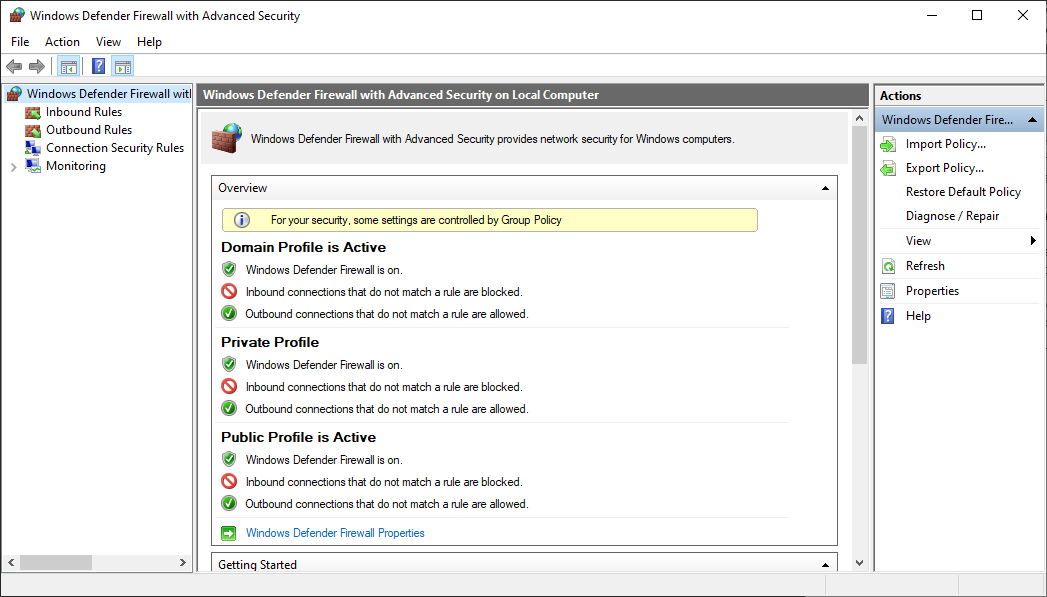
To fix an external hard drive not showing all files, you can utilize the built-in recovery tools on your computer. First, try running a disk check to scan and repair any errors on the drive. To do this, open the Command Prompt by typing “cmd” in the Windows search bar, then type “chkdsk /f X:” (replace X with the letter of your external hard drive).
If the disk check doesn’t solve the issue, you can try recovering lost files using a data recovery tool. There are various software options available online that can help retrieve missing files from your external hard drive. Make sure to choose a reputable and reliable tool to avoid further data loss.
Another option is to check the drive for hidden files or folders that may not be visible. You can do this by opening the Control Panel, selecting “Appearance and Personalization,” then clicking on “Folder Options.” Under the “View” tab, enable the option to show hidden files and folders.
If your external hard drive is still not showing all files after trying these methods, it may be a sign of a more serious issue such as a hardware failure. In this case, it’s recommended to seek professional help to avoid further damage to your data.
Running a Virus and Malware Check
To fix the issue of your external hard drive not showing all files, it is important to run a virus and malware check to ensure that the drive is not infected.
Start by connecting your external hard drive to your computer and running a full scan using a reliable antivirus software. This will help detect and remove any malicious files that may be causing the problem.
If the scan does not resolve the issue, try using a malware removal tool to further clean your external hard drive.
It is also a good idea to update your antivirus software and run regular scans to prevent future infections.
By taking these steps, you can ensure that your external hard drive is free from viruses and malware, allowing you to access all your files without any issues.
Fixing Errors and Damaged Drives
If your external hard drive is not showing all files, there may be errors or damage present. One way to fix this issue is to run a disk check to scan and repair any errors on the drive. This can be done by:
1. Open Command Prompt as an administrator.
2. Type in “chkdsk /f X:” (replace X with the letter of your external hard drive).
3. Press Enter to start the disk check process.
If the disk check does not resolve the issue, you can try fixing disk errors by:
1. Right-click on the external hard drive in File Explorer.
2. Select Properties > Tools > Check to scan and fix any errors.
In some cases, your external hard drive may have a damaged partition. You can repair the partition by:
1. Open Disk Management by right-clicking the Start button and selecting it.
2. Locate your external hard drive, right-click on the partition that is not showing files, and select “Change Drive Letter and Paths.”
3. Assign a new drive letter to the partition.
Data Recovery Solutions
If your external hard drive is not showing all files, you may be experiencing data loss or corruption. One solution to try is data recovery software that can scan the drive and retrieve lost or hidden files.
Another option is to check the file system of the external hard drive to ensure it is compatible with your operating system. You can do this by right-clicking on the drive in File Explorer, selecting Properties, and checking the file system under the General tab.
If the files are still not showing up, you can try connecting the external hard drive to a different computer to see if the issue is with the drive or the computer. This can help determine if the problem is related to the hardware or software.
Running a disk check on the external hard drive can also help identify and fix any errors that may be causing files to not show up. You can do this by opening a Command Prompt window as an administrator and using the chkdsk command.
By trying these solutions, you may be able to fix the issue of your external hard drive not showing all files and recover any lost data.
Keeping Your Data Protected
To keep your data protected while fixing an external hard drive not showing all files, first, scan for viruses to ensure your files are not compromised. Next, encrypt sensitive data to prevent unauthorized access. Additionally, back up your files regularly to avoid data loss in case of a malfunction. Finally, keep your device in a secure location and avoid exposing it to extreme temperatures or physical damage.
Following these steps will help safeguard your data while resolving the issue with your external hard drive.
External Hard Drive: A Modern Essential
If your external hard drive is not showing all files, there are a few steps you can take to troubleshoot the issue. First, check the connection between the hard drive and your computer to ensure it is secure. If that doesn’t work, try using a different USB port or cable to rule out any hardware issues.
Next, you can try running a disk check to scan for any errors on the external hard drive. In Windows, you can do this by opening a Command Prompt window and typing “chkdsk /f X:” (replace X with the drive letter of your external hard drive).
If the issue persists, you may need to check the disk partitioning of the external hard drive. Use a disk management tool to ensure that the drive is properly partitioned and formatted.
It’s also a good idea to scan the external hard drive for viruses or malware that may be causing files to be hidden or missing. Use a reliable antivirus program to scan the drive and remove any threats.
F.A.Q.
Why is my external hard drive not showing all the files?
Your external hard drive may not be showing all the files due to hidden settings, corruption, bad sectors, or poor connections.
How do I fix missing files on my external hard drive?
To fix missing files on your external hard drive, you can try displaying hidden files, checking the hard drive recycle bin, running CHKDSK, changing Registry Value, checking One Drive, and recovering files with data recovery software. Additionally, you can check the cable and port connections, and use devices troubleshooter to address the issue.
Why can’t I see anything on my external hard drive?
You can’t see anything on your external hard drive because there may be USB port connection issues or power supply issues causing the problem.
Why is my hard drive not showing all the storage?
Your hard drive may not be showing all the storage due to possible damage that is preventing it from storing data correctly. This can lead to error messages like “Hard Drive Not Showing Full Capacity.” Consider replacing the hard drive to fix this issue.