
Having trouble with DisplaySwitch.exe on your Windows 7? Here’s how to troubleshoot and fix it.
Troubleshooting DisplaySwitch.exe Runtime Errors
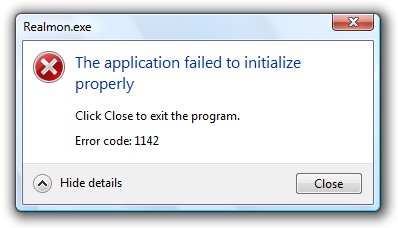
If you’re experiencing runtime errors with DisplaySwitch.exe on Windows 7, we have some troubleshooting steps to help you resolve the issue. Follow the steps below to troubleshoot and fix DisplaySwitch.exe not working on your Windows 7 system.
1. Run System File Checker:
– Click on the Start menu and type “cmd” into the search box.
– Right-click on “cmd.exe” and select “Run as administrator”.
– In the Command Prompt window, type “sfc /scannow” and press Enter.
– Wait for the scan to complete and fix any corrupted system files.
2. Perform a System Restore:
– Click on the Start menu and type “system restore” into the search box.
– Select “Create a restore point” from the search results.
– In the System Properties dialog box, click on the “System Restore” button.
– Follow the on-screen instructions to restore your system to a previous working state.
3. Check for malware and viruses:
– Ensure that your antivirus software is up to date.
– Run a full system scan to check for any malware or viruses that may be causing the runtime errors.
– Quarantine or remove any detected threats.
4. Update Windows:
– Click on the Start menu and type “Windows Update” into the search box.
– Select “Windows Update” from the search results.
– Click on “Check for updates” and install any available updates for your system.
5. Reinstall DisplaySwitch.exe:
– Press the Windows key + R to open the Run dialog box.
– Type “appwiz.cpl” and press Enter to open the Programs and Features window.
– Locate DisplaySwitch.exe in the list of installed programs.
– Right-click on DisplaySwitch.exe and select “Uninstall”.
– Download the latest version of DisplaySwitch.exe from the official Microsoft website or a trusted source.
– Install the downloaded file and restart your computer.
If these troubleshooting steps do not resolve the issue, consider seeking further assistance from a qualified technician or contacting Microsoft support.
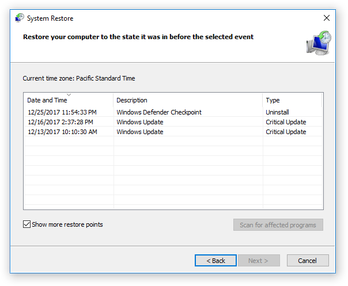
Restore your PC to a previous state
![]()
1. Press the Windows key + R to open the Run dialog box.
2. Type “rstrui” and press Enter to open the System Restore window.
3. Select “Choose a different restore point” and click Next.
4. Choose a restore point from the list and click Next.
5. Review the details of the restore point and click Finish.
6. Confirm your selection and click Yes to start the restoration process.
7. Your PC will restart and begin the restoration process.
If you’re experiencing issues with DisplaySwitch.exe not working on Windows 7, using System Restore can help revert your PC back to a previous state when DisplaySwitch.exe was functioning properly. This can resolve any software conflicts or changes that may have caused the issue.
Please note that System Restore will not affect your personal files, but it will uninstall any programs or drivers installed after the restore point was created. Make sure to backup any important data before proceeding.
If you’re still experiencing issues after restoring your PC, you may want to consider updating your graphics drivers or performing a clean boot to troubleshoot further.
Run System File Checker
If you are experiencing issues with DisplaySwitch.exe not working on your Windows 7 computer, you can use the System File Checker tool to scan and repair any corrupted or missing system files. This can help resolve the problem and restore the functionality of DisplaySwitch.exe.
To run System File Checker, follow these steps:
Step 1: Press the Windows key + R on your keyboard to open the Run dialog box.
Step 2: Type “cmd” and press Enter to open the Command Prompt.
Step 3: In the Command Prompt window, type “sfc /scannow” and press Enter. This command will initiate the scanning process.
Step 4: Wait for the scan to complete. The process may take some time, so be patient.
Step 5: Once the scan is finished, you will receive a message indicating whether any corrupted or missing files were found and repaired. If any issues are detected, the System File Checker will attempt to fix them automatically.
Step 6: Restart your computer to apply the changes.
By running System File Checker, you can effectively troubleshoot and fix issues with DisplaySwitch.exe not working on your Windows 7 system. This tool is designed to scan and repair system files, ensuring the optimal functioning of your computer.
python

import subprocess
def set_display_mode(mode):
try:
# Execute displayswitch.exe with the desired mode
subprocess.call(['displayswitch.exe', '/{}'.format(mode)])
print("Display mode set to: {}".format(mode))
except FileNotFoundError:
print("Error: displayswitch.exe not found.")
except Exception as e:
print("An error occurred: {}".format(str(e)))
# Example usage:
set_display_mode('extend')
Please note that the above code assumes the existence and correct usage of “displayswitch.exe” on the system. It invokes the executable with a specified mode (e.g., ‘extend’), and handles potential exceptions that may occur during the execution.
Perform a Windows Update
Performing a Windows Update is a crucial step in troubleshooting and fixing issues with DisplaySwitch.exe not working on Windows 7. Here’s a concise guide to help you through the process:
1. Open the Start menu and type “Windows Update” in the search bar.
2. Select “Windows Update” from the search results to open the Windows Update window.
3. Click on the “Check for updates” button to start the process.
4. Windows will now check for available updates for your system.
5. If updates are found, click on the “Install updates” button to begin the installation.
6. Follow the on-screen instructions to complete the update process. Your computer may need to restart during this process.
7. Once the updates are installed, check if the issue with DisplaySwitch.exe not working has been resolved.
8. If the issue persists, try restarting your computer and checking for updates again.
9. If there are no further updates available, you may need to consider other troubleshooting steps or seek further assistance.
Managing DisplaySwitch.exe File
If you’re experiencing issues with the DisplaySwitch.exe file not working on your Windows 7 computer, follow these troubleshooting steps to fix the problem.
Step 1: Run a Full System Scan for Malware
Sometimes, malware can interfere with the proper functioning of system files like DisplaySwitch.exe. Run a full scan using your antivirus software to check for any potential threats. If any malware is detected, follow your antivirus software’s instructions to remove it.
Step 2: Check for System Updates
Ensure that your Windows 7 operating system is up to date. Microsoft regularly releases updates that include bug fixes and improvements. To check for updates, click the Start button, go to Control Panel, and select Windows Update. Follow the on-screen instructions to install any available updates.
Step 3: Verify DisplaySwitch.exe File Location
Make sure that the DisplaySwitch.exe file is located in the correct directory. By default, it should be in the C:\Windows\System32 folder. To verify the file’s location, follow these steps:
1. Press the Windows key + R to open the Run dialog box.
2. Type “cmd” and press Enter to open the Command Prompt.
3. In the Command Prompt, type “cd C:\Windows\System32” and press Enter.
4. Type “dir DisplaySwitch.exe” and press Enter.
If the file is not found or located in a different folder, you may need to restore it from a backup or reinstall the operating system.
Step 4: Perform a System File Check
Corrupted system files can cause issues with DisplaySwitch.exe. To check for and repair any corrupted files, use the System File Checker (SFC) tool. Here’s how:
1. Open the Command Prompt as an administrator. To do this, press the Windows key, type “cmd,” right-click on Command Prompt, and select “Run as administrator.”
2. In the Command Prompt, type “sfc /scannow” and press Enter.
3. Wait for the scan to complete. If any corrupted files are found, the SFC tool will attempt to repair them automatically.
Step 5: Reinstall DisplaySwitch.exe
If the previous steps didn’t resolve the issue, you can try reinstalling the DisplaySwitch.exe file. Here’s how:
1. Download a fresh copy of the DisplaySwitch.exe file from a trusted source or extract it from your Windows installation media.
2. Copy the downloaded or extracted DisplaySwitch.exe file to the C:\Windows\System32 folder.
3. Restart your computer.
After following these steps, check if the DisplaySwitch.exe file is now working as expected on your Windows 7 computer. If the issue persists, you may consider seeking further assistance from Microsoft Support or a qualified technician.
Scan for malicious software
If you are experiencing issues with DisplaySwitch.exe not working on Windows 7, it is important to ensure that your system is free from any malicious software that may be causing the problem. Microsoft provides a built-in tool called Windows Defender that can help you scan and remove any potential threats.
To scan for malicious software using Windows Defender, follow these steps:
1. Click on the Start button in the bottom left corner of your screen.
2. Type “Windows Defender” in the search bar and click on the Windows Defender Security Center app.
3. In the Windows Defender Security Center window, click on the Virus & threat protection tab.
4. Click on the Quick scan option to perform a fast scan of your system. This will check the most common areas where malicious software is known to hide.
5. Windows Defender will now scan your system for any potential threats. This process may take some time depending on the size of your hard drive and the number of files on your system.
6. Once the scan is complete, Windows Defender will display the results. If any threats are found, Windows Defender will provide options to remove or quarantine them. Follow the on-screen instructions to take the necessary actions.
7. After removing the threats, restart your computer and check if the issue with DisplaySwitch.exe not working has been resolved.
It is important to keep your system protected from malicious software by regularly scanning for threats using Windows Defender or other reliable antivirus software. Additionally, make sure to keep your operating system and other software up to date to benefit from the latest security patches and bug fixes.
If you continue to experience issues with DisplaySwitch.exe or suspect that your system may be infected with malware despite scanning with Windows Defender, it is recommended to seek professional assistance or contact Microsoft Support for further guidance.
Remember to always exercise caution when downloading and installing software from the internet, as malicious programs can often be disguised as legitimate files. Be sure to verify the source and integrity of the files before executing them on your system.
Update system and drivers
Troubleshoot and Fix DisplaySwitch.exe Not Working on Windows 7
If you’re experiencing issues with DisplaySwitch.exe not working on Windows 7, here are some steps you can take to troubleshoot and fix the problem.
1. Update your system and drivers: Keeping your system and drivers up to date is crucial for optimal performance. Ensure that you have the latest updates installed for Windows 7. To do this, follow these steps:
a. Press the Windows key + R to open the Run dialog box.
b. Type “msconfig” and press Enter.
c. In the System Configuration window, click on the “Services” tab.
d. Check the box next to “Hide all Microsoft services” and click “Disable all”.
e. Click on the “Startup” tab and click “Open Task Manager”.
f. In the Task Manager window, disable all startup items.
g. Close the Task Manager window and click “OK” in the System Configuration window.
h. Restart your computer.
i. After restarting, check if DisplaySwitch.exe is working properly.
2. Run a system file check: Windows has a built-in tool called System File Checker that can help fix corrupted system files. To run this tool, follow these steps:
a. Press the Windows key + X and select “Command Prompt (Admin)”.
b. In the command prompt window, type “sfc /scannow” and press Enter.
c. Wait for the scan to complete. If any issues are found, the tool will attempt to repair them automatically.
d. Restart your computer and check if DisplaySwitch.exe is functioning correctly.
3. Check for malware infections: Malware can cause various issues on your computer, including problems with DisplaySwitch.exe. Run a full system scan with your antivirus software to check for any malware infections. Make sure your antivirus software is up to date before running the scan.
4. Reinstall your graphics driver: If the above steps didn’t resolve the issue, it’s possible that your graphics driver is causing the problem. To reinstall your graphics driver, follow these steps:
a. Press the Windows key + X and select “Device Manager”.
b. Expand the “Display adapters” category.
c. Right-click on your graphics card and select “Uninstall device”.
d. Follow the on-screen instructions to uninstall the driver.
e. Restart your computer.
f. After restarting, Windows should automatically reinstall the driver. If not, visit the manufacturer’s website and download the latest driver for your graphics card.
g. Install the driver and restart your computer.
h. Check if DisplaySwitch.exe is now working properly.
5. Contact support: If none of the above solutions work, it’s recommended to contact Microsoft support or seek assistance from a professional technician. They can provide further guidance and help resolve the issue.
Restore Windows system
![]()
Troubleshoot and Fix DisplaySwitch.exe Not Working on Windows 7
If you’re experiencing issues with DisplaySwitch.exe not working on your Windows 7 system, we have some troubleshooting steps to help you resolve the problem. Follow these steps to get your system back to normal:
Step 1: Restart Your Computer
Sometimes, a simple restart can fix the issue. Restart your computer and see if the problem persists.
Step 2: Check for Windows Updates
Ensure that your Windows 7 system is up to date by checking for and installing any available updates. Windows updates often include bug fixes and improvements that could resolve the issue with DisplaySwitch.exe.
To check for updates, follow these steps:
1. Click on the Start button and type “Windows Update” in the search box.
2. Click on “Windows Update” from the search results.
3. Click on “Check for updates” on the left-hand side of the Windows Update window.
4. Install any available updates and restart your computer if prompted.
Step 3: Run System File Checker (SFC)
System File Checker is a built-in Windows tool that scans for and repairs corrupt system files. Running SFC might help fix any issues with DisplaySwitch.exe.
To run System File Checker, follow these steps:
1. Click on the Start button and type “cmd” in the search box.
2. Right-click on “cmd.exe” from the search results and select “Run as administrator”.
3. In the Command Prompt window, type “sfc /scannow” and press Enter.
4. Wait for the scan to complete. If any issues are found, they will be automatically repaired.
Step 4: Perform a Clean Boot
A clean boot starts Windows with a minimal set of drivers and startup programs, which can help identify software conflicts that might be causing the issue.
To perform a clean boot, follow these steps:
1. Press the Windows key + R to open the Run dialog box.
2. Type “msconfig” and press Enter.
3. In the System Configuration window, click on the “Services” tab.
4. Check the box for “Hide all Microsoft services” and click on “Disable all”.
5. Click on the “Startup” tab and click on “Open Task Manager”.
6. In the Task Manager window, disable all startup items by selecting each item and clicking on “Disable”.
7. Close the Task Manager and click on “OK” in the System Configuration window.
8. Restart your computer.
Step 5: Reinstall DisplaySwitch.exe
If none of the above steps resolve the issue, you may need to reinstall DisplaySwitch.exe. To do this, follow these steps:
1. Press the Windows key + R to open the Run dialog box.
2. Type “control panel” and press Enter.
3. In the Control Panel window, click on “Programs” or “Programs and Features”.
4. Find DisplaySwitch.exe in the list of installed programs and click on it.
5. Click on “Uninstall” or “Remove” and follow the prompts to uninstall DisplaySwitch.exe.
6. After uninstalling, restart your computer.
7. Download the latest version of DisplaySwitch.exe from the official Microsoft website or a trusted source.
8. Install DisplaySwitch.exe following the installation instructions provided.
Conclusion
Download and replace DisplaySwitch.exe file
If you are experiencing issues with DisplaySwitch.exe not working on your Windows 7 computer, you can troubleshoot and fix the problem by downloading and replacing the DisplaySwitch.exe file. Here’s a step-by-step guide to help you through the process:
1. First, make sure you have a backup of the original DisplaySwitch.exe file. This will allow you to revert back to the original file if anything goes wrong during the replacement process.
2. Next, download a new copy of the DisplaySwitch.exe file from a trusted source. You can search for the file online or obtain it from a reliable software repository.
3. Once you have downloaded the file, locate the original DisplaySwitch.exe file on your computer. The file is typically located in the C:\Windows\System32 folder.
4. Before proceeding with the replacement, it is recommended to check the file integrity using a hash algorithm such as MD5 or SHA-1. This will ensure that the downloaded file is not corrupted. You can use various online tools or command line utilities to perform this check.
5. Once you have verified the integrity of the downloaded file, rename the original DisplaySwitch.exe file to something like “DisplaySwitch.exe.old”. This will allow you to easily identify and revert back to the original file if needed.
6. Now, copy the downloaded DisplaySwitch.exe file and paste it into the C:\Windows\System32 folder. You may be prompted to provide administrator permissions to complete the file replacement.
7. After the file replacement is complete, restart your computer to apply the changes.
8. Once your computer has restarted, test the DisplaySwitch.exe functionality to see if the issue has been resolved. You can do this by pressing the Windows key + P on your keyboard to open the display options menu. If the DisplaySwitch.exe is working properly, you should be able to switch between different display modes without any problems.
File versions list
| File Name | Version |
|---|---|
| DisplaySwitch.exe | 6.1.7600.16385 |
| DisplaySwitch.exe.mui | 6.1.7600.16385 |
| DisplaySwitch.exe | 6.1.7601.17514 |
| DisplaySwitch.exe.mui | 6.1.7601.17514 |
| DisplaySwitch.exe | 6.1.7601.24000 |
| DisplaySwitch.exe.mui | 6.1.7601.24000 |
Resolving DisplaySwitch.exe Missing Error
If you are experiencing issues with DisplaySwitch.exe not working on your Windows 7 system, we can help you troubleshoot and fix the problem.
First, try these steps:
1. Restart your computer. Sometimes a simple restart can resolve temporary software issues.
2. Update your graphics drivers. Outdated or incompatible drivers can cause problems with DisplaySwitch.exe. Visit your graphics card manufacturer’s website or use Windows Update to download and install the latest drivers.
3. Run a system file check. This will scan your system for any corrupt or missing files that may be causing the issue. Open the Command Prompt as an administrator and type “sfc /scannow“. Wait for the scan to complete and follow any prompts to fix any issues found.
4. Perform a malware scan. Malicious software can interfere with system processes, including DisplaySwitch.exe. Use a reputable antivirus program to scan your computer and remove any malware found.
If these steps did not resolve the issue, you can try the following advanced troubleshooting steps:
1. Restore DisplaySwitch.exe from a backup. If you have a backup of your system files, you can restore the DisplaySwitch.exe file from there. Locate the backup file and copy the DisplaySwitch.exe to the appropriate directory on your system.
2. Reinstall Windows. If all else fails, you may need to reinstall Windows to fix the issue. This will replace any missing or corrupted system files, including DisplaySwitch.exe. Be sure to back up your files before proceeding with a reinstall.
Important: Reinstalling Windows will remove all your installed programs and files, so make sure to back up everything before proceeding.
We hope these steps help you resolve the DisplaySwitch.exe missing error on your Windows 7 system. If you continue to experience issues, we recommend contacting Microsoft Support for further assistance.
Download the correct version of DisplaySwitch.exe
If you are experiencing issues with DisplaySwitch.exe not working on Windows 7, you may need to download the correct version of the file. This troubleshooting guide will walk you through the steps to ensure you have the right version and fix any problems you may be encountering.
1. Determine your operating system: Before downloading DisplaySwitch.exe, it’s important to know which version of Windows 7 you are running. To check, follow these steps:
a. Click on the “Start” button.
b. Right-click on “Computer” and select “Properties.”
c. Under the “System” section, you will see the version of Windows 7 you have installed.
2. Download the correct version of DisplaySwitch.exe: Once you have determined your operating system, you can download the appropriate version of DisplaySwitch.exe. Follow these steps:
a. Visit the official Microsoft website.
b. In the search bar, type “Download DisplaySwitch.exe for Windows 7 [your operating system version].”
c. Click on the appropriate download link that matches your operating system version.
d. Save the file to a location on your computer that you can easily access.
3. Verify the integrity of the downloaded file: After downloading DisplaySwitch.exe, it’s important to verify its integrity to ensure it hasn’t been corrupted during the download process. To do this, follow these steps:
a. Open the folder where you saved the downloaded file.
b. Right-click on the file and select “Properties.”
c. Go to the “Digital Signatures” tab and check for any signatures. If there are no signatures, proceed to the next step.
d. Go to the “Details” tab and check the file hash. Compare it to the official hash provided on the Microsoft website. If they match, the file is intact.
4. Replace the existing DisplaySwitch.exe file: If you have determined that the existing DisplaySwitch.exe file is causing the issue, you will need to replace it with the downloaded version. Follow these steps:
a. Close any applications that are currently running.
b. Navigate to the location of the existing DisplaySwitch.exe file. The default location is “C:\Windows\System32.”
c. Rename the existing DisplaySwitch.exe file to “DisplaySwitch_old.exe” to keep it as a backup.
d. Copy the downloaded DisplaySwitch.exe file from the location where you saved it and paste it into the “C:\Windows\System32” folder.
e. Restart your computer to apply the changes.
5. Test DisplaySwitch.exe functionality: After replacing the file, it’s important to test if DisplaySwitch.exe is now working properly. Follow these steps:
a. Press the “Windows” key + “P” on your keyboard to open the DisplaySwitch menu.
b. Select the desired display option (e.g., “Duplicate,” “Extend,” “Projector only,” etc.) and check if it is applied correctly.
c. If the display options are working as expected, the issue with DisplaySwitch.exe has been resolved.
Properly place the DisplaySwitch.exe file
1. Locate the DisplaySwitch.exe file:
– Open File Explorer by pressing the Windows key + E.
– Navigate to the C:\Windows\System32 folder.
– Look for the DisplaySwitch.exe file in this folder.
2. Verify the integrity of the file:
– Right-click on the DisplaySwitch.exe file and select Properties.
– Go to the “Digital Signatures” tab, and ensure that the file is signed by “Microsoft Windows”.
– If the file is not signed or the signature is invalid, you may have a corrupt or malicious version. In this case, you should consider scanning your system for malware or restoring the file from a trusted source.
3. Replace the file:
– If you suspect that the DisplaySwitch.exe file is corrupted or missing, you can replace it with a fresh copy from a Windows installation source or a trusted download.
– Make sure to download the file from a reputable source to avoid malware or other issues.
– After downloading the file, copy and paste it into the C:\Windows\System32 folder, overwriting the existing file if prompted.
4. Restart the computer:
– After replacing the file, restart your computer to apply the changes and see if the DisplaySwitch.exe issue has been resolved.
Remember to always exercise caution when replacing system files and ensure that you have a backup of important data before making any changes.
If you continue to experience issues with DisplaySwitch.exe, it may be helpful to seek further assistance from Microsoft support or consult online forums for additional troubleshooting steps.
Note: This troubleshooting guide specifically addresses DisplaySwitch.exe issues on Windows 7. For troubleshooting steps on other Windows versions, such as Windows 10 or Windows 8, please refer to the respective documentation or consult the Microsoft website for more information.
Register DisplaySwitch.exe
If you are experiencing issues with DisplaySwitch.exe not working on your Windows 7 computer, registering the executable file may help resolve the problem. Registering DisplaySwitch.exe ensures that the necessary system information is correctly linked to the file, allowing it to function properly.
To register DisplaySwitch.exe, follow these steps:
1. Press the Windows key + R to open the Run dialog box.
2. Type “cmd” and press Enter to open the Command Prompt.
3. In the Command Prompt, navigate to the location of the DisplaySwitch.exe file. For example, if the file is located in the “C:\Windows\System32” folder, you would enter the following command: cd C:\Windows\System32
4. Once you are in the correct folder, type the following command to register DisplaySwitch.exe: regsvr32 DisplaySwitch.exe
5. Press Enter to execute the command. You should see a confirmation message indicating that the registration was successful.
After registering DisplaySwitch.exe, try using the DisplaySwitch function again to see if the issue has been resolved. If the problem persists, you may need to further troubleshoot your system or seek additional assistance.
It is worth noting that DisplaySwitch.exe is a system file used for managing display settings and is typically located in the “C:\Windows\System32” folder. If the file is missing or corrupted, it can cause issues with the DisplaySwitch function. In such cases, you may need to restore the file from a backup or perform a system repair.
We hope this guide has been helpful in resolving the issue with DisplaySwitch.exe not working on your Windows 7 computer. If you have any further questions or need assistance, please don’t hesitate to reach out to our support team.
Fix missing error automatically
If you’re experiencing issues with the DisplaySwitch.exe not working on Windows 7, there are a few steps you can take to fix the problem automatically. Here’s what you can do:
Step 1: Restart your computer. Sometimes, a simple restart can resolve the issue by refreshing the system and clearing any temporary glitches.
Step 2: Run the Windows Troubleshooter. Windows 7 includes a built-in tool that can automatically detect and fix common issues. To access it, go to the Control Panel and search for “Troubleshooting” in the search bar. Click on “Troubleshooting” and then select “View all” from the left-hand side. Look for the “Hardware and Devices” option and click on it. Follow the on-screen instructions to run the troubleshooter and see if it can fix the DisplaySwitch.exe not working issue.
Step 3: Update your graphics drivers. Outdated or incompatible graphics drivers can often cause problems with DisplaySwitch.exe. To update your drivers, go to the manufacturer’s website for your graphics card and look for the latest drivers available for your specific model. Download and install the drivers, then restart your computer to see if the issue is resolved.
Step 4: Check for Windows updates. Microsoft regularly releases updates to fix bugs and improve system stability. To check for updates, go to the Control Panel and search for “Windows Update” in the search bar. Click on “Windows Update” and then select “Check for updates” from the left-hand side. If any updates are available, click on “Install updates” and follow the on-screen instructions to install them. After the updates are installed, restart your computer and check if the DisplaySwitch.exe not working issue is resolved.
Step 5: Perform a system restore. If none of the above steps work, you can try using the System Restore feature to revert your computer back to a previous state when DisplaySwitch.exe was working properly. To access System Restore, go to the Control Panel and search for “System Restore” in the search bar. Click on “System Restore” and then select a restore point from before the issue started occurring. Follow the on-screen instructions to restore your system and check if the problem is resolved.
Update drivers to restore missing .exe files
If you’re experiencing issues with the DisplaySwitch.exe file not working on Windows 7, updating your drivers can often help resolve the problem. Here’s how you can update your drivers and restore the missing .exe files:
1. Press the Windows key + R on your keyboard to open the Run dialog box.
2. Type “devmgmt.msc” and press Enter to open the Device Manager.
3. In the Device Manager window, expand the Display adapters category.
4. Right-click on your display adapter and select “Update driver.”
5. Choose the option to search automatically for updated driver software.
6. Windows will now search for the latest driver updates for your display adapter and install them if available.
7. Once the driver update is complete, restart your computer to apply the changes.
Note: If Windows couldn’t find a new driver for your display adapter, you can try visiting the manufacturer’s website and downloading the latest driver manually. Make sure to choose the driver that’s compatible with your version of Windows 7.
Updating your drivers can help fix issues with missing .exe files, as it ensures that your computer has the necessary software to run these files correctly. By keeping your drivers up to date, you can improve the overall performance and stability of your system.
If updating your drivers didn’t resolve the problem, there may be other underlying issues causing the DisplaySwitch.exe file to not work. It’s recommended to run a full system scan using an antivirus program to check for any malware or viruses that could be affecting your system.
Additionally, you can try using the System File Checker tool to scan and repair any corrupted system files. To do this:
1. Press the Windows key + R on your keyboard to open the Run dialog box.
2. Type “cmd” and press Ctrl + Shift + Enter to open an elevated Command Prompt.
3. In the Command Prompt window, type “sfc /scannow” and press Enter.
4. Wait for the scan to complete and follow any on-screen instructions if prompted.
The System File Checker tool will scan your system for any corrupted files and attempt to repair them. Restart your computer after the scan is complete.
If you’re still experiencing issues with the DisplaySwitch.exe file not working, it’s recommended to seek further assistance from Microsoft support or a qualified technician. They can help diagnose and resolve any underlying issues specific to your system.
Scan for malware
If you are experiencing issues with DisplaySwitch.exe not working on Windows 7, it is essential to scan your system for malware. Malicious software can often interfere with the proper functioning of system files and processes, leading to various errors and malfunctions.
To scan for malware on your Windows 7 computer, follow these steps:
1. Open your preferred antivirus software or Windows Defender, which is built into Windows 7.
2. Initiate a full system scan to thoroughly examine all files and programs on your computer.
3. Allow the scan to complete, as it may take some time depending on the size and speed of your system.
During the scan, your antivirus software or Windows Defender will search for any known malware signatures or suspicious behavior. If any malware is found, it will prompt you to take appropriate action, such as quarantining or removing the infected files.
It is important to keep your antivirus software or Windows Defender up to date to ensure the most effective protection against the latest malware threats. Regularly updating your antivirus software will provide you with the latest virus definitions and security patches.
Preventing Malware Infections
In addition to scanning your system for malware, it is crucial to take preventive measures to avoid future infections. Here are some best practices to follow:
1. Keep your operating system, antivirus software, and other applications up to date with the latest security patches and updates. This will help protect your system from known vulnerabilities that malware can exploit.
2. Be cautious when downloading and installing software from the internet. Only download from trusted sources and verify the authenticity of the files using digital signatures or checksums.
3. Enable the built-in Windows Firewall or use a reputable third-party firewall to block unauthorized access to your system.
4. Avoid clicking on suspicious links, opening email attachments from unknown sources, or visiting potentially harmful websites.
5. Regularly back up your important files to an external storage device or cloud service. In the event of a malware infection, you can restore your files from a clean backup.
Fix corrupted DisplaySwitch.exe with System File Checker
If you are experiencing issues with DisplaySwitch.exe not working on your Windows 7 computer, you can try using the System File Checker (SFC) tool to fix any corrupted files that may be causing the problem. The SFC tool is a built-in utility in Microsoft Windows that scans for and restores corrupted system files.
Here’s how you can use the System File Checker to troubleshoot and fix DisplaySwitch.exe issues:
1. Press the Windows key on your keyboard and type “cmd” to open the Command Prompt.
2. Right-click on Command Prompt and select “Run as administrator” to open an elevated Command Prompt window.
3. Run the System File Checker (SFC) command:
In the Command Prompt window, type the following command and press Enter:
sfc /scannow
The System File Checker will now scan your system for any corrupted files and automatically replace them with the correct versions from the Windows installation media. This process may take some time, so please be patient.
4. Once the scan is complete, restart your computer and check if the DisplaySwitch.exe issue has been resolved.
If the System File Checker was able to fix any corrupted files related to DisplaySwitch.exe, the issue should now be resolved. However, if the problem persists, you may need to consider other troubleshooting steps or seek further assistance.
Remember to keep your Windows operating system up to date with the latest updates and patches, as these updates often include bug fixes and enhancements that can help resolve various issues.
By using the System File Checker, you can easily identify and fix any corrupted files that may be causing DisplaySwitch.exe not to work on your Windows 7 computer.
Perform a System Restore
Performing a System Restore can help troubleshoot and fix the issue of DisplaySwitch.exe not working on Windows 7.
To perform a System Restore, follow these steps:
1. Press the Windows key and type “System Restore” in the search bar.
2. Click on “System Restore” from the search results.
3. In the System Restore window, click on “Next” to proceed.
4. Select a restore point from the list that appears. It is recommended to choose a restore point prior to when the issue with DisplaySwitch.exe started occurring.
5. Click on “Next” and then click on “Finish” to start the System Restore process.
6. Your computer will restart and begin the restoration process.
7. Once the System Restore is complete, your computer will restart again.
Please note that performing a System Restore will not affect your personal files, but it may uninstall recently installed programs or drivers. It is recommended to create a backup of your important files before proceeding with the System Restore.
If the System Restore does not resolve the issue, you may need to consider other troubleshooting steps or seek further assistance.
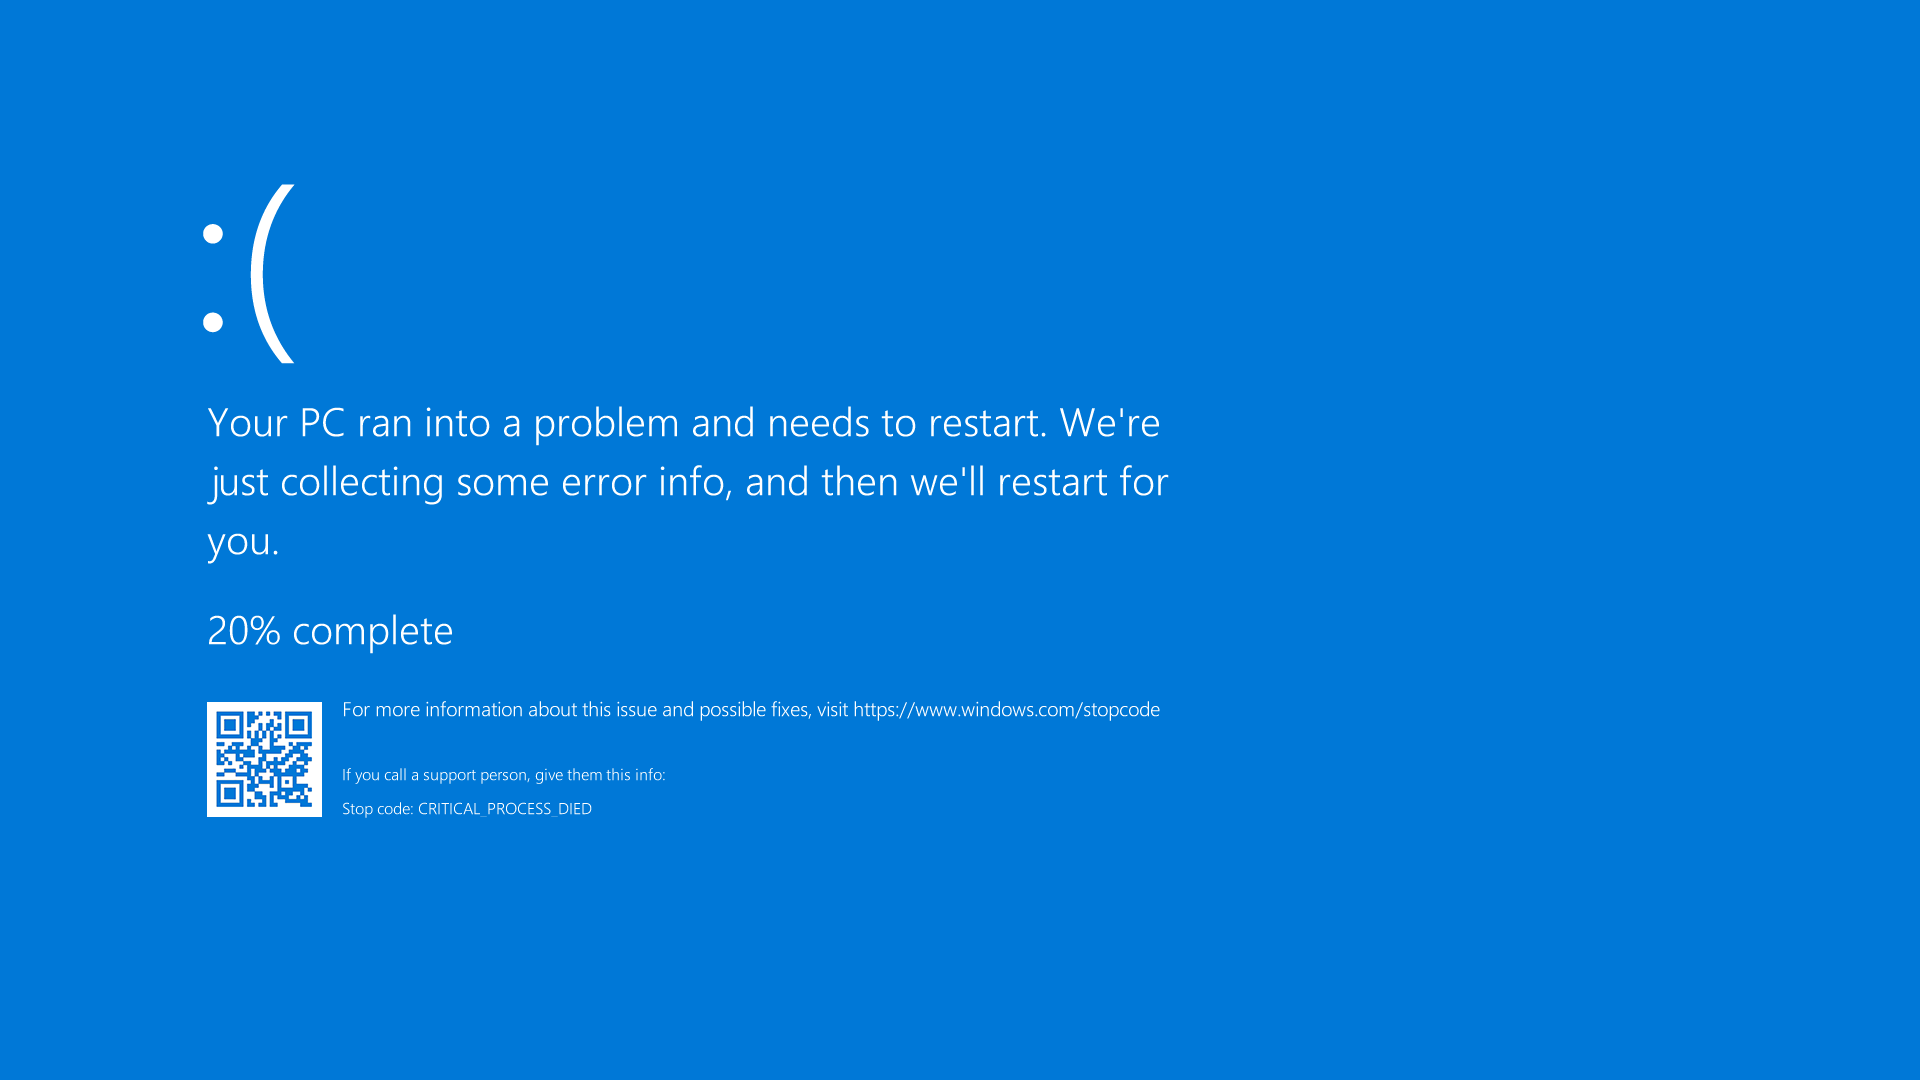
Fixing DisplaySwitch.exe Errors and Issues
![]()
If you’re experiencing problems with DisplaySwitch.exe not working on your Windows 7 computer, there are a few troubleshooting steps you can take to resolve the issue.
First, make sure that your computer meets the system requirements for DisplaySwitch.exe. This utility is included in Windows 7 and is used to switch between display modes. If you’re running Windows 7, you should have no issues with compatibility.
If you’re receiving an error message when trying to use DisplaySwitch.exe, it’s possible that the file itself is corrupt or missing. To fix this, you can try the following steps:
1. Open the Command Prompt as an administrator. You can do this by clicking on the Start menu, typing “cmd” into the search bar, right-clicking on “Command Prompt,” and selecting “Run as administrator.”
2. In the Command Prompt window, type the following command and press Enter: sfc /scannow. This will initiate a system file check, which will scan for and replace any corrupted or missing system files, including DisplaySwitch.exe.
3. Wait for the scan to complete. This may take some time, so be patient. Once the scan is finished, you should see a message indicating whether any issues were found and fixed.
If the system file check didn’t resolve the issue, you can also try reinstalling DisplaySwitch.exe. Here’s how:
1. Open the Command Prompt as an administrator, as described in the previous steps.
2. In the Command Prompt window, type the following command and press Enter: dism /online /cleanup-image /restorehealth. This command will repair any issues with the Windows image, which may include DisplaySwitch.exe.
3. Again, wait for the process to complete. Once it’s finished, you should see a message indicating whether any issues were repaired.
If you’re still experiencing problems with DisplaySwitch.exe after trying these steps, it’s possible that there may be deeper issues with your Windows 7 installation. In this case, you may want to consider performing a system restore or contacting Microsoft Support for further assistance.
Troubleshoot runtime errors
Troubleshoot and Fix DisplaySwitch.exe Not Working on Windows 7
If you’re experiencing runtime errors with DisplaySwitch.exe on Windows 7, here are some troubleshooting steps to help you resolve the issue.
Step 1: Check for system updates
Make sure your Windows 7 operating system is up to date. Sometimes, runtime errors can occur due to outdated system files. To check for updates, follow these steps:
1. Click on the Start button.
2. Type “Windows Update” in the search box and press Enter.
3. Click on “Check for updates” and wait for Windows to search for available updates.
4. Install any pending updates and restart your computer if prompted.
Step 2: Run a system file check
Corrupted or missing system files can cause runtime errors. To fix this, you can run a system file check using the built-in Windows tool called System File Checker. Here’s how:
1. Click on the Start button.
2. Type “cmd” in the search box.
3. Right-click on “Command Prompt” and select “Run as administrator”.
4. In the Command Prompt window, type “sfc /scannow” and press Enter.
5. Wait for the scan to complete and follow any on-screen instructions.
Step 3: Perform a clean boot
Conflicting programs or services running in the background can sometimes cause runtime errors. Performing a clean boot can help identify the culprit. Here’s how:
1. Press the Windows key + R to open the Run dialog box.
2. Type “msconfig” and press Enter.
3. In the System Configuration window, go to the “Services” tab.
4. Check the box that says “Hide all Microsoft services”.
5. Click on “Disable all” to disable all non-Microsoft services.
6. Go to the “Startup” tab and click on “Open Task Manager”.
7. In the Task Manager window, disable all startup items by right-clicking on each item and selecting “Disable”.
8. Close the Task Manager and go back to the System Configuration window.
9. Click on “Apply” and then “OK”.
10. Restart your computer.
Step 4: Reinstall DisplaySwitch.exe
If the previous steps didn’t resolve the issue, you can try reinstalling the DisplaySwitch.exe file. Here’s how:
1. Press the Windows key + R to open the Run dialog box.
2. Type “appwiz.cpl” and press Enter.
3. In the Programs and Features window, locate DisplaySwitch.exe and uninstall it.
4. After uninstalling, restart your computer.
5. Visit the official Microsoft website or a trusted software repository to download the latest version of DisplaySwitch.exe.
6. Install the downloaded file and follow any on-screen instructions.
If you’re still experiencing runtime errors with DisplaySwitch.exe after following these steps, it’s recommended to seek further assistance from Microsoft support or a qualified technician.
Manage DisplaySwitch.exe file
DisplaySwitch.exe is an important file in Windows 7 that allows you to switch between different display modes on your computer. If you’re experiencing issues with DisplaySwitch.exe not working, we have some troubleshooting steps to help you fix the problem.
First, let’s make sure that DisplaySwitch.exe is located in the correct directory. By default, the file should be in the C:\Windows\System32 folder. If it’s not there, you may need to restore the file from a backup or reinstall Windows 7.
If the file is in the correct location, the next step is to check for any errors or corruption in the file. To do this, you can use the System File Checker tool. Here’s how:
1. Press the Windows key + R to open the Run dialog box.
2. Type “cmd” and press Enter to open the Command Prompt.
3. In the Command Prompt, type “sfc /scannow” and press Enter.
4. The System File Checker will scan your system for any corrupted or missing files, including DisplaySwitch.exe. If any issues are found, the tool will attempt to repair them.
If the System File Checker doesn’t find any issues or if the problem persists after running the tool, you can try resetting the DisplaySwitch.exe file. Here’s how:
1. Press the Windows key + R to open the Run dialog box.
2. Type “cmd” and press Enter to open the Command Prompt.
3. In the Command Prompt, type “taskkill /f /im DisplaySwitch.exe” and press Enter. This will force close any running instances of DisplaySwitch.exe.
4. Next, type “ren C:\Windows\System32\DisplaySwitch.exe DisplaySwitch.old” and press Enter. This will rename the existing DisplaySwitch.exe file.
5. Finally, type “sfc /scannow” and press Enter to run the System File Checker again. This will replace the renamed file with a fresh copy.
After resetting the DisplaySwitch.exe file, restart your computer and see if the issue is resolved. If not, you may need to consider other troubleshooting steps or seek further assistance.
Resolve missing error

If you are experiencing issues with DisplaySwitch.exe not working on your Windows 7 computer, follow these steps to resolve the problem:
Step 1: Check for missing or corrupted system files by running the System File Checker tool. To do this, follow these steps:
1. Press the Windows key + R to open the Run dialog box.
2. Type “cmd” and press Enter to open the Command Prompt.
3. In the Command Prompt, type “sfc /scannow” and press Enter.
4. Wait for the scan to complete. If any errors are found, the tool will attempt to repair them automatically.
Step 2: Update your display drivers to ensure they are compatible with Windows 7. To do this, follow these steps:
1. Press the Windows key + X to open the Power User menu.
2. Select Device Manager from the list.
3. Expand the Display adapters category.
4. Right-click on your display adapter and select Update driver.
5. Choose the option to search automatically for updated driver software.
6. Follow the on-screen instructions to install the latest drivers.
Step 3: Reset the DisplaySwitch.exe settings to their default values. To do this, follow these steps:
1. Press the Windows key + R to open the Run dialog box.
2. Type “regedit” and press Enter to open the Registry Editor.
3. Navigate to the following key: HKEY_CURRENT_USER\Software\Microsoft\Windows\CurrentVersion\Explorer\Advanced
4. Right-click on the “Advanced” folder and select Export to create a backup of the settings.
5. Once the backup is created, right-click on the “Advanced” folder again and select Delete.
6. Close the Registry Editor and restart your computer.
Step 4: Run a full system scan for malware and viruses. Sometimes, malicious software can interfere with the proper functioning of DisplaySwitch.exe. Use your preferred antivirus software to scan your system and remove any threats that are detected.
Step 5: If none of the above steps resolve the issue, consider performing a system restore to a previous point in time when DisplaySwitch.exe was working correctly. To do this, follow these steps:
1. Press the Windows key + R to open the Run dialog box.
2. Type “rstrui” and press Enter to open the System Restore wizard.
3. Follow the on-screen instructions to choose a restore point and restore your system.
Fix corrupted file with System Restore
If you’re experiencing issues with the DisplaySwitch.exe file on Windows 7, you can try using System Restore to fix any corrupted files. System Restore is a built-in feature that allows you to revert your computer’s settings to a previous point in time, which can help resolve problems caused by recent changes.
To fix the DisplaySwitch.exe not working issue, follow these steps:
Step 1: Open the Start menu and type “System Restore” in the search bar.
Step 2: Click on the “System Restore” option that appears in the search results.
Step 3: In the System Restore window, click on “Next” to proceed.
Step 4: Select a restore point from the list of available options. It’s recommended to choose a restore point that was created before you started experiencing issues with the DisplaySwitch.exe file.
Step 5: Click on “Next” and then “Finish” to start the system restore process. Your computer will restart during this process, so make sure to save any important work before proceeding.
After the system restore is complete, your computer will be reverted back to the selected restore point, and any corrupted files, including the DisplaySwitch.exe file, should be fixed. Make sure to test the functionality of DisplaySwitch.exe to ensure that the issue has been resolved.
It’s worth noting that System Restore will not affect your personal files, but it may remove recently installed programs or drivers. If you have any concerns about potential data loss or changes to your system, it’s recommended to create a backup before proceeding with the system restore.
If the DisplaySwitch.exe issue persists even after performing a system restore, you may need to consider other troubleshooting steps or seek further assistance from Microsoft support or a qualified technician.


