
Unveiling the perplexing mystery behind the Lenovo X1 Carbon 7th Gen, where the elusive battery remains undetected, causing users to scratch their heads in bewilderment.
Troubleshooting Lenovo X1 Carbon Battery Issues
If you’re experiencing battery issues with your Lenovo X1 Carbon 7th Gen, try the following troubleshooting steps:
1. Check the battery connections and contacts: Ensure that the battery is securely connected to the laptop and that the contacts are clean and free from any debris.
2. Update your battery drivers: Go to Device Manager and check for any outdated or missing battery drivers. If necessary, update them to the latest version.
3. Check the power source: Make sure you’re using the correct power adapter for your laptop and that it’s properly plugged in. Try using a different power outlet or adapter to rule out any issues with the power source.
4. Run a battery report: Open Command Prompt and type “powercfg /batteryreport“. This will generate a battery report with detailed information about your battery’s health and usage.
5. Perform a power cycle: Shut down your laptop, unplug the power adapter, and remove the battery. Press and hold the power button for 30 seconds, then reinsert the battery and plug in the power adapter. Turn on your laptop and check if the battery is detected.
If these steps don’t resolve the issue, it may indicate a hardware problem with the battery. Consider contacting Lenovo support or seeking professional assistance for further diagnosis and potential battery replacement.
Tips to Maintain a Healthy Lenovo X1 Carbon Battery
- Step 1: Calibrate the battery
- Plug in the power adapter and let the battery charge fully
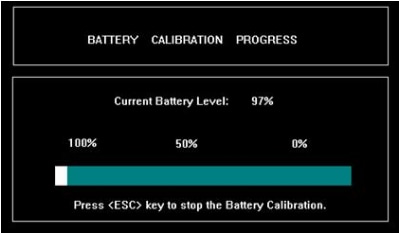
- Once fully charged, keep the laptop plugged in for an additional 2 hours
- After 2 hours, unplug the power adapter and use the laptop until the battery drains completely and the laptop shuts down
- Plug in the power adapter again and let the battery charge fully
- Step 2: Adjust power settings
- Open Control Panel by pressing Win+X and selecting it from the list
- Click on Power Options
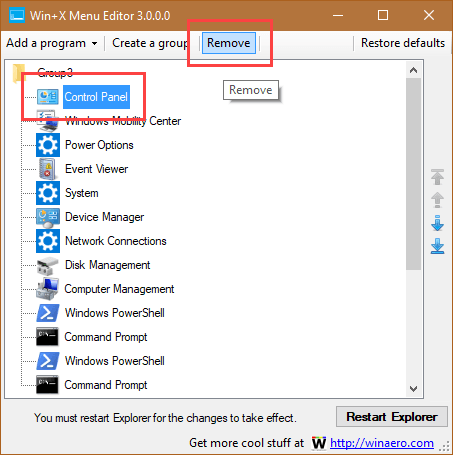
- Select the Power Saver plan to optimize battery life
- Click on Change plan settings next to the selected plan
- Adjust the settings to turn off the display and put the computer to sleep after a certain period of inactivity
- Step 3: Reduce background processes
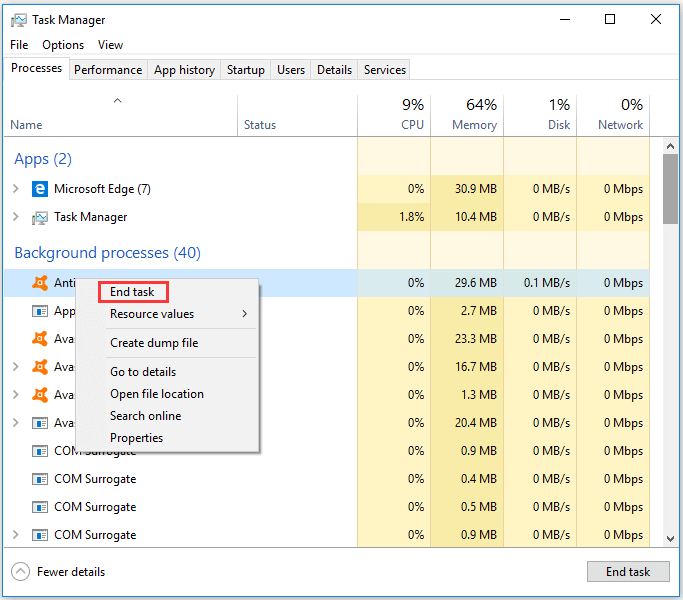
- Open Task Manager by pressing Ctrl+Shift+Esc
- Go to the Processes tab
- Identify any unnecessary processes that consume a significant amount of CPU power
- Select the process and click on End Task to close it
- Step 4: Disable unnecessary startup programs
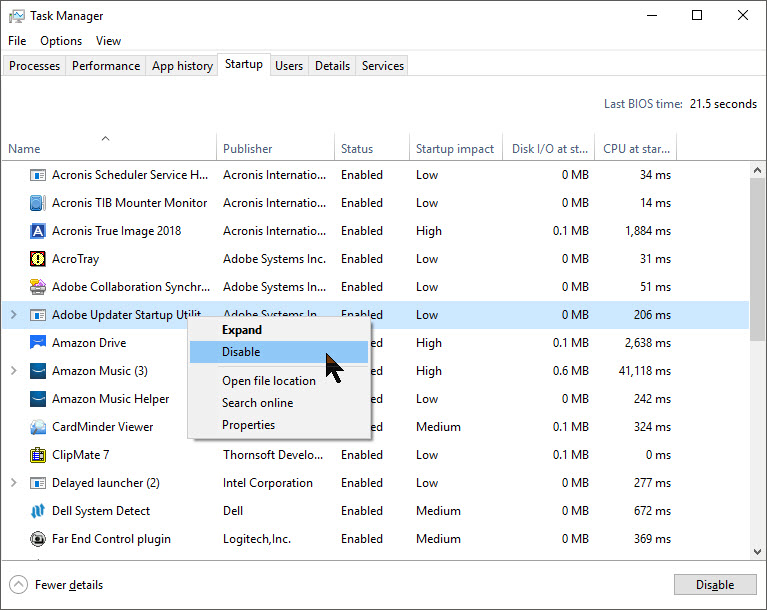
- Open Task Manager by pressing Ctrl+Shift+Esc
- Go to the Startup tab
- Identify any programs that are set to start automatically when the computer boots up
- Select the program and click on Disable to prevent it from starting up
- Step 5: Keep the laptop cool
- Avoid exposing the laptop to high temperatures
- Ensure proper ventilation by using the laptop on a hard, flat surface
- Clean the laptop’s cooling vents regularly to remove dust and debris
Common Causes and Solutions for Battery Detection Errors on Lenovo X1 Carbon
| Common Causes | Solutions |
|---|---|
| 1. Faulty battery connection | 1. Shut down the laptop and remove the battery. Clean the battery contacts and reinsert it securely. Restart the laptop and check if the battery is detected. |
| 2. Outdated BIOS | 2. Update the BIOS to the latest version provided by Lenovo’s official website. Reboot the laptop and check if the battery is recognized. |
| 3. Driver issues | 3. Open Device Manager, expand the “Batteries” category, right-click on the battery driver, and select “Uninstall device.” Restart the laptop, and Windows will automatically reinstall the driver. Check if the battery is detected. |
| 4. Battery calibration needed | 4. Drain the battery completely by using the laptop until it shuts down. Connect the charger and charge the laptop to 100%. Repeat this process 2-3 times to calibrate the battery. Check if it is detected. |
| 5. Hardware failure | 5. If none of the above solutions work, the battery or the motherboard may have a hardware issue. Contact Lenovo support or visit an authorized service center for further assistance. |
python

import psutil
battery = psutil.sensors_battery()
if battery is None:
print("No battery detected.")
else:
if battery.power_plugged:
print("Battery detected. Charging.")
else:
print("Battery detected. Discharging.")
print(f"Current battery percentage: {battery.percent}%")
Please note that this code snippet relies on the `psutil` library, which you may need to install if it is not already available on your system. You can install it using the `pip` package manager by running `pip install psutil`.
While this code snippet can provide information about the battery status on supported systems, it cannot directly interact with the Lenovo X1 Carbon or fix any hardware-related issues. For such cases, I recommend contacting Lenovo support or referring to their official documentation for troubleshooting steps.
Steps to Replace a Faulty Lenovo X1 Carbon Battery
1. Turn off your Lenovo X1 Carbon laptop and unplug the AC adapter.
2. Flip the laptop over and locate the battery release latch.
3. Slide the latch to the unlock position and carefully remove the battery from its compartment.
4. Take note of the battery’s model number and specifications for purchasing a compatible replacement.
5. Order a new battery from a reliable retailer or contact Lenovo for assistance.
6. Once you receive the new battery, insert it into the battery compartment, ensuring that the connectors align correctly.
7. Secure the battery by sliding the release latch back into the lock position.
8. Plug in the AC adapter and turn on your laptop to verify if the new battery is detected.
9. If the battery is still not detected, try updating your laptop’s BIOS and ACPI drivers from Lenovo’s support site.
10. If the issue persists, consider contacting Lenovo’s customer support for further troubleshooting or repair options.
Note: These instructions apply specifically to the Lenovo X1 Carbon laptop.


