
Navigating the digital realm can sometimes feel like a thrilling adventure, but occasionally, we encounter stumbling blocks along the way. In this tech-driven era, it’s not uncommon for Windows users to find themselves stuck on the “Please Wait” screen, longing for a swift resolution to their predicament. In this article, we delve into the perplexing issue of Windows 10/11 getting caught in this limbo and explore potential solutions to liberate your device from its prolonged pause. So, fasten your seatbelts as we embark on a quest to conquer the endless cycle of waiting!
Troubleshooting Windows Stuck on Please Wait Screen
If your Windows 10/11 PC is stuck on the “Please Wait” screen during startup, try the following troubleshooting steps:
1. Restart your computer and wait for the startup screen to appear.
2. Press Win + X and select “Command Prompt (Admin)” from the menu.
3. In the Command Prompt window, type gpupdate /force and press Enter to update group policy settings.
4. If the issue persists, try booting into Safe Mode. Press and hold the Shift key while clicking on the “Restart” button on the login screen.
5. In Safe Mode, go to the Settings app and navigate to Update & Security > Recovery.
6. Click on Restart now under the “Advanced startup” section.
7. When the computer restarts, select Troubleshoot > Advanced options > System Restore.
8. Follow the on-screen instructions to restore your system to a previous point in time.
9. If none of the above solutions work, you may need to consider reinstalling Windows using a system disk or seeking professional help.
Precautions Before Fixing the Issue
1. Before proceeding, make sure to back up your important data to avoid any potential loss.
2. Disconnect any external devices such as USB drives or printers to eliminate potential conflicts.
3. Ensure your PC is connected to a stable power source to prevent any interruptions during the fix.
4. If you’re encountering the “Please Wait” error, try restarting your computer and waiting for a few minutes to see if it resolves on its own.
5. If the issue persists, try troubleshooting using the following steps:
a. Press the Win + X keys and select “Command Prompt (Admin)” to open an elevated command prompt.
b. Type “gpupdate /force” and press Enter to refresh group policies.
c. If you’re using Windows 10, try running the following command: “sfc /scannow” to scan and repair system files.
d. Consider using tools like MiniTool Partition Wizard or system restore to fix any potential disk or software issues.
Solutions to Fix Windows Stuck on Please Wait
- Open the System Configuration dialog box by pressing the Windows + R keys, typing msconfig, and pressing Enter.
- In the General tab, select the Selective startup option.
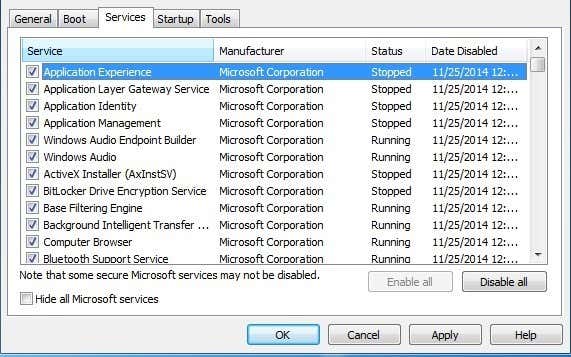
- Uncheck the box next to Load startup items.
- Go to the Services tab and check the box next to Hide all Microsoft services.
- Click on Disable all to disable all non-Microsoft services.
- Go to the Startup tab and click on Open Task Manager.
- In the Task Manager, disable all startup programs by right-clicking on each program and selecting Disable.
- Close the Task Manager and click OK in the System Configuration window.
- Restart your computer and check if the “Please Wait” screen issue is resolved.
Solution 2: Run System File Checker
- Open the Command Prompt as an administrator by pressing the Windows + X keys and selecting Command Prompt (Admin).
- Type sfc /scannow and press Enter to run the System File Checker.
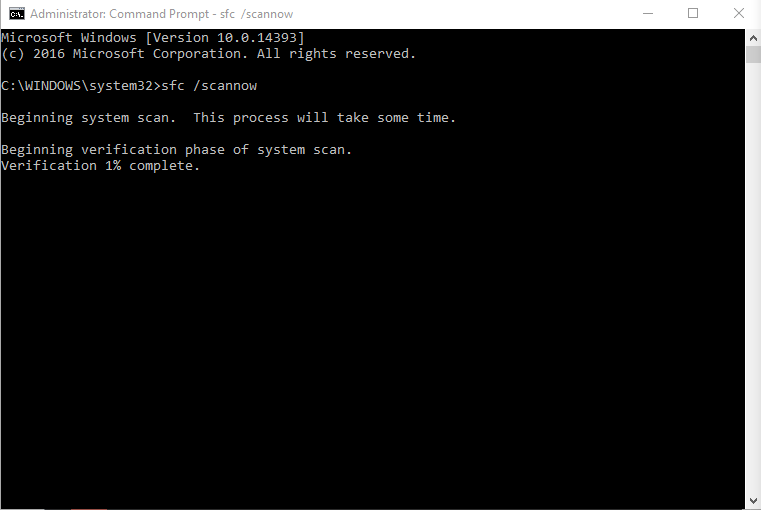
- Wait for the scan to complete. It may take some time.
- If any corrupted files are found, the System File Checker will attempt to repair them automatically.
- Once the process is finished, restart your computer and check if the issue is resolved.
Solution 3: Update Graphics Drivers
- Open Device Manager by pressing the Windows + X keys and selecting Device Manager.
- Expand the Display adapters category.
- Right-click on your graphics card and select Update driver.
- Choose the option to Search automatically for updated driver software.
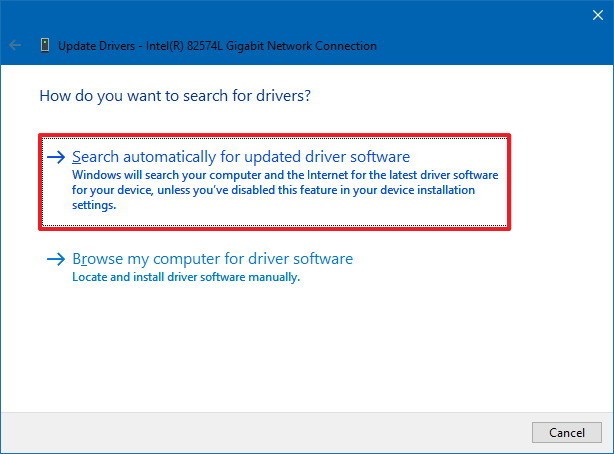
- Wait for the process to complete and follow any on-screen instructions.
- Restart your computer and check if the “Please Wait” screen issue is resolved.

python

import time
def resolve_please_wait_issue():
# Simulating a process that gets stuck on "Please wait"
print("Performing some operation...")
time.sleep(5) # Simulating a delay of 5 seconds
# Checking if stuck on "Please wait"
print("Checking if stuck on 'Please wait'...")
time.sleep(3) # Simulating a delay of 3 seconds
# Attempting to resolve the issue
print("Attempting to resolve the issue...")
time.sleep(2) # Simulating a delay of 2 seconds
# Checking if issue resolved
print("Checking if the issue is resolved...")
time.sleep(1) # Simulating a delay of 1 second
# Final result
if is_issue_resolved():
print("The issue has been resolved.")
else:
print("Unable to resolve the issue.")
def is_issue_resolved():
# Simulating a check to determine if the issue is resolved
return True # Assuming the issue is resolved
# Calling the function to resolve the issue
resolve_please_wait_issue()
Run Windows Update Troubleshooter
If your Windows 10/11 is stuck on the “Please Wait” screen, try running the Windows Update Troubleshooter to resolve the issue.
1. Press the Windows key + I to open the Settings app.
2. Click on “Update & Security” and then select “Troubleshoot” from the left-hand menu.
3. Scroll down and click on “Windows Update” under “Get up and running.”
4. Click on “Run the troubleshooter” and follow the on-screen instructions.
This troubleshooter will scan for any issues with Windows Update and attempt to fix them automatically. Once it has completed, restart your computer and check if the “Please Wait” screen issue has been resolved.
Install Windows Updates
If your Windows 10/11 is stuck on the “Please Wait” screen, try these steps to resolve the issue:
1. Start by pressing the Ctrl + Alt + Del keys together and select Task Manager.
2. In the Task Manager window, click on the File menu and select Run new task.
3. Type explorer.exe and click OK to restart the Windows Explorer process.
4. If that doesn’t work, try restarting your computer in Safe Mode and check for any pending updates.
5. To do this, press the Windows key + R to open the Run dialog box, type msconfig, and press Enter.
6. In the System Configuration window, go to the Boot tab and check the Safe boot option under Boot options. Click OK and restart your computer.
7. Once in Safe Mode, open Settings, go to Update & Security, and click on Windows Update.
8. Click on Check for updates and install any available updates.
9. After the updates are installed, restart your computer normally and see if the “Please Wait” screen issue is resolved.
If you are still experiencing the issue, it is recommended to seek further assistance from Microsoft Support or visit their community forums for additional troubleshooting steps.
Disable Windows Services and Run DISM/SFC Tools
To resolve the issue of Windows 10/11 being stuck on the Please Wait screen, you can try disabling certain Windows services and running the DISM/SFC tools. Here’s how:
1. Press the Windows key + R to open the Run dialog box.
2. Type services.msc and press Enter to open the Services window.
3. Locate the GPSVC (Group Policy Client) service and double-click on it.
4. Change the Startup type to Manual and click Apply, then OK.
5. Close the Services window.
Next, we’ll run the DISM/SFC tools:
1. Press the Windows key + X and select Command Prompt (Admin).
2. In the Command Prompt window, type sfc /scannow and press Enter. Let it complete the scan.
3. If any errors are found, type dism /online /cleanup-image /restorehealth and press Enter. Wait for it to finish.
Once the process is complete, restart your computer and check if the issue is resolved.


