
In the realm of data mishaps, the frustration of encountering corrupted files can be all too familiar. Fear not, for Windows 10 has a trusty ally known as System File Checker (SFC) that comes to the rescue. This article delves into the art of repairing corrupted files on Windows 10 using the reliable and efficient SFC tool.
Run the System File Checker tool (SFC.exe)
To repair corrupted files on Windows 10, you can use the System File Checker tool (SFC.exe). This tool helps identify and fix issues with system files that may be causing problems on your PC.
Here’s how to run the System File Checker tool:
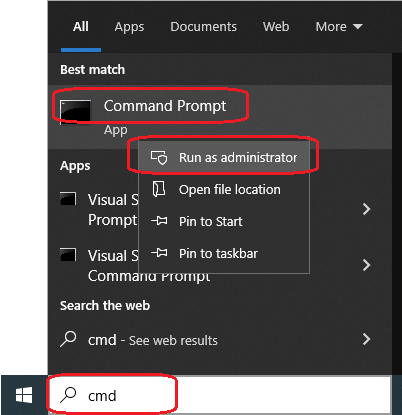
1. Open the Command Prompt as an administrator. You can do this by searching for “Command Prompt” in the Start menu, right-clicking on it, and selecting “Run as administrator.”
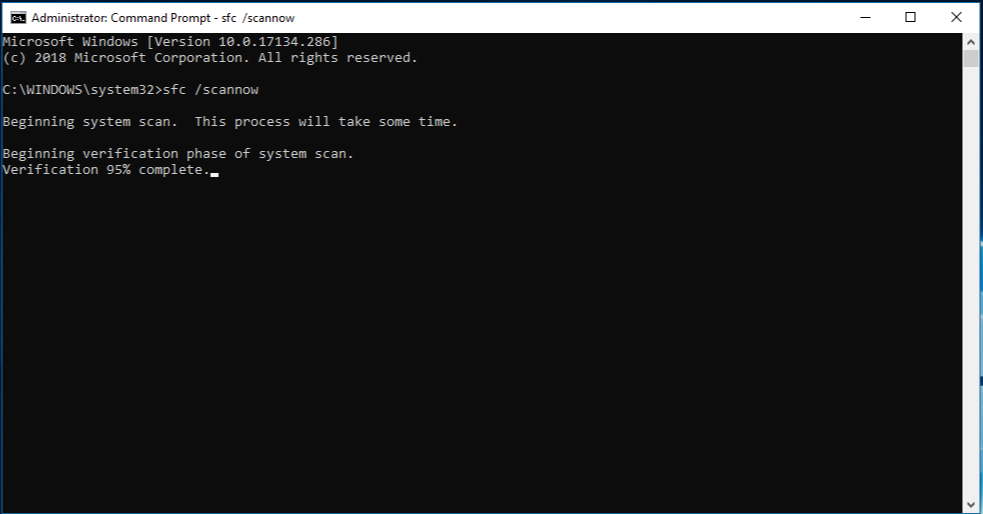
2. In the Command Prompt window, type “sfc /scannow” and press Enter. This command will initiate a scan of your system files and attempt to repair any issues it finds.
3. Wait for the scan to complete. It may take some time, so be patient.
4. Once the scan is finished, check the Command Prompt window for any messages regarding missing or corrupted files. If there are any issues, the System File Checker tool will attempt to repair them automatically.
Check expert solutions to eliminate or replace corrupt files
- Step 1: Open the Command Prompt as an administrator.
- Press the Windows key on your keyboard.
- Type “Command Prompt” into the search bar.
- Right-click on Command Prompt and select Run as administrator.
- Step 2: Run the System File Checker (SFC) scan.
- Type “sfc /scannow” into the Command Prompt.
- Press Enter to start the scan.
- Wait for the scan to complete. This may take some time.
- Step 3: Review the scan results.
- Once the scan is finished, check if any corruption or errors are detected.
- If corruption is found, proceed to the next step.
- If no corruption is found, the scan did not detect any issues.
- Step 4: Repair corrupted files using the System File Checker.
- Type “dism /online /cleanup-image /restorehealth” into the Command Prompt.
- Press Enter to start the repair process.
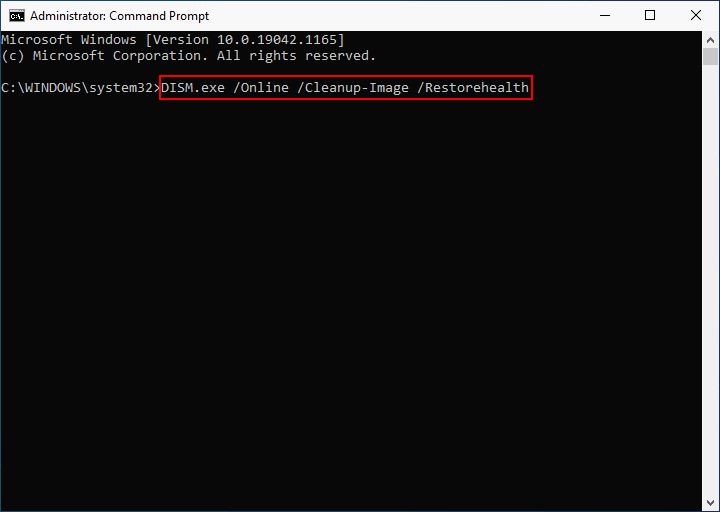
- Wait for the repair to complete. This may take some time.
- Step 5: Restart your computer.
- Once the repair process is finished, restart your computer to apply the changes.
- After the restart, check if the corrupted files have been repaired.

What causes corrupt system files in Windows 10?
Corrupt system files in Windows 10 can cause a variety of issues, including crashes, blue screens, and application errors. These corruptions can occur due to a variety of reasons such as power outages, improper shutdowns, or malware infections. To repair corrupted files on Windows 10, you can use the System File Checker (SFC) tool.
Here’s how to use the SFC tool:
1. Open the Command Prompt as an administrator.
2. Type “sfc /scannow” and press Enter.
3. The tool will scan your system for any missing or corrupted files and attempt to repair them.
4. If the SFC tool is unable to repair the files, you can try using the Deployment Image Servicing and Management (DISM) tool to restore system health.
5. To use DISM, open Command Prompt as an administrator and type “dism /online /cleanup-image /restorehealth” and press Enter.
6. Once the repair process is complete, restart your PC to apply the changes.
Repairing corrupted files using the SFC and DISM tools can help resolve various system issues and ensure smooth performance on your Windows 10 system.
python

import os
def find_corrupted_files(directory):
corrupted_files = []
for root, dirs, files in os.walk(directory):
for file in files:
file_path = os.path.join(root, file)
try:
with open(file_path, 'r') as f:
f.read()
except UnicodeDecodeError:
corrupted_files.append(file_path)
except (IOError, OSError):
corrupted_files.append(file_path)
return corrupted_files
# Example usage
corrupted_files = find_corrupted_files('C:\\Users\\YourUsername\\Documents')
print("Corrupted files:")
for file in corrupted_files:
print(file)
The above code utilizes the `os` module in Python to recursively search for files within a specified directory. It then attempts to open each file and read its contents. If any exceptions related to file corruption occur (such as `UnicodeDecodeError`, `IOError`, or `OSError`), the file path is added to the `corrupted_files` list. Finally, the code prints out the list of potentially corrupted files found within the given directory.
How do I fix corrupted files on Windows 10?
To repair corrupted files on Windows 10, you can use the System File Checker (SFC) tool. Follow these steps:
1. Press the Windows key + X and select “Command Prompt (Admin)” from the menu. Alternatively, you can press Windows key + R, type “cmd,” and press Ctrl + Shift + Enter.
2. In the command prompt, type “sfc /scannow” and press Enter. This will initiate a scan of your system files.
3. The scan may take some time to complete. Once finished, the tool will attempt to repair any corrupted files it finds.
4. If the SFC tool is unable to repair the files, you can try using the DISM command with the “/RestoreHealth” option to restore the files from a repair source.
5. After the repair process is complete, restart your computer to apply the changes.
Use the DISM tool
To repair corrupted files on Windows 10, you can use the DISM (Deployment Image Servicing and Management) tool.
Here are the steps to follow:
1. Open Command Prompt as an administrator.
2. Type “dism /online /cleanup-image /restorehealth” and press Enter to scan and repair corrupted system files.
3. Wait for the scan to complete. It may take some time.
4. Once the scan is finished, restart your computer.
Using the DISM tool can help fix various issues, such as component corruption or missing files. It is a reliable method recommended by experts to resolve problems that may cause crashes, blue screens, or other errors on your Windows 10 system.
By repairing corrupted files, you can ensure that your system functions properly and that applications, icons, and files are not affected by any unreadable or damaged data.
Run a SFC scan from Safe Mode
To repair corrupted files on Windows 10 with System File Checker (SFC), you can run a scan from Safe Mode. This can be useful if you’re experiencing issues such as blue screen errors or component corruption. Here’s how to do it:
1. Restart your computer and press the F8 key repeatedly until the Advanced Boot Options menu appears.
2. Select Safe Mode and press Enter to boot into Safe Mode.
3. Once in Safe Mode, open the Command Prompt by pressing the Windows key + X and selecting “Command Prompt (Admin).”
4. In the Command Prompt, type “sfc /scannow” and press Enter. This will initiate the SFC scan.
5. The scan may take some time to complete. Once it’s done, it will display the results.
6. If the scan detects any missing or corrupted files, it will attempt to repair them automatically.
Running an SFC scan from Safe Mode can help resolve various issues with your Windows 10 system files.
Perform a SFC scan before Windows 10 starts
Performing a System File Checker (SFC) scan can help repair corrupted files on Windows 10. Before starting Windows 10, follow these steps:
1. Press the Windows key + X and select “Command Prompt (Admin)” or “Windows PowerShell (Admin)”.
2. In the command prompt, type “sfc /scannow” and press Enter.
3. The scan will start and check for any corrupted files. It may take some time to complete.
4. If the scan finds any corrupted files, it will attempt to repair them automatically. If it cannot repair them, it will provide a detailed report of the errors.
5. After the scan is complete, restart your computer.
Performing an SFC scan is a useful troubleshooting step to fix various issues, such as blue screen errors, missing icons, or unreadable Excel files. It is recommended to run the scan regularly to ensure the stability and performance of your Windows 10 system.
Replace the files manually
To manually replace corrupted files on Windows 10 using the System File Checker (SFC) tool, follow these steps:
1. Open the Command Prompt as an administrator.
2. Type “sfc /scannow” and press Enter.
3. The SFC tool will scan and repair any missing or corrupted files on your system.
4. If the tool finds any issues, it will automatically replace the corrupted files with a cached copy from a Windows component store.
5. Once the scan is complete, restart your computer to apply the repairs.
Note: If you encounter difficulty with the SFC tool, you can also try running it in Safe Mode or using the Deployment Image Servicing and Management (DISM) tool for further repairs.
By following these steps, you can easily replace corrupted files on Windows 10 and restore your system to normal functionality.


