
In this article, we delve into the frustrating issue of PCs refusing to go to sleep, uncovering effective techniques to resolve the sleep mode glitch in Windows 10/11.
Adjusting Power Options and Troubleshooting Sleep Mode
If your PC is not going to sleep or waking up from sleep mode, there are a few adjustments and troubleshooting steps you can take to fix the issue.
Start by checking your power options. Go to the Control Panel and navigate to “Power Options.” From there, select “Change plan settings” and then “Change advanced power settings.”
In the Power Options dialog box, navigate to “Sleep” and ensure that the settings are configured correctly. Adjust the time it takes for your PC to go into sleep mode and the actions it should take when waking up.
If adjusting the power options doesn’t solve the problem, you may need to troubleshoot further. First, check for any recently installed software or drivers that could be causing conflicts. Update or uninstall these if necessary.
Next, scan your PC for malware threats that could be interfering with sleep mode. Use a reputable antivirus program to ensure your system is clean.
Finally, check for any external sources that could be causing your PC to wake up unexpectedly, such as a mouse or vibrations from nearby devices. Disconnect or adjust these as necessary.
Updating Device Drivers for Sleep Mode Issues
If your PC is not going to sleep properly and you’re experiencing sleep mode issues, it could be related to outdated or malfunctioning device drivers. Here are some concise steps to update your device drivers and resolve the sleep mode problem:
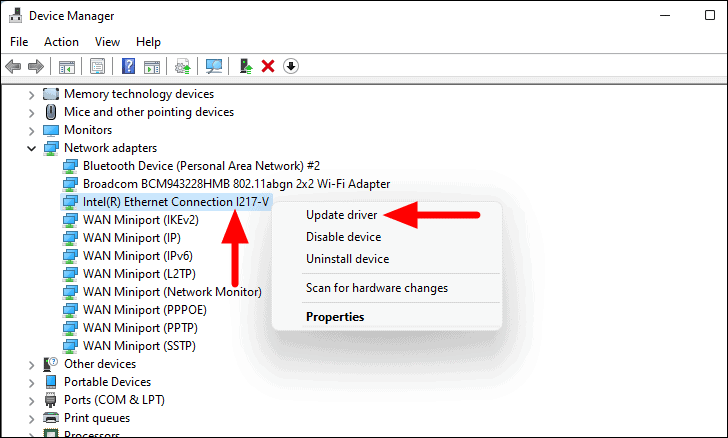
1. Press the Windows key + X and select “Device Manager” from the menu.
2. In the Device Manager window, locate the problematic device(s) under the relevant categories (e.g., Display adapters, Network adapters).
3. Right-click on the device and select “Update driver.”
4. Choose the option to automatically search for updated driver software.
5. If Windows doesn’t find any updates, you can manually download the latest driver from the manufacturer’s website.
6. Install the downloaded driver and restart your computer.
7. After the restart, check if the sleep mode issue has been resolved.
By keeping your device drivers up to date, you can ensure optimal performance and address sleep mode problems effectively.
Temporarily Disabling PC Mouse for Sleep Mode
If your PC is not going to sleep properly and you suspect that the mouse is causing the issue, you can temporarily disable the mouse for sleep mode.
To do this, follow these steps:
1. Press the Windows key + X and select “Device Manager” from the menu.
2. Expand the “Mice and other pointing devices” category.
3. Right-click on your mouse and select “Properties.”
4. Go to the “Power Management” tab.
5. Check the box that says “Allow this device to wake the computer.”
6. Uncheck the box that says “Allow this device to wake the computer.”
7. Click “OK” to save the changes.
By disabling the mouse for sleep mode, you can eliminate any potential issues caused by mouse movements or vibrations waking up your computer. Remember to re-enable the mouse for normal use after addressing the sleep issue.
python

import pyautogui

import time
def prevent_sleep():
while True:
# Move the mouse cursor slightly every 30 seconds
pyautogui.move(1, 1)
time.sleep(30)
prevent_sleep()
This code uses the `pyautogui` library to move the mouse cursor by a small amount every 30 seconds. The continuous mouse movement can trick the system into thinking that user activity is ongoing, potentially preventing sleep mode from activating. However, note that this is not a foolproof solution and may not work on all systems or OS versions. Additionally, running this tool indefinitely can cause unnecessary resource consumption and may not be an ideal approach.
Ensuring Sleep Mode is Enabled and Resolving Update-related Sleep Issues
To ensure sleep mode is enabled and resolve update-related sleep issues on your Windows 10/11 PC, follow these steps:
1. Check your power settings: Go to the Control Panel and search for “power options.” Select “Change when the computer sleeps” and make sure the sleep mode is enabled for both battery and plugged-in scenarios.
2. Update your device drivers: Outdated drivers can cause sleep issues. Open the Device Manager, right-click on each device, and select “Update driver.” Alternatively, you can use the Windows Update feature to automatically update your drivers.
3. Scan for malware threats: Malware can interfere with sleep mode. Run a full system scan using your preferred antivirus software to detect and remove any threats.
4. Reset Windows files: Corrupted system files can also cause sleep problems. Open the Command Prompt as an administrator and enter the command “sfc /scannow” to scan and repair any damaged files.
5. Disable unnecessary startup programs: Some programs may prevent your PC from entering sleep mode. Press Ctrl + Shift + Esc to open the Task Manager, go to the “Startup” tab, and disable any unnecessary applications.
Troubleshooting PC Wake-up Problems
If your PC is experiencing wake-up problems and not going to sleep properly, there are a few troubleshooting steps you can take to fix the issue.
First, check your device drivers and ensure they are up to date. Outdated drivers can sometimes cause sleep mode problems.
Next, examine your power settings. Adjust the settings to allow your PC to enter sleep mode without any issues.
If the problem persists, check for any software conflicts or applications that may be preventing your PC from going to sleep. Close any unnecessary programs and test sleep mode again.
Additionally, make sure your PC is free from malware or viruses, as they can interfere with sleep mode functionality.
Lastly, run a system file check to scan for any corrupted Windows files that may be causing the problem.
Checking Device Settings to Resolve Sleep Mode Problems
| Checking Device Settings to Resolve Sleep Mode Problems |
|---|
Article Title:PC Not Going to Sleep – How to Fix Windows 10/11 Sleep Mode Issue |
Step 1: Check Power OptionsMake sure your power settings are correctly configured.
|
Step 2: Update Device DriversOutdated or incompatible device drivers can cause sleep mode issues.
|
Step 3: Disable Wake TimersWake timers can prevent your PC from entering sleep mode.
|
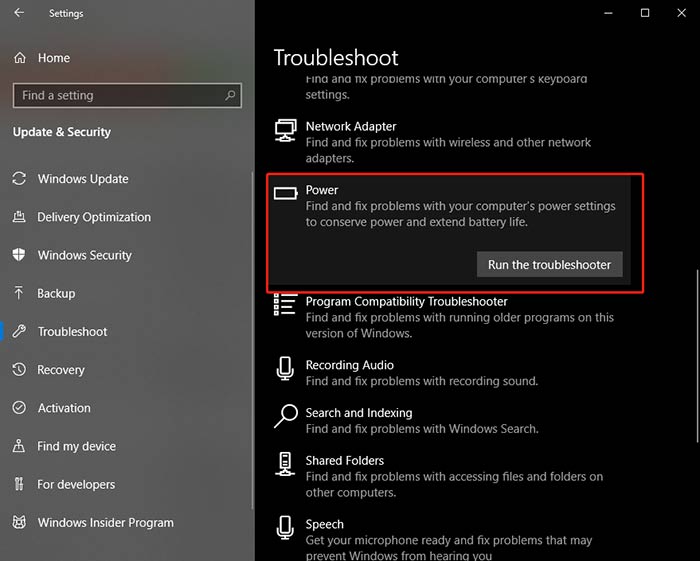
Step 4: Check Power TroubleshooterWindows has a built-in power troubleshooter that can help diagnose sleep mode issues.
|

Understanding Sleep Mode and Differentiating from Hibernation
Sleep Mode and Hibernation are two power-saving options on your PC that can help conserve energy and extend battery life. While they may seem similar, there are key differences between them.
Sleep Mode is a power-saving state that allows your PC to quickly resume full-power operation when you want to start working again. It keeps your documents and applications open, while putting your computer into a low-power state. This means you can pick up right where you left off, without waiting for your PC to start up.
Hibernation, on the other hand, saves everything in your computer’s memory to the hard disk and shuts down the computer. When you turn on your PC again, it restores your previous session.
If your PC is not going to sleep or waking up from sleep unexpectedly, there are a few fixes you can try:
1. Check Power Settings: Go to Power Options in the Control Panel and make sure the sleep settings are configured correctly.
2. Update Device Drivers: Outdated or incompatible device drivers can cause sleep issues. Visit the manufacturer’s website to download and install the latest drivers.
3. Disable Wake-on-LAN: Wake-on-LAN allows your PC to be woken up by network activity. Disabling this feature can prevent unwanted wake-ups.
4. Scan for Malware: Malware can interfere with sleep mode. Run a full system scan with your antivirus software to ensure your PC is clean.
By following these steps, you should be able to troubleshoot and resolve sleep mode issues on your PC. Remember, there are plenty of resources and solutions available online if you need further assistance.


