Fix iPad Earphone Not Working??????Tips

Having trouble with your iPad earphones not working? Here are some tips to help you fix the issue.

Common Reasons for Headphone Jack Issues

Headphone jack with an X mark symbolizing issue

If you are experiencing problems with your iPad earphones not working, try cleaning the headphone jack with a small brush or compressed air to remove any debris that may be causing the issue.

Another solution could be to try using a different pair of headphones to see if the problem lies with the headphones themselves.

If the problem persists, you may want to restart your iPad to see if that resolves the issue.

If none of these solutions work, it may be best to visit an Apple Store or Genius Bar for further troubleshooting or to inquire about potential warranty options.

Troubleshooting Steps and DIY Fixes

  • Check the Earphone Connection

    • Ensure the earphone is fully plugged into the iPad’s headphone jack.
    • Try removing and reinserting the earphone to see if it makes a proper connection.
    • Inspect the earphone for any damage or debris that may be blocking the connection.
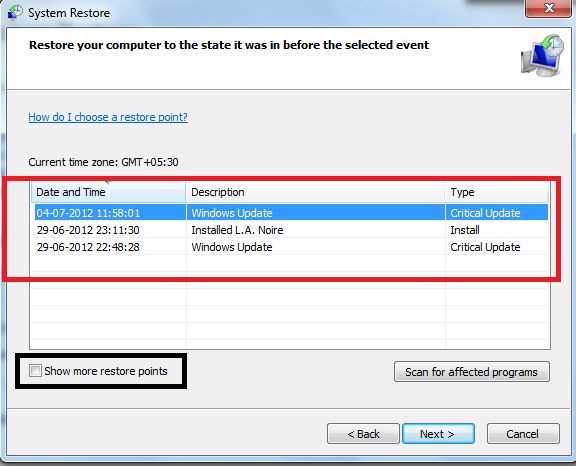
  • Restart the iPad

    • Hold down the power button until the “Slide to Power Off” slider appears.
    • Slide the slider to turn off the iPad.
    • Wait a few seconds, then press the power button again to turn on the iPad.
  • Check Volume Settings

    • Adjust the volume using the volume buttons on the side of the iPad.
    • Make sure the volume is not muted or turned down too low.
    • Try playing audio from another app to see if the issue is specific to one app.

Professional Repair and Replacement Process

If the earphone on your iPad is not working, you may need to repair or replace it. Here is a professional process to help you fix the issue:

First, check the earphone connection to ensure it is plugged in properly. Sometimes a loose connection can cause the problem.

If the connection is secure and the earphone still does not work, try using a different pair of earphones to see if the issue is with the original pair.

If the problem persists, restart your iPad to see if that resolves the issue. Sometimes a simple restart can fix technical glitches.

If none of the above steps work, you may need to contact Apple support or visit an Apple store for further assistance. They can help diagnose the problem and offer solutions such as repair or replacement.

Post-Repair Checks and Additional Tips

iPad with earphones plugged in

After completing the repair process for the iPad earphone not working issue, it is important to perform post-repair checks to ensure everything is functioning correctly.

Firstly, test the earphones on another device to rule out any issues with the earphones themselves.

Secondly, try restarting the iPad to see if that resolves the problem.

Thirdly, check the audio settings on the iPad to make sure they are correctly configured.

If the issue persists, it may be necessary to seek further assistance from Apple support or visit a Genius Bar for professional help.

Additionally, it is always a good idea to avoid exposing your iPad to moisture and keep it away from extreme temperatures to prevent any potential damage to the earphone jack.

FAQ

Why are my headphones not working when I plug them in iPad?

Your headphones may not be working when plugged into your iPad due to a variety of reasons. First, try using a different pair of headphones to ensure the issue is not with the earphones themselves. If the problem persists, you may need to try a Hard Reset on your iPad. If the issue continues, it is possible that the headphone jack connector needs to be replaced.

Why are my earphones not working when I plug them in?

Your earphones may not be working when you plug them in due to a bent or damaged audio jack, cable, or internal headphone damage. Check for physical damage on the jack and cable to troubleshoot the issue.

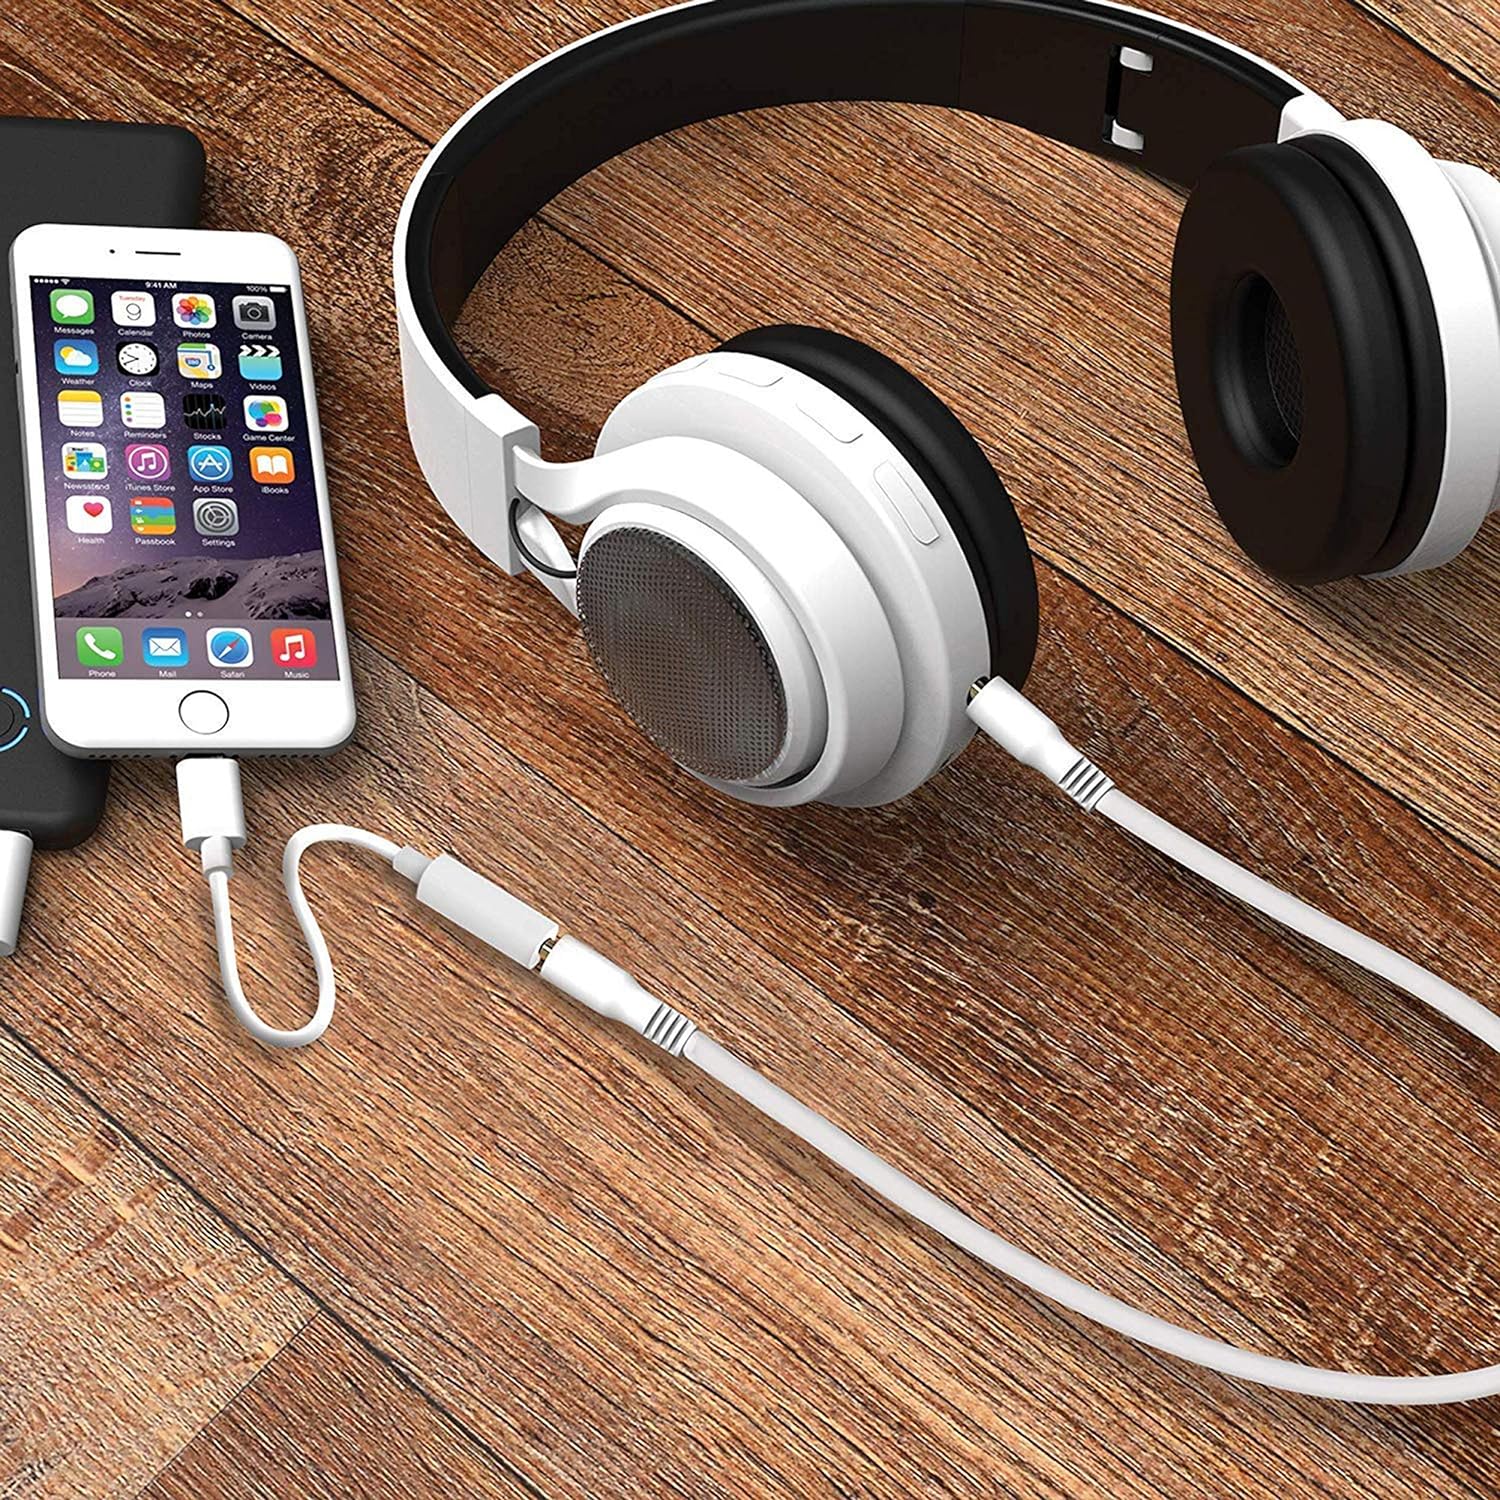
How do I get my wired headphones to work on my iPad?

To get your wired headphones to work on your iPad, you can use a USB-C to 3.5 mm Headphone Jack Adapter. Simply plug the adapter into the USB-C port on your iPad and then plug your headphones into the adapter.

How do I get my iPad out of headphone mode?

To get your iPad out of headphone mode, try switching to speaker or enabling airplane mode. Simply go into settings and toggle on airplane mode to resolve the issue.

Garmin Express Uninstall Failed, Try Again

Having trouble uninstalling Garmin Express? Keep getting the “Uninstall failed, try again” message? Here’s what to do next.

Reasons Behind Uninstallation Attempts

Some common reasons behind failed Garmin Express uninstallation attempts include conflicts with other software, corrupted installation files, or insufficient permissions. Make sure to close all Garmin Express-related processes and try again. If that doesn’t work, boot your computer in Safe Mode and attempt the uninstallation. It may also be helpful to run a Windows Registry cleaner to fix any issues that could be causing the problem. If all else fails, contact Garmin support for further troubleshooting assistance.

Common Uninstallation Problems

Garmin Express uninstallation error message

  • Check for any running processes related to Garmin Express:

    • Open Task Manager by pressing Ctrl+Shift+Esc
    • Look for any Garmin Express processes running
    • End the process by selecting it and clicking on End Task
  • Use Control Panel to uninstall Garmin Express:

    • Press Windows key + R to open the Run dialog box
    • Type appwiz.cpl and press Enter
    • Locate Garmin Express in the list of installed programs
    • Click on Uninstall and follow the on-screen instructions
  • Clean up remaining files and registry entries:

    • Delete the Garmin Express folder from C:\Program Files
    • Press Windows key + R to open the Run dialog box
    • Type regedit and press Enter to open the Registry Editor
    • Navigate to HKEY_CURRENT_USER\Software and HKEY_LOCAL_MACHINE\Software
    • Delete any Garmin Express entries

Complete Uninstallation Methods

1. Use the Uninstaller Tool: Locate the Garmin Express uninstaller in the programs folder and run it to remove all program files.

2. Manually Delete Remaining Files: Go to the program files and app data folders to delete any remaining Garmin Express files.

3. Clear Registry Entries: Use the Windows Registry Editor to remove any Garmin Express registry entries.

4. Reboot Your Computer: Restart your computer after completing the uninstallation process to ensure all changes are applied.

Utilizing Third-party Tools for Removal

If Garmin Express uninstallation fails, try using third-party tools to remove the software completely. Some tools like Revo Uninstaller or CCleaner can help you get rid of stubborn programs. Download one of these tools and run it on your computer. Follow the on-screen instructions to scan for Garmin Express and remove it from your system.

Make sure to restart your computer after the process is complete to ensure the software is fully removed.

F.A.Qs

How do I uninstall Garmin Express?

To uninstall Garmin Express, you can go to Apps and Features or Programs and Features, locate Garmin Express in the list, and then click on uninstall to initiate the uninstallation process.

How do I uninstall Garmin from my Mac?

To uninstall Garmin from your Mac, you can open Finder, click on Go in the menu bar, select Computer, and then drag the Garmin device to the Trash to remove it safely.

How do I uninstall Garmin update?

To uninstall a Garmin update, you can navigate to the Settings menu from the Start menu, select Apps & features, and scroll down to find the Garmin Express or Garmin WebUpdater that you want to remove. Highlight the app and select uninstall.

Why won’t Garmin Express work?

Garmin Express may not work due to issues with the USB cable, USB ports, or outdated software. Try using a different USB cable, checking the USB ports, force quitting Garmin Express, restarting the computer, and ensuring that Garmin Express is up to date.

Fix Windows 10/11 Work Folder Sync Error 0x8007017C

In my experience, fixing Windows 10/11 Work Folder Sync Error 0x8007017C can be frustrating.

Symptoms and Causes

To troubleshoot this error: First, check for any pending Windows updates and install them to ensure your operating system is up to date. It is also recommended to run a System Restore to revert your system to a previous state where the error did not occur. Additionally, you can try resetting the Work Folder settings in Control Panel or reinstalling the Work Folder feature on your computer. If these steps do not resolve the issue, consider seeking assistance from Microsoft support or IT professionals for further diagnosis and resolution.

Resolution Methods

  • Check Network Connection:
    • Ensure your device is connected to a stable internet connection.
    • Check for any network issues or outages that may be affecting the sync process.
  • Restart Work Folder Sync:
    • Open Settings by pressing Windows key + I.
    • Navigate to Accounts > Work Access.
    • Click on Sync and then select Sync now.
  • Reset Work Folder:
    • Open Control Panel by searching for it in the Windows search bar.
    • Go to System and Security > Work Folders.
    • Click on Stop Sync and then Start Sync to reset the work folder.

Perform a System Restore

Windows system restore screen

1. Open the Control Panel by typing “Control Panel” in the search bar and pressing Enter.

2. Click on “Recovery” and then select “Open System Restore.”

3. Follow the on-screen instructions to choose a restore point before the error occurred.

After the System Restore process is complete, your Windows operating system should be restored to a previous state where the Work Folder Sync Error 0x8007017C was not present.

Uninstall Problematic Updates

1. Open the Control Panel by searching for it in the Windows search bar.

2. Click on “Programs” and then “Programs and Features.”

3. In the list of installed programs, locate the problematic update that may be causing the sync error.

4. Right-click on the update and select “Uninstall.”

5. Follow the on-screen instructions to complete the uninstallation process.

6. Restart your computer and check if the Work Folder sync error 0x8007017C has been resolved.

If the issue persists, consider checking for any additional updates or reaching out to Microsoft support for further assistance.

Disable On-demand File Access

To disable on-demand file access, open File Explorer and go to the View tab. Click on Options and then on the View tab. Uncheck the box that says “Show placeholders for files.” This will ensure that all files are fully downloaded to your device.

If you are using Windows 10 Pro or Enterprise, you can also use Group Policy to disable on-demand file access. Open the Group Policy Editor by pressing Windows key + R, typing “gpedit.msc,” and hitting Enter. Navigate to User Configuration > Administrative Templates > Windows Components > OneDrive and double-click on “Prevent the usage of OneDrive for file storage.” Set it to Enabled.

After making these changes, restart your computer and try syncing your Work Folder again. Hopefully, this will resolve the error 0x8007017C and allow you to access your files without any issues.

Conclusion and Author’s Note

In conclusion, fixing Windows 10/11 Work Folder Sync Error 0x8007017C is essential for smooth file synchronization. By following the steps outlined in this article, users can resolve this issue and ensure seamless syncing between their devices. Remember to regularly check for Windows updates and keep your system up to date to prevent future errors.

Thank you for reading and we hope this article has been helpful in resolving the sync error. If you have any further questions or need assistance, feel free to reach out to Microsoft support for additional troubleshooting.

FAQs

Why is OneDrive not syncing?

OneDrive is not syncing because the file may be open and in use by another application. Simply close the file, allow OneDrive to process the update, and then you should be able to open it again.

What is the on demand file access feature?

The on demand file access feature allows you to view all your files as online-only in File Explorer without taking up space. You can access these files when connected to the Internet and choose specific ones to be available offline as well.

What is error code 0x800701AA?

Error code 0x800701AA typically occurs when accessing, downloading, copying, or opening shared files in Microsoft OneDrive. It indicates that the Cloud operation did not complete before the time-out period expired.

Troubleshooting Canon Printer Not Printing Fix

In this article, I will discuss common troubleshooting steps to fix a Canon printer that is not printing.

Diagnosing and Repairing Issues

If the problem persists, check the printer settings on your computer. Make sure that the printer is set as the default printer and that there are no pending print jobs in the queue. You can also try printing a test page to see if the issue is with a specific document or if it is a more general problem.

If the printer still isn’t printing, check for any error messages on the printer’s display. These messages can provide valuable information about what is causing the issue. Additionally, make sure that there is paper in the printer and that the ink or toner cartridges are not empty.

Troubleshooting Paper and Printing Problems

  • Check for paper jams:

    • Open the printer cover and check for any stuck paper or debris.
    • Remove any jammed paper carefully to avoid tearing.
    • Clean the rollers with a damp cloth to ensure smooth paper feed.
  • Check paper size and type:

    • Make sure the paper loaded matches the settings in the printer driver.
    • Check for any wrinkled or damaged paper that may be causing printing issues.
    • Use high-quality paper recommended for your printer model.
  • Run a printer self-test:

    • Access the printer’s menu or control panel to initiate a self-test.
    • Follow the on-screen instructions to print a test page.
    • Check for any errors or missing colors on the test page.

Updating and Managing Printer Drivers

To update and manage printer drivers for your Canon printer, you can easily do so through your computer’s Control Panel. Start by navigating to the Control Panel on your Windows computer and locate the Devices and Printers section. From there, find your Canon printer and right-click on it to access the context menu.

Look for an option that says “Update Driver” or “Manage Driver” and follow the prompts to update the driver software. This will ensure that your printer is using the latest software and will help troubleshoot any printing issues you may be experiencing.

If you are still having problems after updating the drivers, you may need to uninstall the printer and then reinstall it. Go back to the Devices and Printers section in the Control Panel, right-click on your Canon printer, and select “Remove Device.” Then, follow the prompts to reinstall the printer and see if that resolves the issue.

By updating and managing your printer drivers, you can ensure that your Canon printer is functioning properly and printing without any issues.

Examining Connectivity and Network Settings

Step Description
1 Check the network connections: Make sure the printer is connected to the same network as the computer. Verify that the Wi-Fi or Ethernet connection is working properly.
2 Restart the printer and router: Sometimes a simple restart can fix connectivity issues. Turn off the printer and router, wait a few seconds, and then turn them back on.
3 Update printer firmware: Check for any available firmware updates for your Canon printer. Updating the firmware can improve connectivity and fix bugs.
4 Reset network settings: If all else fails, you can reset the network settings on the printer. This will remove all network configurations, so you will need to set it up again.
5 Contact Canon support: If you have tried all the troubleshooting steps and still cannot get your printer to print, it may be time to contact Canon support for further assistance.

Handling Specific Documents and Applications

When troubleshooting your Canon printer not printing, it’s important to first check for specific issues with documents and applications.

If certain documents are not printing, make sure they are not stuck in the print queue. Open the Control Panel on Windows and navigate to Devices and Printers. Right-click on your Canon printer and select See what’s printing. From here, you can cancel any pending print jobs.

Additionally, ensure that the application you are trying to print from is compatible with your printer. Some applications may not work well with certain printer models. Try printing from a different application or file to see if the issue persists.

If you are experiencing problems with specific settings like duplex printing or Wi-Fi connectivity, check the printer menu for any errors. Access the printer menu and navigate to the appropriate settings to make sure everything is configured correctly.

F.A.Qs

Why is my Canon printer not printing anything?

Your Canon printer may not be printing anything due to a clogged or dried out printhead. This is a common issue caused by ink or dust drying up and blocking the nozzle.

Why is my printer connected but not printing?

Your printer may be connected but not printing due to various reasons. First, you should check the connection to ensure that the printer is properly connected to your computer or network. If it’s a wireless printer, verify the Wi-Fi connection and make sure it is connected to the correct network. Additionally, check for any paper jams in the printer and carefully remove any jammed paper if necessary.

Why is my printer not printing anything even though it has ink?

Your printer may not be printing anything even though it has ink due to issues with the ink cartridges. Check for compatibility, make sure they are installed correctly, clean the contacts, restart the printer, and replace the cartridges if needed.

iPhone 7 Constant Reboot Loop Fix Solutions 2024

If you’re experiencing a constant reboot loop issue with your iPhone 7, you’re not alone. In this article, I will discuss some potential solutions to fix this problem in 2024.

Identifying Causes of Boot Loop Issues

To identify the causes of boot loop issues on your iPhone 7, start by checking for any recent software updates or installations that may have triggered the problem. Connect your iPhone 7 to your Mac using a USB cable and launch Finder or iTunes to see if there are any pending updates or patches available for your device.

Next, consider if any physical damage or liquid exposure could be causing the reboot loop. Inspect the exterior of your iPhone 7 for any signs of damage and ensure that all ports are clean and free from debris.

If the issue persists, try performing a hard reset on your iPhone 7. Press and hold the Power button along with the Volume Down button simultaneously until the Apple logo appears on the screen. This can sometimes resolve boot loop problems caused by software glitches.

Lastly, if none of the above solutions work, consider restoring your iPhone 7 to factory settings. Make sure to back up your data before proceeding with a factory reset to avoid losing any important information.

Effective Solutions for Boot Loop Without Data Loss

  • Press and hold the Volume Down button and Power button simultaneously.
  • Continue holding both buttons until the Apple logo appears on the screen.
  • Release both buttons and wait for the device to restart.

Update iOS to the Latest Version

  • Go to Settings on your iPhone.
  • Select General and then Software Update.
  • If an update is available, download and install it.
  • Restart your device once the update is complete.

Use iTunes to Restore Your iPhone

  • Connect your iPhone to your computer and open iTunes.
  • Select your device in iTunes and choose Restore.
  • Follow the on-screen instructions to complete the restoration process.
  • Once the process is finished, set up your iPhone as a new device.

Restoring and Resetting Techniques to Address Reboot Loop

If your iPhone 7 is stuck in a constant reboot loop, there are a few restoring and resetting techniques you can try to fix the issue.

First, try performing a hard reset by pressing and holding the power and volume down buttons simultaneously until the Apple logo appears. This can sometimes help break the cycle of continuous rebooting.

If that doesn’t work, you can try restoring your iPhone 7 using iTunes on a computer. Connect your iPhone to the computer, open iTunes, and select the option to restore your device. Make sure to back up your data before doing this to avoid losing any important information.

If the issue persists, you may need to put your iPhone 7 into DFU (Device Firmware Update) mode and restore it using iTunes. This is a more advanced troubleshooting step, so make sure to follow a detailed guide to avoid any mistakes.

Preventative Measures to Avoid Future Boot Loop Problems

To prevent future boot loop problems on your iPhone 7, there are a few preventative measures you can take. Firstly, make sure to regularly update your device’s software to the latest version to ensure that any bugs or glitches that could cause boot loops are patched. Additionally, backing up your data regularly is crucial in case a boot loop occurs and you need to restore your device.

Another important step is to avoid installing unauthorized or suspicious apps that could potentially harm your device’s software and cause it to enter a boot loop. If you do encounter a boot loop, try force restarting your device by pressing and holding the power and volume down buttons simultaneously until the Apple logo appears.

It’s also advisable to contact Apple Support if the issue persists or if you are unsure of how to resolve it yourself. By taking these preventative measures, you can avoid future boot loop problems on your iPhone 7 and ensure a smoother user experience.

FAQs

How do I fix my iPhone 7 boot loop?

To fix your iPhone 7 boot loop, you can try entering recovery mode by pressing and holding both the Volume Down button and the Sleep/Wake button until you see the recovery mode screen. This may help resolve the issue.

How do I stop my iPhone from rebooting loop?

To stop your iPhone from rebooting in a loop, you can try performing a hard reset by pressing the volume up button, then the volume down button, and finally holding down the side (power) button until you see the Apple logo.

Why does my iPhone 7 keep restarting?

Your iPhone 7 may be constantly restarting due to faulty or outdated apps. Consider updating any apps that need it and removing any apps from unverified sources to see if this resolves the issue.

AMD Wattman Settings Keep Resetting Fix

Are you frustrated with your AMD Wattman settings constantly resetting? Find out how to fix this issue once and for all.

Disabling Fast Startup Feature

To disable the Fast Startup feature, go to Control Panel > Power Options > Choose what the power buttons do > Change settings that are currently unavailable > Uncheck “Turn on fast startup”. This should prevent AMD Wattman settings from resetting. Make sure to restart your computer for the changes to take effect. If the issue persists, consider updating your AMD Radeon Software or checking for any conflicting configurations in the system. Join discussions on Reddit for additional troubleshooting tips.

Updating Graphics Driver

To update your graphics driver, go to the AMD Radeon Software website and download the latest driver for your Radeon graphics card. After downloading, install the driver by following the on-screen instructions. Once the installation is complete, restart your computer to apply the changes.

If you are still experiencing issues with your AMD Wattman settings resetting, consider checking for any conflicting software or settings that may be causing the problem. You can also try resetting your Wattman settings to default and then reapplying your preferred configurations.

If the issue persists, you may need to reach out to AMD’s customer support for further assistance. They may be able to provide additional troubleshooting steps or solutions to help resolve the problem.

Removing Overclocking Software

  • Step 1: Open Task Manager by pressing Ctrl+Shift+Esc.
  • Step 2: Navigate to the Processes tab and look for any overclocking software running in the background.
  • Step 3: Right-click on the overclocking software process and select End Task to stop it from running.
  • Step 4: Go to Control Panel and uninstall any overclocking software that is installed on your system.
  • Step 5: Restart your computer to ensure that all changes take effect.

Conclusion

To ensure your AMD Wattman settings do not keep resetting, you can try the following steps:
First, make sure you are running the latest AMD drivers.
Next, disable any third-party software that may interfere with the settings.
Finally, consider adjusting the power limit and fan speed settings to prevent any issues.

Frequently Asked Questions

How to fix the default Radeon WattMan settings have been restored?

To fix the default Radeon WattMan settings have been restored, you can adjust the power settings by accessing the Power Options window and disabling the Turn on fast startup option under Shutdown settings.

How do I change the default settings on my WattMan?

To change the default settings on your WattMan, you can restore Global or individual application Radeon WattMan settings to their default values by clicking on the Reset option located in the upper right corner of the Global or individual Radeon WattMan menu.

How do I disable WattMan AMD?

To disable WattMan AMD, you can choose not to enable it or revert to factory defaults in Radeon Settings. Additionally, you can download the driver only using the custom install option and uncheck Radeon Settings during installation.

Facebook Group Notifications Not Working Fix

Having trouble with Facebook Group notifications not working properly? Let’s explore some potential fixes.

Turning Notifications On or Off

Facebook notification settings

To turn Facebook group notifications on or off, follow these steps:

1. Visit the Facebook group you want to manage notifications for.
2. Click on the Notifications bell icon located at the top of the group page.
3. Select the notification settings you prefer, such as All Posts, Highlights, Friends’ Posts, or Off.
4. To turn off notifications completely, click on the bell icon again and select Off.
5. If you are using the Facebook mobile app, go to the group, tap on the Notifications icon, and adjust your settings there.

Remember, turning notifications on or off can help manage your online presence and stay up to date with group activity without being overwhelmed. Make sure to regularly check and adjust your settings to suit your preferences and needs.

Customizing Notification Preferences

  • Open Facebook Group and navigate to the group you are having notification issues with.
  • Click on three dots located at the top right corner of the group page.
  • Select ‘Notification Settings’ from the drop-down menu.
  • Adjust Notification Preferences by selecting the type of notifications you want to receive for the group.
  • Save Changes by clicking the ‘Save’ button at the bottom of the notification settings.

Managing Notifications on Mobile and Desktop

To manage Facebook Group notifications on mobile and desktop, follow these steps:

1. Check Notification Settings: Make sure your notification settings are configured correctly. On mobile, go to the group, click on “Notifications” and select the desired option. On desktop, go to the group, click on “Notifications” and adjust settings accordingly.

2. Clear Cache and Cookies: Sometimes notifications may not work due to a cache or cookie issue. Clear cache and cookies on your browser or mobile app to resolve this.

3. Update App and Software: Ensure that your Facebook app and operating system are up to date. Outdated software can cause notification issues.

4. Check Internet Connection: Poor internet connection can also impact notification delivery. Make sure you have a stable connection on your mobile device or desktop computer.

5. Contact Facebook Support: If notifications are still not working after following these steps, reach out to Facebook support for further assistance.

Understanding Different Types of Notifications

Notification Type Description
Push Notifications These are notifications that appear on your device’s screen, even if you’re not actively using the app.
Email Notifications These notifications are sent to your email address to alert you to new activity within the app or website.
In-App Notifications These are notifications that appear within the app itself, usually in the form of a pop-up or badge icon.
SMS Notifications These notifications are sent to your phone via text message to alert you to new activity.

Frequently Asked Questions

Why am I not getting notifications from my group on Facebook?

You are not receiving notifications from your Facebook group because your notification settings may be set to “All Posts.” To adjust this setting, tap on the top right of Facebook, then tap Groups, select your group, tap the group’s name, and then tap Notifications. From there, you can customize your notification preferences.

Why is Facebook not sending me push notifications?

Facebook may not be sending you push notifications because your notifications for Facebook are not turned on in the settings of your mobile device. Make sure to check and adjust your notification settings to ensure you receive notifications from Facebook.

Why am I not getting notifications even though they are turned on?

You are not getting notifications even though they are turned on because there may be settings such as Do Not Disturb or Airplane Mode turned on, notifications may be turned off for specific apps, or power/data settings may be blocking notification alerts. Additionally, outdated apps or OS software can also cause issues with notifications.

How do I turn on push notifications for Facebook?

To turn on push notifications for Facebook, you can go to the Notifications section within the Facebook app and toggle the Allow Notifications option to on.

How to recover restored file from recycle bin

In this article, I will discuss the process of recovering restored files from the recycle bin.

Exploring Restored Files via Search and Professional Tools

When attempting to recover restored files from the recycle bin, one effective method is to utilize search and professional tools. Begin by accessing the recycle bin on your computer to locate the files you wish to recover. Once you have identified the files, use the search function within the recycle bin to quickly locate specific items.

If the search function does not yield the desired results, consider using professional data recovery tools. These tools are designed to scan your system thoroughly and recover files that may not be visible through traditional methods.

When using professional tools, ensure that you follow the instructions carefully to avoid any potential data loss. Additionally, be prepared to invest some time in the recovery process, as it may take a while to scan and retrieve all the necessary files.

By combining search functions with professional tools, you can increase your chances of successfully recovering restored files from the recycle bin.

Unveiling Hidden and AppData Files on Windows

File Type Description
Hidden Files These are files that are not normally visible to the user and are typically used by the operating system or applications for various purposes.
AppData Files These are files that are specific to individual applications and are stored in the AppData folder on Windows. They may contain important settings or data for the application.

Utilizing File History for Recovery

To recover a file that has been restored from the recycle bin, you can utilize the File History feature in Windows. First, open the Control Panel on your computer.

Next, navigate to the “File History” option and select “Restore personal files.” This will open a window where you can search for the specific file you want to recover.

Once you locate the file, right-click on it and select “Restore to original location” to recover the restored file from the recycle bin.

Using File History for recovery can be a useful tool in situations where files have been accidentally deleted or restored from the recycle bin.

Recovering Files after Recycle Bin has been Emptied

To recover files after the recycle bin has been emptied, you can try using a data recovery software. These programs are designed to scan your computer’s hard drive for deleted files and restore them. Make sure to stop using your computer as soon as you realize files are missing to prevent overwriting the data.

Another option is to check if you have a backup of the files in question. If you have previously backed up your data, you may be able to restore the files from the backup copy.

If the above methods do not work, you can also consider seeking professional help from a data recovery service. These experts have the tools and knowledge to retrieve lost files in more complex situations.

Actions for Missing Recycle Bin and Unlocatable Files

If you are unable to locate the Recycle Bin on your computer, you can still retrieve deleted files by searching for them in the File Explorer. Simply type the name of the file you are looking for in the search bar at the top right corner of the window.

If you accidentally deleted a file and it is not in the Recycle Bin, you can try using a data recovery software to scan your computer and retrieve the lost files. There are many free and paid options available online that can help you recover deleted files.

In some cases, the Recycle Bin may be hidden on your computer. To unhide the Recycle Bin, right-click on your desktop, select “Personalize,” then “Themes,” and finally “Desktop icon settings.” From there, you can check the box next to Recycle Bin to make it visible on your desktop.

If you are still having trouble locating your files or the Recycle Bin, consider contacting your IT department or a professional data recovery service for assistance. They may have additional tools and expertise to help you recover your lost files.

F.A.Q.

Where do restored documents from Recycle Bin go?

Restored documents from the Recycle Bin go back to their original location in the folder from which they were deleted.

How do I recover deleted files not found in Recycle Bin?

To recover deleted files not found in the Recycle Bin, you can right-click on the folder where the file was located and click on “Restore previous versions” to access a list of previous versions and restore the appropriate one using File History.

How do I find restored files in Windows 10?

To find restored files in Windows 10, you can right-click the file or folder and select “Restore previous versions.” This will show you a list of available previous versions of the file or folder, including files saved on a backup or restore points.

Where is Recycle Bin restore?

Recycle Bin restore is located by double-clicking the Recycle Bin icon on your desktop, locating the deleted files you want to recover, selecting them, right-clicking any of the selected files, and choosing the Restore option to move them back to their original location.

Fix Computer Without Operating System

In this article, I will discuss how to fix a computer that is not working properly without an operating system.

Common Reasons for Operating System Absence

There are several common reasons for the absence of an operating system on a computer. One of the main culprits is a corrupted master boot record (MBR), which can prevent the operating system from loading properly. Another common issue is a misconfigured BIOS setting, which may need to be adjusted in order for the operating system to boot correctly.

If your computer is missing an operating system, check the boot order in the BIOS settings to ensure that the correct drive is selected as the primary boot device.

Disk partitioning errors can also lead to an operating system not being found. If the partitions on your hard drive are not set up correctly, the computer may not be able to locate the operating system files.

Use disk partitioning tools like EaseUS Partition Master to check and repair any partition errors that may be causing the operating system to be missing.

Additionally, issues with the hard disk drive itself, such as physical damage or a malfunctioning drive, can prevent the operating system from loading properly. If you suspect that your hard drive may be the problem, consider running diagnostics or seeking professional help to resolve the issue.

Initial Troubleshooting Steps

  1. Check power supply:

    • Make sure the power cord is securely plugged in.
    • Check if the power outlet is working by plugging in another device.
  2. Inspect hardware components:

    • Check for any loose or disconnected cables.
    • Ensure that all hardware components are properly seated.
  3. Reset BIOS settings:

    • Access the BIOS by pressing the designated key during startup.
    • Look for the option to reset BIOS settings to default.

BIOS Detection and Settings Adjustment

BIOS Setting Description
Boot Order Determines the order in which the computer will attempt to boot from various devices.
System Time and Date Allows you to set the current date and time for your system.
Hardware Configuration Shows a list of all hardware components detected by the BIOS.
Security Settings Allows you to set passwords and other security measures to protect your system.

Hard Drive Testing and Repair Methods

Hard drive diagnostic tool interface.

When facing the challenge of fixing a computer without an operating system, one of the key areas to focus on is the hard drive. To ensure that the hard drive is functioning properly, you can perform various testing and repair methods.

One effective method is to use diagnostic tools such as EaseUS Partition Master to check the health of the hard drive. This software can help identify any potential issues with the drive and provide insights into how to address them.

If the diagnostic tool indicates that there are errors on the hard drive, you can attempt to repair them using the software’s built-in repair functions. This can help resolve any issues that may be preventing the computer from operating properly.

In some cases, if the hard drive is severely damaged and cannot be repaired, you may need to consider replacing it with a new one. This can be done by physically removing the old drive and installing a new one in its place.

Boot Record Repair Techniques

When attempting to fix a computer without an operating system, one of the key areas to focus on is repairing the boot record. The boot record, also known as the master boot record (MBR), is essential for the computer to start up properly. If the boot record is corrupted or damaged, it can prevent the computer from booting into the operating system.

One technique to repair the boot record is to use the Command Prompt in the Windows Recovery Environment. To do this, boot the computer using a Windows installation disc or USB drive. Then, navigate to the Command Prompt option and enter the following command: bootrec /fixmbr. This command will repair the master boot record and allow the computer to boot properly.

Another technique is to use third-party boot repair software. There are various tools available that can automatically repair the boot record and fix any issues preventing the computer from starting up. These tools can be especially helpful if the Command Prompt method does not work or if you are not comfortable using the Command Prompt.

Setting the Active Partition Correctly

To set the active partition correctly on a computer without an operating system, follow these steps:

1. Boot your computer from a bootable CD or USB drive.

2. Access the BIOS or UEFI settings by pressing the designated key during startup (common keys include F2, F10, or Delete).

3. Navigate to the boot options and select the boot device as the CD/DVD drive or USB drive.

4. Save the changes and exit the BIOS/UEFI settings.

5. Restart the computer and let it boot from the bootable CD or USB drive.

6. Once booted, open a command prompt or terminal.

7. Use the diskpart command to list the available disks and partitions.

8. Identify the active partition and set it correctly using the diskpart command. For example, to set partition 1 as active, type: “select partition 1” followed by “active”.

9. Exit the diskpart utility and restart the computer.

FAQ

What to do if my PC doesn’t have an operating system?

If your PC doesn’t have an operating system, you can try restarting it and checking the BIOS settings to ensure the hard drive with the operating system is listed as the first boot device. Disconnect any unnecessary external drives and remove any discs or floppy disks.

What happens if a computer does not have an operating system?

If a computer does not have an operating system, it is limited to performing basic functions programmed into its firmware or bootloader, such as hardware checks or simple pre-installed tasks.

Can you have a computer without an operating system?

Yes, a computer cannot function without an operating system.

How do I fix a missing operating system on my computer?

To fix a missing operating system on your computer, you can restart the PC and enter the BIOS settings. From there, enable the default setup option such as Load Optimal Defaults, Get Default Values, Load Optimized Defaults, Load Setup Defaults, etc. Save the changes by pressing “F10” and exit BIOS.

PSN Sign-In Error Solutions – Troubleshoot PS4 Network Failure

Having trouble signing into your PSN account on your PS4? Learn how to troubleshoot network failure and fix sign-in errors with these solutions.

Culprits Behind Failed Sign-Ins

If you are using a proxy server, make sure it is set up properly to avoid any connection problems. Additionally, check for any system software updates that may be available for your PS4 to ensure it is running the latest version. Sometimes, simply restarting your console can resolve sign-in errors and network failures.

If you are still unable to sign in to the PlayStation Network, consider enabling multi-factor authentication for an added layer of security. Double-check your password and login information to make sure there are no typos or errors.

Essential Fixes for Sign-In Issues

  • Turn off your PS4 completely by holding the power button for at least seven seconds.
  • Unplug the power cable from both your PS4 and router.
  • Wait for at least five minutes before plugging them back in.
  • Turn on your router first and wait for it to fully boot up before turning on your PS4.

Check PSN Server Status

  • Visit the official PlayStation Network status page to check if there are any ongoing server issues.
  • Look for any red bars or error messages indicating service disruptions.
  • Wait for the server issues to be resolved before trying to sign in again.

Update PS4 System Software

  • Go to Settings on your PS4 dashboard.
  • Select System Software Update.
  • Download and install any available updates.
  • Restart your PS4 after the update is complete.

Updating System and Personal Info

To update your system and personal information on your PlayStation 4, navigate to the settings menu. From there, select “Account Management” and then “Account Information.” Here, you can update your personal details such as your email address or password.

Make sure your system software is up to date by going to “System Software Update” in the settings menu. It’s important to keep your PlayStation 4 software current to avoid potential network issues.

If you are experiencing network errors, check your internet connection settings. Go to “Network” in the settings menu, select “Set Up Internet Connection,” and ensure your Wi-Fi or LAN connection is configured correctly. You may need to adjust settings such as your IP address, DNS, or proxy server.

If you continue to encounter issues, try using Google Public DNS for a more reliable connection. Go to the network settings, select “Custom,” and enter the Google Public DNS addresses.

Reset and Rebuild: Ultimate Solutions

Resetting your PlayStation Network (PSN) sign-in error can be frustrating, but don’t worry – we have the ultimate solutions for you to troubleshoot PS4 network failure. If you are experiencing issues signing in to your PSN account, follow these steps to reset and rebuild your network connection:

First, try restarting your PS4 system to see if that resolves the sign-in error. If the issue persists, you may need to reset your network settings on your console.

To do this, go to Settings > Network > Set Up Internet Connection. Choose either Wi-Fi or LAN cable, depending on your connection type. Select Custom and follow the on-screen instructions to set up your network connection again.

If resetting your network settings doesn’t work, you may need to rebuild the database on your PS4. To do this, turn off your console, then hold the power button until you hear two beeps. Connect your controller with a USB cable and select the Rebuild Database option.

If you are still experiencing sign-in errors, you may need to restore your PS4 to factory settings. Be sure to back up your data before doing this, as it will erase all content on your console.

Frequently Asked Questions

Why is there an error when I try to sign into PSN?

There may be an error when trying to sign into PSN due to a connection issue between your console and router. Try turning both off and on again, and consider using a wired connection instead of WiFi for a more stable connection. For further troubleshooting, visit PlayStation Repairs.

Why isn’t my PlayStation not letting me sign in?

Your PlayStation may not be letting you sign in due to log-in issues. You can try going to the Account Management sign-in page and select “Trouble Signing in?” to reset your password by entering your sign-in ID (email address). An email will be sent to you containing a secure link to help you resolve the issue.

Why can’t i sign up for PSN?

You can’t sign up for PSN because your internet connection may be lost or PlayStation Network is undergoing maintenance. Verify your internet connection and check the PSN status page. If you can’t create an account due to a used email address, contact customer support for assistance.

How do I fix PlayStation connection error?

To fix a PlayStation connection error, you can start by checking the status of the PlayStation Network, restarting your modem and router, restarting the PlayStation 4, confirming your Wi-Fi password is correct, moving your PS4 closer to the wireless router, changing the Wi-Fi network’s channel number, and adjusting the DNS settings on the PS4.