
Having trouble installing Windows 10 through USB? Let’s troubleshoot the installation error.
Check the Bootable USB for Physical Errors
1. Insert the bootable USB into your computer’s USB port.
2. Restart your computer and enter the boot menu by pressing the appropriate key (usually F12 or Esc) during startup.
3. Use the arrow keys to navigate to the option that allows you to boot from the USB.
4. Press Enter to select the USB as the boot device.
5. Once the computer boots from the USB, you will see the Windows Setup screen.
6. Press Shift + F10 to open a command prompt.
7. In the command prompt, type chkdsk /r and press Enter.
8. The chkdsk utility will scan the USB for physical errors and attempt to fix them.
9. Wait for the scan to complete. This may take some time depending on the size of the USB.
10. Once the scan is finished, close the command prompt window.
11. Continue with the Windows installation process.
Ensure Compatibility of the Boot Device
1. Check the boot order in your computer’s BIOS settings. Restart your computer and press the Esc key or the key specified by your motherboard to access the BIOS. Make sure the USB device is listed as the first boot option.
2. Verify that the USB device is properly formatted. Open the File Explorer and right-click on the USB drive. Select Format from the context menu. Choose the NTFS file system and click Start to format the USB drive.
3. Ensure that the USB device is not damaged or corrupted. Try using a different USB port or a different USB drive. If the USB drive is scratched or physically damaged, consider using a new one.
4. Update the device drivers for your motherboard. Visit the manufacturer’s website and download the latest drivers for your specific model. Install the drivers and restart your computer.
5. If you are using a USB-C port, make sure it is compatible with your USB device. Some older USB-C ports may not support certain boot devices. Try using a USB-A to USB-C adapter or a different USB port.
Verify USB Disk Format and File System
- Connect the USB disk to your computer.
- Open File Explorer by pressing Windows key + E.
- Locate the USB disk in the list of drives.
- Right-click on the USB disk and select Properties.
- In the Properties window, go to the General tab.
- Verify the File system is set to FAT32 or NTFS.
- If the file system is not FAT32 or NTFS, you will need to reformat the USB disk.
- To reformat, right-click on the USB disk and select Format.
- In the Format window, choose the desired file system (FAT32 or NTFS).
- Make sure to select the Quick Format option if available.
- Click Start to begin the formatting process.
- Once the format is complete, close the Format window.
Configure EFI/UEFI Settings Properly
- Check the BIOS/UEFI version: Ensure that your computer’s BIOS/UEFI firmware is up to date.
- Disable Secure Boot: If Secure Boot is enabled, disable it in the BIOS/UEFI settings.
- Enable Legacy Boot:
- Check the Boot Order:
- Disable Fast Boot:
- Enable USB Boot:
- Configure USB Legacy Support:
- Reset BIOS/UEFI Settings:
Free Up Space on the USB Disk
To free up space on your USB disk and troubleshoot Windows 10 USB installation errors, follow these steps:
1. Delete unnecessary files: Go to the USB disk and delete any files or folders that you no longer need. This will help free up space and prevent any installation errors caused by lack of storage.
2. Clear temporary files: Open the USB disk and navigate to the “Temp” folder. Delete all files and folders within this folder to clear temporary files and free up additional space.
3. Remove unnecessary software: If you have any unnecessary software or programs on your USB disk, uninstall them to reclaim space. Right-click on the software’s icon and select “Uninstall” from the context menu.
4. Use compression: Compress large files or folders on the USB disk to save space. Right-click on the file or folder, select “Properties,” and check the “Compress contents to save disk space” option. Click “OK” to apply the changes.
5. Move files to another location: If there are files on the USB disk that you don’t need during the installation process, consider moving them to another location temporarily. This will free up space and reduce the risk of errors.
Resolve ISO Image Issues

1. Check the integrity of the ISO image file. Use a reliable checksum tool to ensure that the downloaded ISO file is not corrupted or incomplete.
2. If the ISO file is fine, try using a different USB drive. Sometimes, the USB drive itself may have issues that prevent it from properly reading the ISO image.
3. Use a tool like Rufus or the Windows USB/DVD Download Tool to create a bootable USB drive from the ISO file. Make sure to select the correct USB drive and file system type during the process.
4. If you encounter errors during the installation process, try changing the boot order in your computer’s BIOS settings. Set the USB drive as the first boot device to ensure that the installation starts from the USB drive.
5. If the installation still fails, try using a different USB port on your computer. Sometimes, certain USB ports may have compatibility issues that can cause installation errors.
6. Check for any software bugs or conflicts that may be causing the issue. Update your computer’s BIOS, device drivers, and operating system to the latest versions to ensure compatibility.
7. If you are using a Windows 7 ISO image for the installation, make sure to use the Windows 7 USB/DVD Download Tool to create the bootable USB drive. This tool is specifically designed for Windows 7 installations and ensures compatibility.
Assess Hardware Compatibility and Resources
Assessing hardware compatibility and resources is crucial when troubleshooting Windows 10 USB installation errors. Before proceeding with the troubleshooting steps, it’s important to ensure that your hardware is compatible with the Windows 10 operating system and has enough resources to support the installation.
To assess hardware compatibility, check if your computer meets the minimum system requirements for Windows 10. This includes the processor speed, RAM, and available disk space. You can usually find these requirements on the official Microsoft website or in the Windows 10 documentation.
Next, verify that your USB device is compatible with Windows 10. Some older USB devices may not be fully compatible, so it’s important to check the manufacturer’s website for any driver updates or compatibility information. Additionally, ensure that the USB port you are using is functioning properly by testing it with another device.
In terms of resources, make sure that you have enough free disk space on the target drive where you plan to install Windows 10. If the drive is running low on space, consider freeing up some space by deleting unnecessary files or moving them to an external storage device.
If you encounter an error during the USB installation process, it may be helpful to try using a different USB port or even a different USB device. Sometimes, certain USB ports or devices can cause compatibility issues.
Test the USB Port’s Functionality
To test the functionality of the USB port on your Windows 10 device, follow these steps:
1. Connect a known working USB device, such as a flash drive or external hard drive, to the USB port.
2. Check if the device is recognized by your computer. To do this, open File Explorer and see if the USB device is listed under “This PC” or “Devices and drives”.
3. If the USB device is not recognized, try connecting it to a different USB port on your computer. Sometimes, certain ports may not be functioning properly.
4. If the USB device is still not recognized, try using a different USB device to eliminate the possibility of a faulty device.
5. If the alternate USB device is also not recognized, there may be an issue with the USB port itself. In this case, you can try updating the device driver for the USB port.
– Press the Windows key + X and select “Device Manager” from the menu.
– In the Device Manager window, expand the “Universal Serial Bus controllers” category.
– Right-click on the USB port and select “Update driver”.
– Follow the on-screen instructions to update the driver.
6. If updating the driver doesn’t resolve the issue, you can try resetting the USB ports.
– Press the Windows key + X and select “Device Manager”.
– Expand the “Universal Serial Bus controllers” category.
– Right-click on each USB port and select “Uninstall device”.
– Restart your computer and Windows will automatically reinstall the USB drivers.
7. If none of the above steps work, there may be a software issue with your Windows installation. You can try using a different installation media or creating a bootable USB drive to reinstall Windows 10.
– Download the Windows 10 installation media from the official Microsoft website.
– Use a tool like Rufus to create a bootable USB drive.
– Boot your computer from the USB drive and follow the on-screen instructions to reinstall Windows 10.
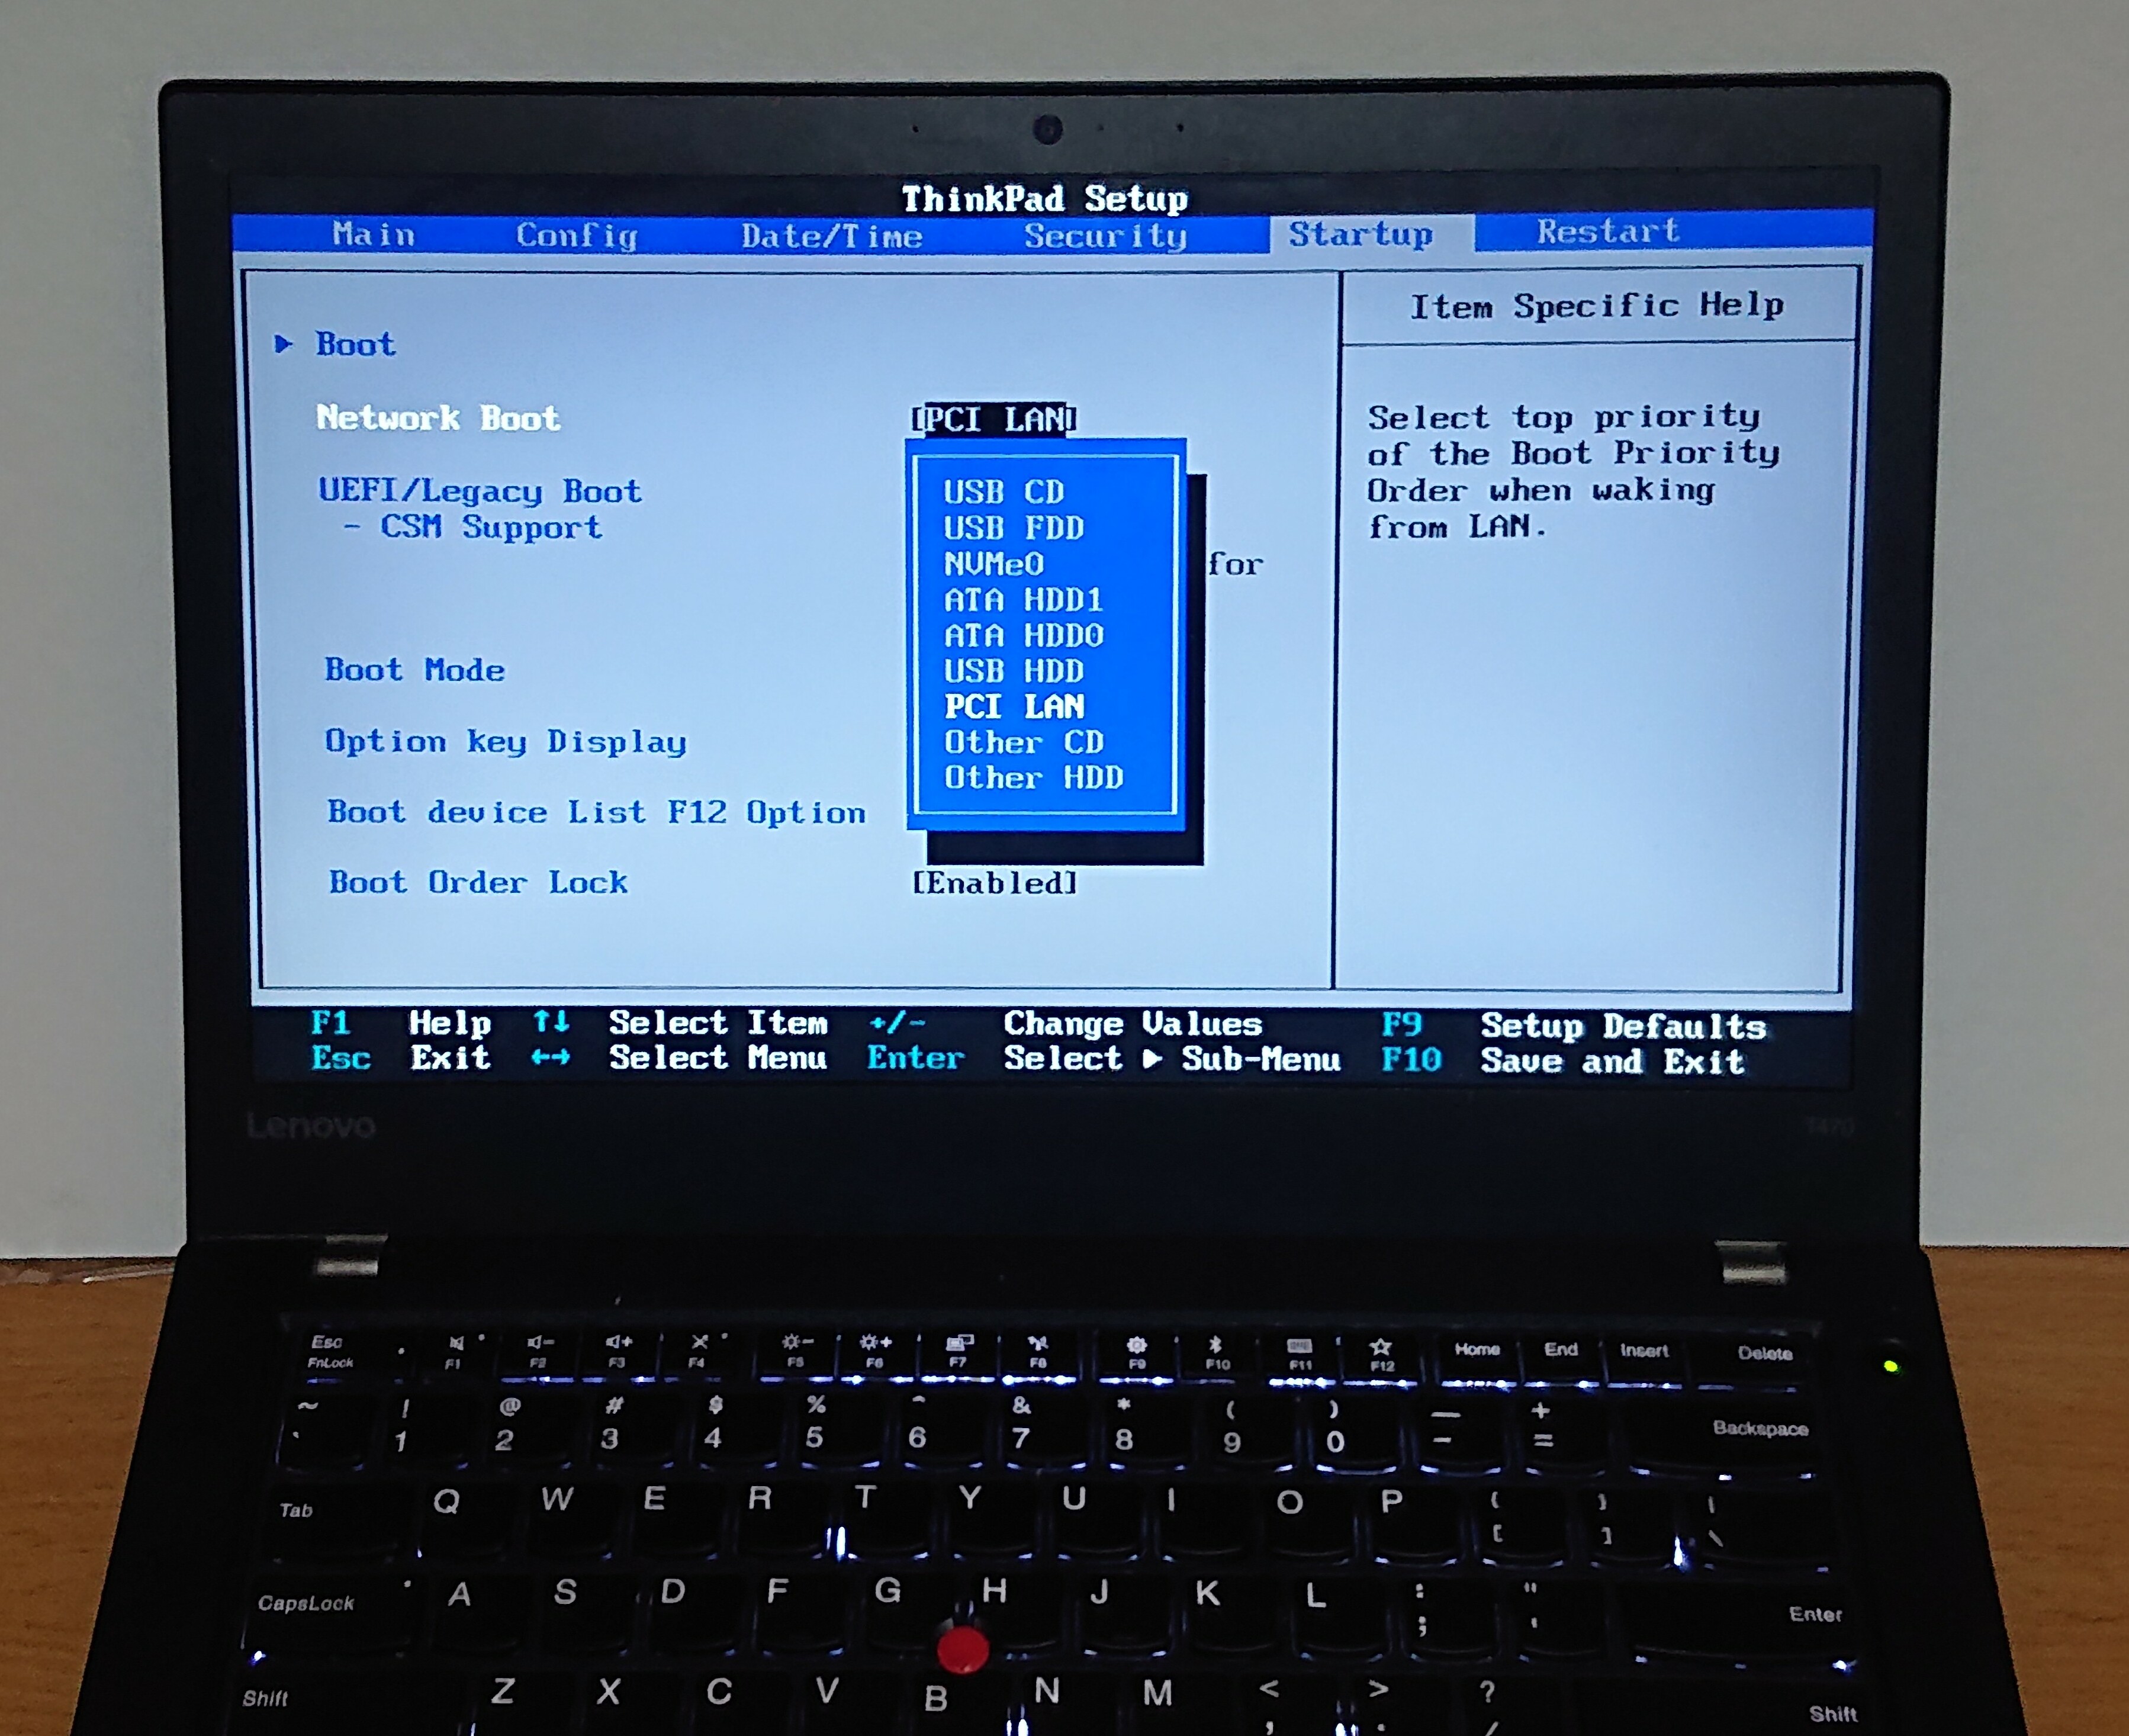
Change Boot Priority to USB Drive
To change the boot priority to a USB drive in Windows 10, follow these steps:
1. Start by restarting your computer and accessing the BIOS or UEFI settings. This can usually be done by pressing a specific key during the startup process, such as F2 or Del. Consult your computer’s manual or look for on-screen instructions if you’re unsure which key to press.
2. Once you’re in the BIOS or UEFI settings, navigate to the “Boot” or “Boot Priority” section. This section may be located in different places depending on your computer’s manufacturer and model.
3. In the boot priority list, you should see a list of devices that your computer can boot from. Look for the entry that corresponds to your USB drive. It may be listed as a specific brand or model, or simply as “USB” or “Removable Media”.
4. Use the arrow keys to highlight the USB drive entry and press the designated key to move it up in the boot priority list. This key is typically F5 or F6, but it could be different on your computer. Look for on-screen instructions or consult your computer’s manual to find the correct key.
5. Once the USB drive is at the top of the boot priority list, save your changes and exit the BIOS or UEFI settings. This is usually done by pressing the designated key, such as F10 or Esc.
6. Restart your computer and it should now boot from the USB drive. Ensure that the USB drive containing the Windows 10 installation files is connected to your computer before restarting.
By changing the boot priority to the USB drive, you are instructing your computer to boot from the USB drive first, rather than the internal hard drive or any other connected devices. This allows you to troubleshoot Windows 10 USB installation errors and perform a clean installation of the operating system.
Disable Secure Boot and Enable CSM or Legacy Mode
1. Start by accessing your computer’s BIOS or UEFI settings. This can usually be done by pressing a specific key during the boot process, such as F2 or Delete. Consult your computer’s manual or manufacturer’s website for the exact key.
2. Once in the BIOS or UEFI settings, navigate to the “Security” or “Boot” tab. Look for an option related to Secure Boot and disable it. Secure Boot is a feature that helps prevent unauthorized operating systems from loading during startup.
3. Next, locate the “Boot Mode” or “Boot Options” section. Change the mode from UEFI to CSM or Legacy Mode. This mode allows the computer to boot from devices that use the older BIOS system.
4. Save your changes and exit the BIOS or UEFI settings. This is usually done by pressing the F10 key or selecting an option like “Save and Exit.”
5. Insert the Windows 10 USB installation media into a USB port on your computer.
6. Restart your computer and boot from the USB device. This can typically be done by pressing a key like F12 or ESC during the startup process to access the boot menu. Select the USB device from the menu.
7. Follow the on-screen instructions to proceed with the Windows 10 installation.
By disabling Secure Boot and enabling CSM or Legacy Mode, you can troubleshoot and resolve USB installation errors on Windows 10.
Create Bootable USB with Windows Media Creation Tool
- Download the Windows Media Creation Tool from the official Microsoft website.
- Insert a USB drive with at least 8GB of storage capacity into your computer.
- Run the Windows Media Creation Tool executable file that you downloaded.
- Select the option to create installation media for another PC and click “Next”.
- Choose the language, edition, and architecture (32-bit or 64-bit) for your Windows 10 installation.
- Select the USB flash drive option to create a bootable USB.
- Click “Next” and wait for the Windows Media Creation Tool to format the USB drive and copy the necessary files.
- Once the process is complete, restart your computer and boot from the USB drive.
- Follow the on-screen prompts to install Windows 10 on your computer.
- Ensure that you have a valid Windows 10 product key ready for activation.
Test USB on Another PC
To test your USB on another PC, follow these steps:
1. Connect the USB drive to another PC. Make sure the PC is powered on and running Windows 10.
2. Open File Explorer by pressing the Windows key + E.
3. Locate the USB drive in the list of drives. It should be listed under “This PC” or “Devices and drives.”
4. Right-click on the USB drive and select “Properties” from the context menu.
5. In the Properties window, go to the “Tools” tab and click on “Check” under the “Error checking” section.
6. A new window will appear asking if you want to scan and fix the drive. Click on “Scan and repair drive.”
7. Wait for the scan to complete. This may take a few minutes depending on the size of the USB drive.
8. Once the scan is finished, you will see a notification indicating whether any errors were found and fixed.
9. Safely eject the USB drive from the PC by right-clicking on it and selecting “Eject” from the context menu.
10. Plug the USB drive back into your original PC and try installing Windows 10 again.
Testing the USB on another PC will help determine if the issue is with the USB drive itself or with your original PC. If the USB works fine on another PC, the problem may be related to your original PC’s hardware or software configuration. If the USB still doesn’t work on another PC, it may be a faulty USB drive and you may need to replace it.
Reinstall Corrupted ISO System Files
1. Insert the Windows 10 installation USB into your computer’s USB port.
2. Restart your computer and press the appropriate key (usually Del, F2, or F12) to enter the BIOS setup.
3. In the BIOS setup, navigate to the “Boot” or “Boot Order” section.
4. Set the USB drive as the first boot device.
5. Save the changes and exit the BIOS setup.
6. As your computer restarts, press any key when prompted to boot from the USB drive.
7. The Windows Setup will launch. Choose your language preferences and click “Next.”
8. On the next screen, click “Repair your computer” at the bottom left corner.
9. Select “Troubleshoot” and then “Advanced options.”
10. Choose “Command Prompt” from the list of advanced options.
11. In the Command Prompt window, type the following command:
“`
bootrec /fixmbr
“`
12. Press Enter to execute the command. This command repairs the master boot record, which is essential for booting the system.
13. Next, type the following command:
“`
bootrec /fixboot
“`
14. Press Enter to execute the command. This command repairs the boot sector of the system partition.
15. Finally, type the following command:
“`
bootrec /rebuildbcd
“`
16. Press Enter to execute the command. This command rebuilds the Boot Configuration Data (BCD) store.
17. After the process is complete, close the Command Prompt window and restart your computer.
FAQs
Why is Windows 10 installation from USB not working?
Windows 10 installation from USB may not be working due to issues with the USB formatting or corrupted files in the ISO. To resolve this, reformat the USB using FAT32 format and reinstall the ISO. Ensure that you restart your computer and initiate the installation process in the correct UEFI mode.
How do I fix Windows 10 installation error?
To fix Windows 10 installation errors, you can seek assistance from Microsoft Support. Visit their website at https://support.microsoft.com/en-us/windows/get for guidance and troubleshooting steps.
How to force install Windows 10 from USB?
To force install Windows 10 from a USB, you can follow these steps:
1. Prepare a USB flash drive with at least 8GB of storage.
2. Download the Windows 10 ISO file from the official Microsoft website.
3. Connect the USB flash drive to your computer.
4. Open the ISO file and extract its contents to the USB flash drive using a tool like Rufus.
5. Restart your computer and enter the BIOS settings by pressing a specific key (usually F2 or Del) during startup.
6. In the BIOS settings, change the boot order to prioritize the USB flash drive.
7. Save the changes and exit the BIOS settings.
8. Your computer will now boot from the USB flash drive and the Windows 10 installation process will begin.
9. Follow the on-screen prompts to complete the installation.
Note: This process may vary depending on your computer’s manufacturer and model. Make sure to back up your important data before proceeding with the installation.
How to fix Windows 10 bootable USB?
To fix a Windows 10 bootable USB, you can follow a complete guide provided by EaseUS Software on their website easeus.com. They offer step-by-step instructions on repairing Windows 10 from a USB.


