
Are you experiencing a black screen on your Windows 10/11 laptop? Follow these 7 steps to fix the issue and get your laptop back up and running.
Understanding the Black Screen of Death
First, reboot your laptop to see if the black screen persists. Sometimes, a simple reboot can fix the issue.
If the problem persists, try starting your laptop in safe mode. Press the Windows key + R, type “msconfig,” and hit Enter. In the System Configuration window, go to the Boot tab and check the “Safe boot” option.
Check for any recent device driver updates or installations that may have caused the black screen. Revert to a previous version of the driver or uninstall the recently installed driver to see if it resolves the issue.
If you have recently connected your laptop to an external monitor or TV using HDMI or DisplayPort, disconnect the external display and see if the black screen is resolved.
Perform a CHKDSK scan to check for any errors on your hard disk drive. Open Command Prompt as an administrator and type “chkdsk /f /r” and hit Enter.
If you are still experiencing the black screen, try accessing your laptop’s Windows Preinstallation Environment using a bootable USB drive to run troubleshooting tools and repair the operating system.
Lastly, if none of the above steps work, consider performing a reset of your Windows 10/11 laptop. This will reinstall the operating system while keeping your personal files intact.
Restart Your Computer to Address Black Screen Issues
To address black screen issues on your laptop running Windows 10/11, try restarting your computer. Press and hold the power button until your laptop turns off completely. Then, press the power button again to turn it back on.
If your laptop still has a black screen after restarting, try rebooting in safe mode to troubleshoot the issue. To do this, press the Windows key + R, type “msconfig” and hit enter. In the System Configuration window, go to the Boot tab and check the “Safe boot” box. Click OK and restart your laptop.
If the black screen persists, check the display connection to ensure it’s properly plugged in. If you’re using an external monitor, make sure the HDMI or DisplayPort cable is securely connected to your laptop.
Additionally, update your graphics card driver to the latest version. Right-click on the Start button, select Device Manager, expand the Display adapters category, right-click on your graphics card, and choose Update driver.
Another option is to run a malware scan to check for any infections that may be causing the black screen. Use your preferred antivirus software to perform a full system scan.
Lastly, if you’re still experiencing a black screen, consider performing a system restore to revert your laptop to a previous state where the black screen issue was not present.
Optimize Startup Applications
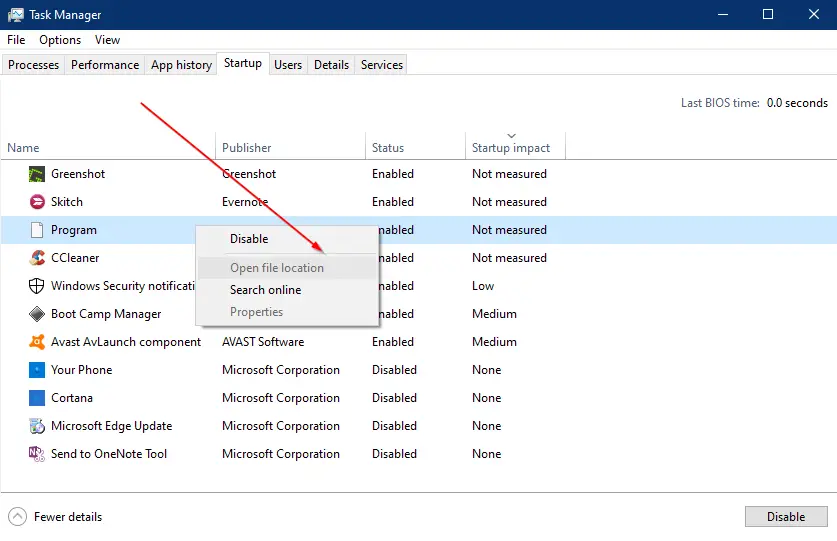
To fix the black screen issue on your laptop running Windows 10/11, optimizing startup applications can help resolve the problem. First, press the Ctrl + Shift + Esc keys to open the Task Manager. Then, navigate to the “Startup” tab to see a list of all the applications that launch when your computer starts.
Next, disable any unnecessary startup applications by right-clicking on them and selecting “Disable.” This will prevent these applications from running in the background when you start your laptop, potentially resolving the black screen problem.
After disabling the unnecessary startup applications, restart your laptop to see if the black screen issue has been resolved. If not, you can re-enable the applications one by one to identify the culprit.
By optimizing your startup applications, you can improve the overall performance of your laptop and potentially fix the black screen problem on Windows 10/11.
Check Cables and Connections
Before diving into more complex troubleshooting steps, it’s important to first ensure that all cables and connections are secure and functioning properly. Start by checking all cables and connections between your laptop and any external monitors or devices. If any cables appear loose or damaged, try reseating them or using a different cable to see if that resolves the issue.
Next, inspect the power cable to ensure it is securely plugged into both the laptop and the power source. If you are using a docking station or external power source, make sure that it is also properly connected and functioning.
It’s also important to check for any loose or damaged USB connections that may be affecting the display. Sometimes, a faulty USB connection can cause the screen to go black or flicker, so make sure all USB devices are securely connected.
If you are using an external keyboard or mouse, ensure that they are properly connected to the laptop and functioning as they should. Sometimes, a faulty keyboard or mouse can cause display issues, so it’s worth checking these connections as well.
By checking and ensuring that all cables and connections are secure and functioning properly, you can eliminate any potential issues that may be causing the black screen problem on your Windows 10/11 laptop.
Unplug Unnecessary Accessories

Unplug any unnecessary accessories from your laptop. This includes external hard drives, USB devices, and any other peripherals that are not essential for the troubleshooting process. Removing these accessories can help to eliminate potential conflicts that may be causing the black screen issue.
After unplugging unnecessary accessories, restart your laptop. Press the power button to turn off the laptop, then press it again to turn it back on. This simple step can sometimes resolve the black screen problem by allowing the system to reboot and refresh the display.
If the black screen persists, try connecting your laptop to an external monitor or TV. Use the appropriate cable to connect your laptop to the external display, then power on both devices. If the external display shows the Windows desktop, the issue may be with the laptop’s built-in display or graphics driver.
If the external display also shows a black screen, it may indicate a more serious hardware or software problem. In this case, it is recommended to seek professional assistance for further troubleshooting and repair.
By unplugging unnecessary accessories and following these steps, you can effectively troubleshoot and resolve the black screen issue on your Windows 10 or 11 laptop.
BIOS/UEFI Reset and Boot Order Verification
BIOS/UEFI Reset: If you are encountering a black screen on your Windows 10/11 laptop, one of the first steps to take is to reset the BIOS/UEFI settings. To do this, restart your laptop and press the BIOS/UEFI key (usually F2, F10, or Del) as soon as the manufacturer’s logo appears. Once in the BIOS/UEFI settings, look for the option to reset to default settings or load optimized defaults. Save the changes and exit the BIOS/UEFI.
Boot Order Verification: After resetting the BIOS/UEFI, it’s important to verify the boot order to ensure that the correct boot device is selected. Restart your laptop and enter the BIOS/UEFI settings again. Navigate to the boot options and check that the primary boot device is set to your laptop’s internal hard drive or SSD. Save the changes and exit the BIOS/UEFI.
After performing these steps, restart your laptop and check if the black screen issue has been resolved. If not, you may need to continue with other troubleshooting steps to pinpoint and fix the underlying cause of the problem.
Launch Windows Repair
First, boot your laptop into Safe Mode by pressing the “Shift” key while clicking on the “Restart” option in the Start menu. This will bring up the recovery options where you can select to boot into Safe Mode.
Once in Safe Mode, open File Explorer and navigate to the location where you downloaded Windows Repair. Right-click on the Windows Repair file and select “Run as administrator” to launch the program.
In the Windows Repair interface, select the “Start Repairs” tab and then click on the “Advanced Mode” button. This will give you access to more repair options.
Next, check the boxes for the repairs you want to perform. In this case, you may want to select options related to booting and device drivers to address the black screen issue.
After selecting the repair options, click on the “Start” button to begin the repair process. Windows Repair will then proceed to fix any issues related to the selected repair options.
Once the repair process is complete, restart your laptop to see if the black screen issue has been resolved. If the issue persists, you may need to repeat the repair process with different options selected.
Boot into Safe Mode
To fix a black screen on your Windows 10 or 11 laptop, the first step is to boot into Safe Mode. Safe Mode allows you to start your computer with only essential drivers and services, which can help troubleshoot the issue.
To boot into Safe Mode, start by restarting your laptop. When the Windows logo appears on the screen, press and hold the Shift key while clicking on Restart.
After your laptop restarts, you will see the Choose an option screen. Click on Troubleshoot, then Advanced options, and finally Startup Settings.
Next, click on Restart, and when your laptop restarts again, you will see a list of options. Press the F4 key to enable Safe Mode, or press the F5 key to enable Safe Mode with Networking if you need internet access.
Once your laptop boots into Safe Mode, you can proceed with the next steps to fix the black screen issue.
Booting into Safe Mode can help isolate the problem and allow you to troubleshoot the black screen on your laptop without any unnecessary software or drivers running in the background.
Update or Roll Back Drivers
If updating the driver doesn’t fix the black screen issue, you can try rolling back to a previous version. To do this, right-click on the display adapter in Device Manager and select Properties. Go to the Driver tab and click on Roll Back Driver if the option is available. Follow the prompts to complete the rollback process.
It’s important to note that outdated or faulty drivers can often cause the black screen problem on Windows laptops. Keeping your drivers up to date is crucial for the smooth functioning of your computer. If you continue to experience the black screen after updating or rolling back the drivers, it may be necessary to seek further assistance or explore other troubleshooting methods.
Disable Automatic Applications
First, press the Ctrl + Alt + Delete keys simultaneously to open the Task Manager.
Next, navigate to the “Startup” tab within the Task Manager.
In the Startup tab, you will see a list of applications that automatically launch when your computer starts. Right-click on any applications that you suspect may be causing the black screen issue and select “Disable”.
After disabling the automatic applications, restart your laptop to see if the black screen issue has been resolved.
If the issue persists, repeat the process and disable additional applications one by one, restarting your laptop each time, until the black screen problem is resolved.
Remember to only disable applications that you are familiar with and that you do not need to run automatically at startup.
After completing these steps, monitor your laptop for any changes in behavior and check to see if the black screen problem has been resolved.
How to Start explorer.exe Manually
Step 1: Use Ctrl + Alt + Delete to open the Windows Security screen.
Step 2: Click on “Task Manager” to open it.
Step 3: In the Task Manager, click on “File” and then “Run new task”.
Step 4: Type “explorer.exe” in the dialogue box and click “OK”.
Step 5: If explorer.exe doesn’t start, try running “cmd” as administrator.
Step 6: In the command prompt window, type “sfc /scannow” and hit enter to run the System File Checker.
Step 7: Restart your laptop and check if the black screen issue is resolved.
Install or Update Graphics Drivers
1. Go to the Device Manager by right-clicking on the Start menu and selecting it from the list.
2. Expand the Display adapters category and right-click on your graphics driver.
3. Select Update driver and then choose Search automatically for updated driver software. This will prompt Windows to search for the latest driver for your graphics card.
4. If Windows doesn’t find a new driver, you can visit the manufacturer’s website and download the latest driver for your graphics card. Be sure to select the driver that is compatible with your version of Windows.
5. Once the new driver is downloaded, go back to the Device Manager, right-click on your graphics driver, and select Update driver. This time, choose Browse my computer for driver software and navigate to the location where you saved the new driver.
6. Follow the on-screen instructions to install the new driver. Once the installation is complete, restart your computer to apply the changes.
7. If updating the driver doesn’t fix the black screen issue, you may need to uninstall the current driver and then reinstall the new one. To do this, go back to the Device Manager, right-click on your graphics driver, and select Uninstall device. Then, follow the same steps as before to install the new driver.
Switch Between Internal and External Screens
First, make sure your laptop is connected to an external monitor or display.
Press the Windows key + P on your keyboard to open the Project panel.
Use the arrow keys to select the display mode you want (e.g. “Duplicate”, “Extend”, “Second screen only”, or “PC screen only”).
Press Enter to confirm your selection.
If the screen is still black on your laptop, try adjusting the display resolution on the external monitor. Right-click on the desktop and select Display settings. Then, adjust the resolution to see if that resolves the issue.
If you’re still experiencing a black screen, check the connection between your laptop and the external monitor. Make sure the cables are securely plugged in and that the monitor is powered on.
If none of these steps work, it’s possible that there may be an issue with the device drivers or the hardware. Consider updating your device drivers or seeking professional help to diagnose and fix any hardware problems.
Scan and Remove Malware
1. Boot into Safe Mode by restarting your computer and pressing the F8 key repeatedly before the Windows logo appears. Select “Safe Mode” from the menu.
2. Run a full malware scan using a reputable antivirus software such as Windows Defender or a third-party program. Ensure the software is updated to the latest version and run a complete scan of your system.
3. Remove any detected malware by following the prompts from your antivirus software. Quarantine or delete any malicious files found during the scan.
4. Reset your web browser settings to remove any unwanted extensions or toolbars that may be causing the black screen issue.
5. Update your device drivers by navigating to Device Manager, right-clicking on each device, and selecting “Update driver.” Ensure all drivers are up to date, especially those related to your graphics card and display.
6. Check for Windows updates by going to Settings > Update & Security > Windows Update. Install any pending updates and restart your computer.
7. Perform a System Restore to revert your system back to a previous point in time before the black screen issue occurred if the above steps do not resolve the problem.
Addressing Overheating and Hardware Issues

1. Check for Overheating: Overheating can cause a black screen on your laptop. Make sure your laptop’s vents are not blocked and clean out any dust that may be causing the issue.
2. Update Device Drivers: Outdated or corrupted device drivers can also lead to a black screen. Use the Device Manager to update your drivers or visit the manufacturer’s website to download the latest drivers for your hardware.
3. Boot in Safe Mode: Boot your laptop in Safe Mode by pressing the F8 key while it’s starting up. This will allow you to troubleshoot any software issues that may be causing the black screen.
4. Check Display Settings: Incorrect display settings can sometimes cause a black screen. Use the keyboard shortcut Windows key + P to change the display settings and see if it resolves the issue.
5. Run a System File Check: Windows has a built-in tool called System File Checker that can scan and repair corrupted system files. Open Command Prompt as an administrator and run the command “sfc /scannow” to use this tool.
6. Perform a System Restore: If the black screen started after a recent change or update, try using System Restore to revert your laptop to a previous state when it was working properly.
7. Update Windows: Make sure your Windows operating system is up to date by running Windows Update. Sometimes, Microsoft releases patches and fixes for known issues that could be causing the black screen.


