
Are you facing roadblocks while installing Windows 10? Don’t worry, we’ve got you covered! Discover essential troubleshooting tips to overcome installation errors and ensure a smooth transition to the latest version of Microsoft’s operating system.
General fixes for PC installation issues
1. Ensure that your PC meets the minimum system requirements for Windows 10 and has enough free disk space.
2. Disconnect any unnecessary external devices or peripherals, such as docking stations or printers, during the installation process.
3. Update your device drivers to the latest version from the manufacturer’s website.
4. Disable any antivirus software temporarily to avoid interference during the installation.
5. Make sure you have a stable internet connection to download updates and install required files.
6. Use the Media Creation Tool to create a bootable USB flash drive for a clean install of Windows 10.
7. Check for any error messages or codes during the installation process and search for specific solutions online.
8. If all else fails, consider seeking assistance from Microsoft Support or a professional technician.
0xC1900101 Errors and other common installation errors
-
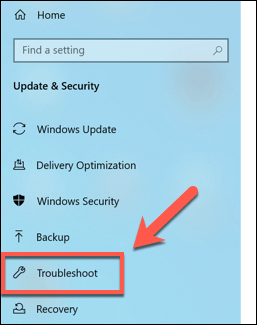
Run Windows Update Troubleshooter:
- Press Windows key + I to open the Settings app.
- Click on Update & Security.
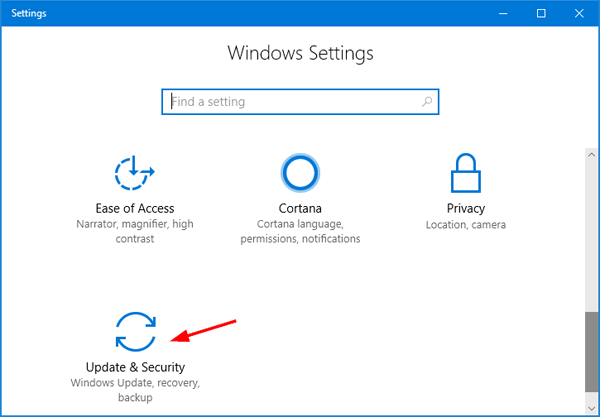
- Go to the Troubleshoot tab in the left pane.
- Select Windows Update and click on Run the troubleshooter.
- Follow the on-screen instructions to complete the troubleshooting process.
-
Check for sufficient disk space:
- Press Windows key + E to open File Explorer.
- Right-click on the system drive (usually C:).
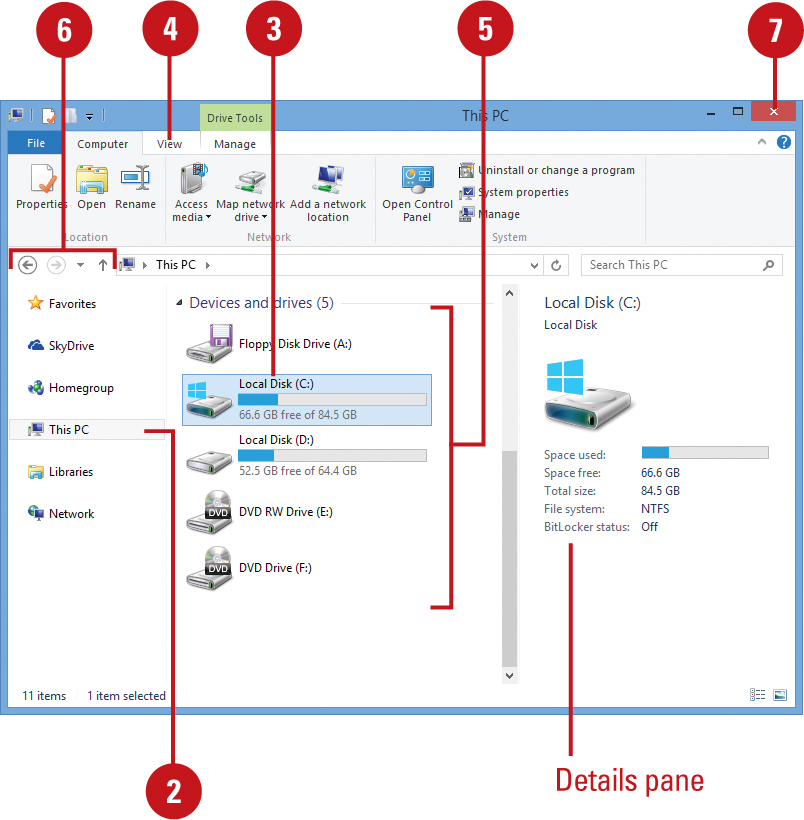
- Select Properties.
- Verify that there is enough free space available (at least 20GB).
- If necessary, delete unnecessary files or move them to an external storage device.
-
Disable or uninstall third-party antivirus software:
- Open the antivirus software interface.
- Look for an option to temporarily disable the antivirus.

- If there is no option to disable, consider uninstalling the antivirus temporarily.
- Restart the computer and attempt the installation again.
-
Disconnect unnecessary peripherals:
- Unplug any external devices connected to the computer, such as printers, scanners, or external hard drives.
- Remove any non-essential USB devices.
- Leave only the keyboard, mouse, and the monitor connected.
- Restart the computer and try the installation again.
-
Update device drivers:
- Press Windows key + X and select Device Manager.
- Expand the categories and look for any devices with a yellow exclamation mark.
- Right-click on the device and select Update driver.
- Choose the option to search automatically for updated driver software.
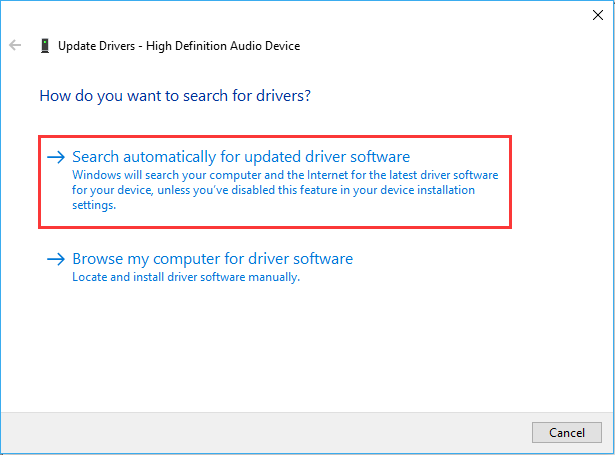
- Follow the on-screen instructions to complete the driver update process.
-
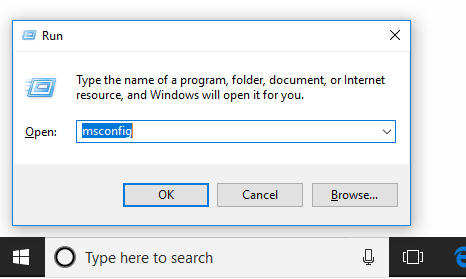
Perform a clean boot:
- Press Windows key + R to open the Run dialog box.
- Type msconfig and press Enter.
- In the System Configuration window, go to the Services tab.
- Check the box for Hide all Microsoft services.
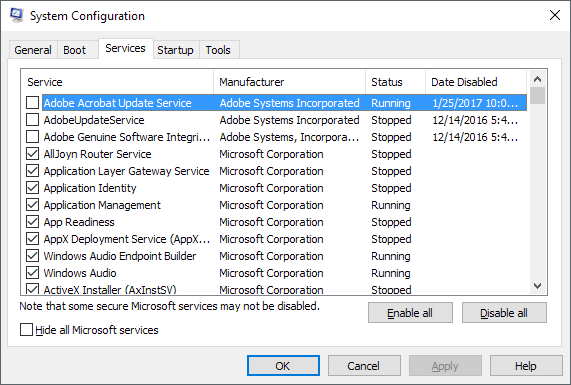
- Click on Disable all.
- Navigate to the Startup tab and click on Open Task Manager.
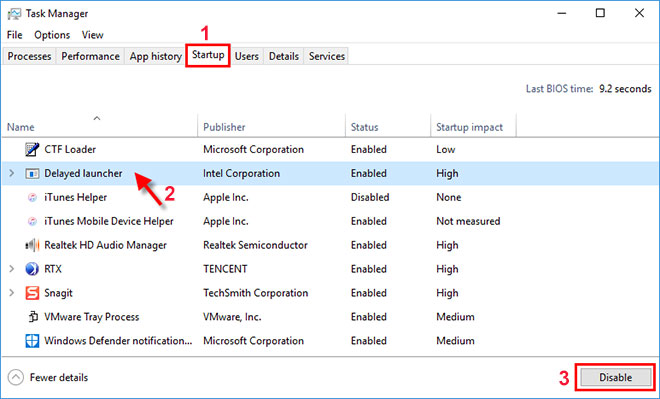
- Disable all the startup programs by right-clicking on each and selecting Disable.
- Close the Task Manager and go back to the System Configuration window.
- Click on Apply and then OK.
- Restart the computer and try the installation again.
Need more help? Want more options?
If you’re experiencing issues during the Windows 10 installation process, don’t worry – we’re here to help. Whether you need more assistance or want additional options, we’ve got you covered.
1. Check your system requirements: Ensure that your device meets the minimum requirements for Windows 10, including compatible hardware and sufficient disk space.
2. Update your BIOS or UEFI firmware: Visit your device manufacturer’s website for instructions on updating your system firmware. This can often resolve compatibility issues.
3. Use the Windows 10 Media Creation Tool: Download and run the Media Creation Tool to create a bootable USB flash drive or DVD, which can be used to perform a clean install of Windows 10.
4. Disable unnecessary applications and antivirus: Temporarily disable any non-essential applications and antivirus software, as they may interfere with the installation process.
5. Perform a clean boot: This helps eliminate software conflicts that may be causing installation errors. Follow the steps in our support article to perform a clean boot.
6. Check for Windows updates: Make sure that your device is up to date with the latest Windows updates. Go to Settings > Update & Security > Windows Update to check for updates.
Can’t Install Windows 10 on a New Build
If you’re having trouble installing Windows 10 on a new build, try these troubleshooting steps. First, make sure you’re using a compatible version of Windows, such as Windows 10, Windows 8. 1, or Windows 7. Check your BIOS and UEFI settings to ensure they’re properly configured for installation. If you encounter errors during the installation process, try booting into Safe Mode and using Windows Setup to repair any issues. Additionally, check if your device drivers are up to date and consider disabling any unnecessary hardware devices.
For more detailed instructions, visit the Microsoft support website.
Why Won’t Windows 10 Install on My PC
If you’re having trouble installing Windows 10 on your PC, there are a few things you can try to troubleshoot the issue. First, make sure your PC meets the system requirements for Windows 10. Check if you have enough disk space and that your hardware is compatible.
If you’re upgrading from Windows 7 or Windows 8.1, make sure you have the latest updates installed. Disconnect any unnecessary devices, such as docking stations or printers, as they may interfere with the installation process.
Try running the Windows Update troubleshooter to fix any issues with Windows Update. You can also try running the Windows Update troubleshooter to fix any issues with Windows Update. If you’re still having trouble, try performing a clean boot to eliminate any conflicts with third-party applications.
If all else fails, you may need to reinstall Windows 10 using a USB or DVD installation media.
How to Fix Can’t Install Windows 10 with Code 0x80300024
If you’re encountering the error code 0x80300024 while trying to install Windows 10, follow these steps to resolve the issue:
1. First, ensure that you have a compatible 64-bit computer with a solid-state drive (SSD) or hard disk drive (HDD) available for installation.
2. If you’re using an SSD, check if it’s properly connected and recognized by your system.
3. Make sure your computer meets the minimum system requirements for Windows 10 installation.
4. If you’re installing from a USB device, try using a different USB port or recreating the bootable USB using the Media Creation Tool.
5. Check your disk partitions using Disk Management or File Explorer to ensure they meet the requirements for installation.
6. If you have any external devices connected, such as a docking station, printer, or graphics card, try disconnecting them and installing Windows 10 with only essential peripherals attached.
7. Disable any unnecessary startup programs or antivirus software temporarily to avoid conflicts during installation.
8. If you’re upgrading from a previous version of Windows, ensure that all device drivers are up to date.
9. Try running the Windows Update troubleshooter to fix any potential issues with Windows Update.
10. If the problem persists, consider seeking assistance from Microsoft Support or referring to the Windows 10 installation forums for further guidance.
Check If Your PC Meets the Minimum Requirements
To ensure a smooth Windows 10 installation, it’s crucial to check if your PC meets the minimum requirements. Here’s how:
1. Start by verifying that your PC meets the hardware specifications for Windows 10. This includes having a compatible processor, sufficient RAM (at least 2 GB for the 64-bit version), and enough available storage.
2. Check your PC’s compatibility with Windows 10 by running the Windows 10 compatibility tool. This tool will scan your system and alert you to any potential issues.
3. Make sure your PC is running on the latest version of Microsoft Windows. Update your operating system to Windows 8.1 or later if necessary.
4. Disable any antivirus software or security programs temporarily. These programs can sometimes interfere with the installation process.
5. If you’re installing Windows 10 from a USB or DVD, ensure that the installation media is in good condition and properly inserted into your PC.
6. If you encounter any error messages during the installation process, note down the error code or message. This information will be helpful for troubleshooting purposes.
Uninstall Language Packs to Fix Installation Issues
To troubleshoot Windows 10 installation errors related to language packs, you can try uninstalling them. Follow these steps:
1. Open the Control Panel (Control Panel).
2. Click on “Uninstall a program” (Control Panel > Programs > Uninstall a program).
3. Locate the language packs installed on your system.
4. Right-click on each language pack and select “Uninstall” (Right-click > Uninstall).
5. Follow the on-screen instructions to complete the uninstallation process.
Removing language packs can help resolve installation issues and streamline the process.
Disable or Uninstall Third-party Antivirus for a While
To troubleshoot Windows 10 installation errors, you may need to disable or uninstall your third-party antivirus temporarily. Here’s how you can do it:
1. Open the Start menu and search for “Control Panel” to access the Control Panel settings.
2. In the Control Panel, click on “Programs” or “Programs and Features.”
3. Look for your third-party antivirus software in the list of installed programs.
4. Right-click on the antivirus program and select “Uninstall” or “Change.”
5. Follow the on-screen instructions to complete the uninstallation process.
6. If you prefer to disable the antivirus temporarily instead, right-click on the antivirus program and select “Disable” or “Pause protection.”
7. Confirm the action and make sure to re-enable the antivirus once you’ve resolved the installation errors.
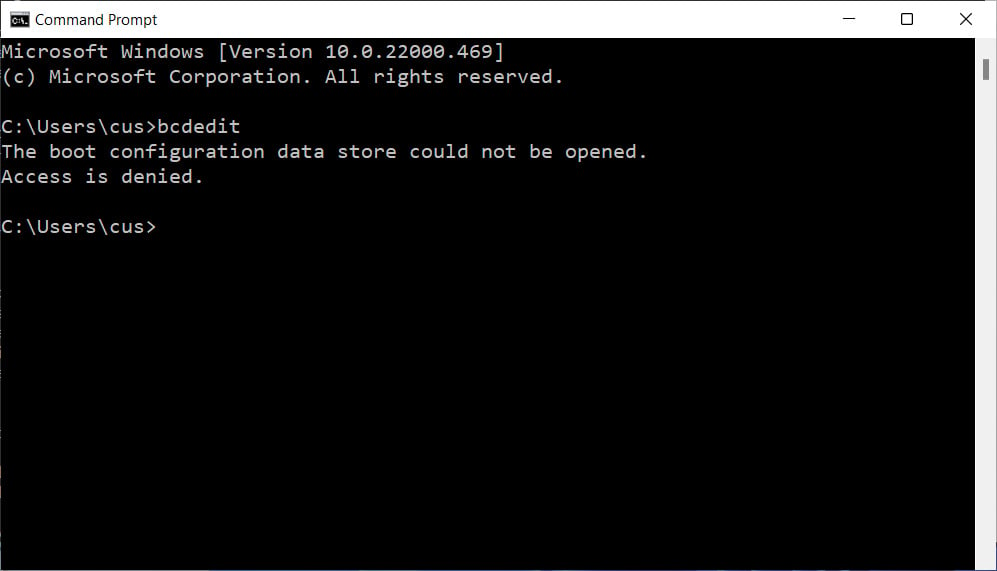
Rebuild the Boot Configuration Data (BCD)
Rebuilding the Boot Configuration Data (BCD) can help troubleshoot Windows 10 installation errors. Follow these steps to resolve the issue:
1. Start your computer and press the appropriate key (usually F2 or Del) to enter the BIOS settings.
2. Navigate to the Boot options and select the primary boot device.
3. Save the changes and exit the BIOS.
4. Insert your Windows installation media and restart the computer.
5. Press any key to boot from the installation media.
6. Select your language preferences and click “Next.”
7. Click “Repair your computer” at the bottom left corner.
8. Choose “Troubleshoot” > “Advanced options” > “Command Prompt.”
9. Type “bootrec /rebuildbcd” and press Enter.
10. Follow the on-screen instructions to complete the process.
This should help resolve Windows 10 installation errors related to the Boot Configuration Data.
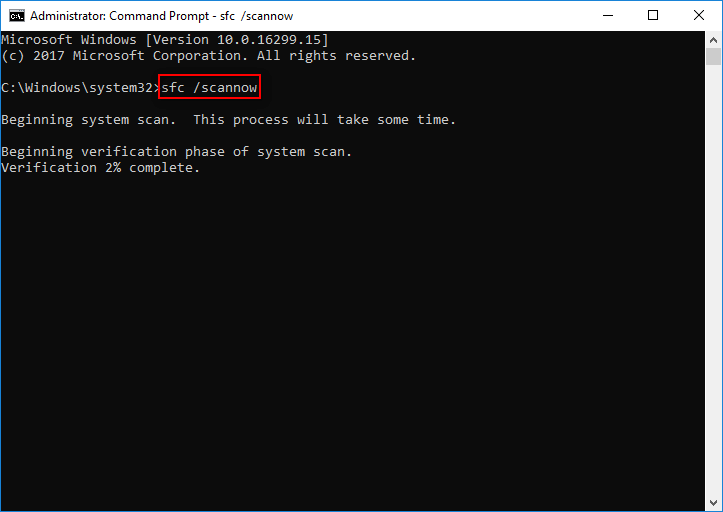
Repair Corrupted System Files to Fix Installation Problems
To troubleshoot Windows 10 installation errors, you can repair corrupted system files. This will help fix any issues that may be causing installation problems. Here’s how you can do it:
1. Press the Windows key and type “Command Prompt.”
2. Right-click on Command Prompt and select “Run as administrator.”
3. In the Command Prompt window, type “sfc /scannow” and press Enter.
4. Wait for the scan to complete. It may take some time.
5. If any corrupted files are found, the system will automatically repair them.
6. Once the scan is finished, restart your computer and try installing Windows 10 again.
Repairing corrupted system files can often resolve installation errors and get your Windows 10 installation back on track.
Turn to Windows Repair Services for Assistance
Turn to Windows Repair Services for assistance with troubleshooting any installation errors you may encounter when installing Windows 10. Our experts are skilled in resolving issues related to Windows 10 installation, ensuring a smooth and successful process. Whether you’re facing problems with 64-bit computing, booting, solid-state drives, or disk partitioning, we can help. Our team is well-versed in resolving issues with device drivers, Microsoft Defender Antivirus, and other components that may affect the installation process.
Contact our Windows Repair Services for prompt and efficient resolution of your installation errors.
Run Windows 10 Installation in Clean Boot Mode
To troubleshoot Windows 10 installation errors, you can run the installation in Clean Boot Mode. This helps eliminate any conflicting software or services that may be causing the error. Here’s how:
1. Press the Windows key + R to open the Run dialog box.
2. Type “msconfig” and press Enter to open the System Configuration window.
3. In the General tab, select “Selective startup” and uncheck “Load startup items”.
4. Go to the Services tab and check “Hide all Microsoft services”.
5. Click “Disable all” to disable all non-Microsoft services.
6. Go to the Startup tab and click “Open Task Manager”.
7. In the Task Manager, disable all startup items by right-clicking and selecting “Disable”.
8. Close the Task Manager and go back to the System Configuration window.
9. Click “OK” and restart your computer.
Running the Windows 10 installation in Clean Boot Mode can help resolve any installation errors related to conflicting software or services.
Troubleshooting for Windows Installation Issues
- Restart the computer:
- Press the Start button, then click on the Power icon.
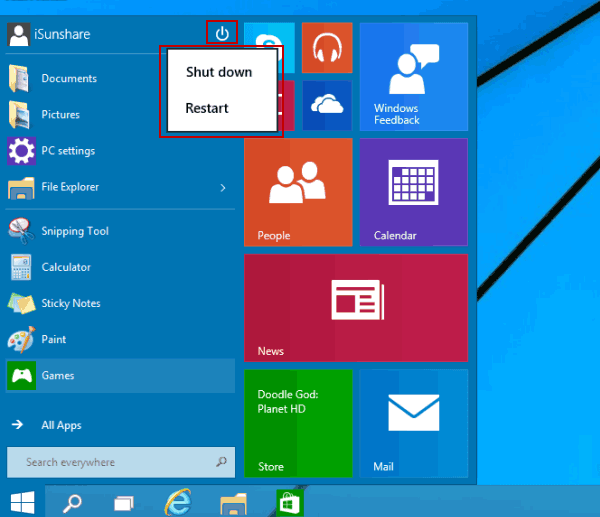
- Select Restart from the drop-down menu.
- Check system requirements:
- Verify that the computer meets the minimum hardware and software requirements for Windows 10.
- Ensure that there is enough free disk space for the installation process.
- Disconnect external devices:
- Disconnect any unnecessary external devices such as printers, scanners, or USB drives.
- Leave only the essential devices connected, such as the keyboard, mouse, and monitor.

- Disable antivirus software:
- Open the Settings app by pressing Win+I on your keyboard.
- Click on Update & Security, then select Windows Security.
- Click on Virus & threat protection and choose Manage settings.
- Toggle the switch to turn off the antivirus software temporarily.

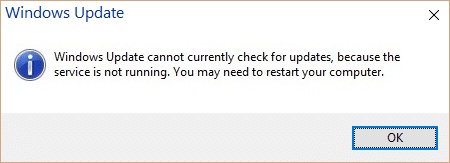
- Use Windows Update Troubleshooter:
- Press Win+I to open the Settings app.
- Click on Update & Security, then select Troubleshoot.
- Scroll down and click on Windows Update.
- Click on Run the troubleshooter and follow the on-screen instructions.
- Perform a clean boot:
- Press Win+R to open the Run dialog box.
- Type msconfig and press Enter.
- In the System Configuration window, go to the Services tab.
- Check the box that says Hide all Microsoft services.
- Click on Disable all.
- Go to the Startup tab and click on Open Task Manager.

- Disable all startup items in the Task Manager window.
- Close the Task Manager and click on OK in the System Configuration window.
- Restart the computer.
- Perform a system file check:
- Press Win+X and select Command Prompt (Admin).
- Type sfc /scannow and press Enter.
- Wait for the scan to complete and follow any instructions provided.
- Reset Windows Update components:
- Open Command Prompt (Admin) as mentioned above.
- Type the following commands, pressing Enter after each one:
- net stop wuauserv
- net stop cryptSvc
- net stop bits
- net stop msiserver
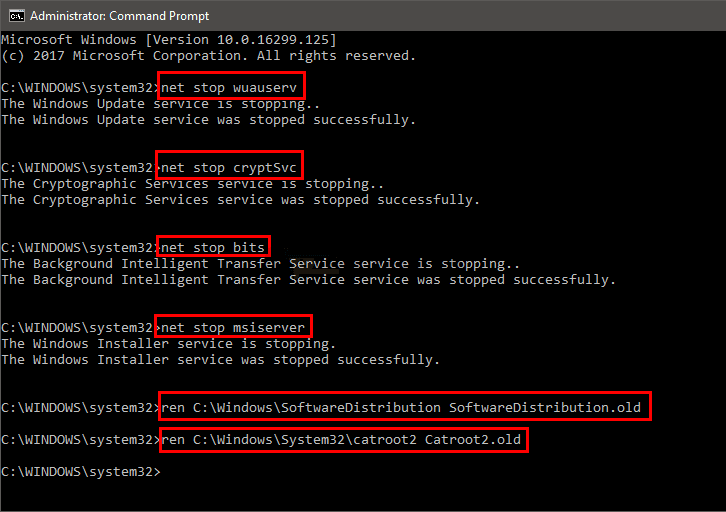
- ren C:\Windows\SoftwareDistribution SoftwareDistribution.old
- ren C:\Windows\System32\catroot2 catroot2.old
- net start wuauserv
- net start cryptSvc
- net start bits
- net start msiserver
- Close the Command Prompt window and restart the computer.
- Perform a clean installation of Windows 10:
- Create a bootable USB or DVD of Windows 10.
- Boot from the installation media.
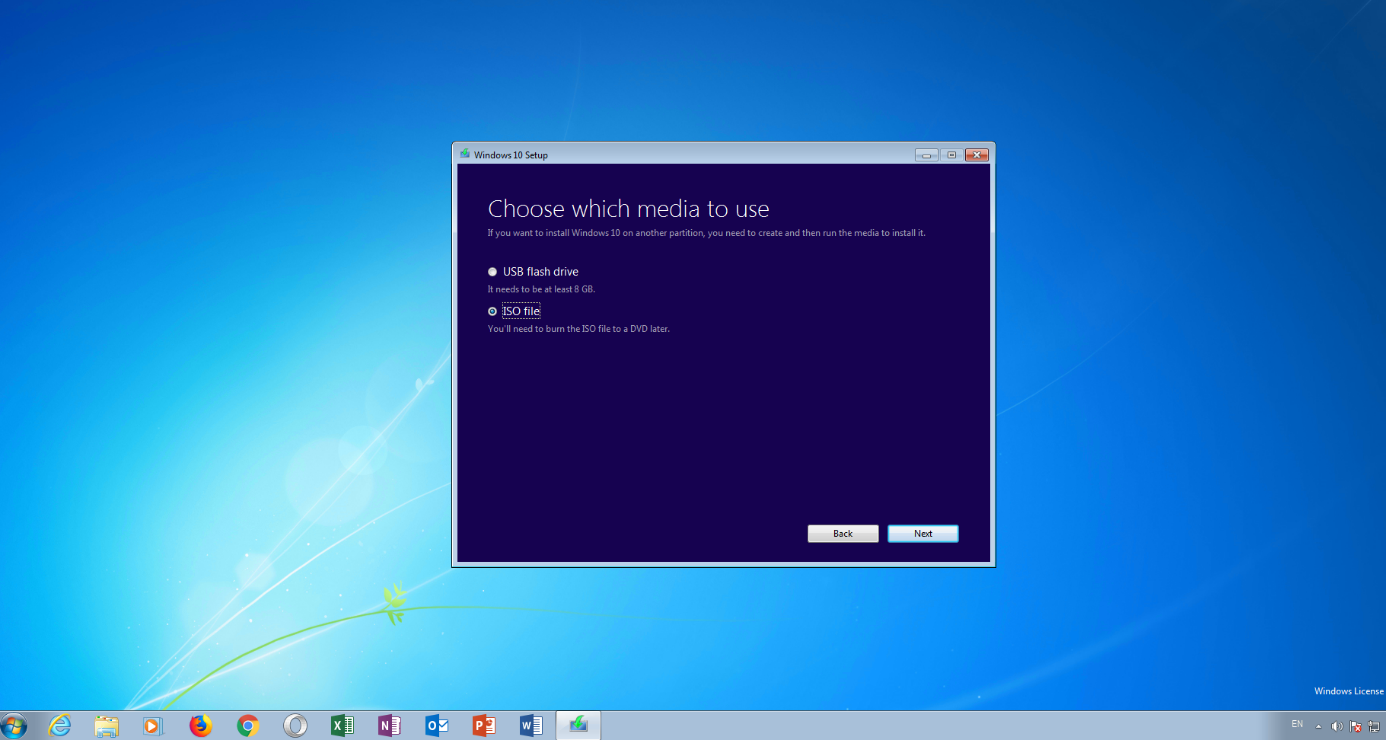
- Follow the on-screen instructions to perform a clean installation.


