In the ever-evolving world of technology, Windows 10 System Restore can sometimes present its own set of challenges. From mysterious errors to unexpected setbacks, this article is here to guide you through the troubleshooting process, ensuring a smooth journey towards restoring your system.
Run System Restore in Safe Mode
To run System Restore in Safe Mode, follow these steps:
1. Start your computer and press the F8 key repeatedly until the Advanced Boot Options menu appears.
2. Use the arrow keys to select “Safe Mode” and press Enter.
3. Once in Safe Mode, click the Start button and type “System Restore” in the search bar.
4. Select “Create a restore point” from the search results.
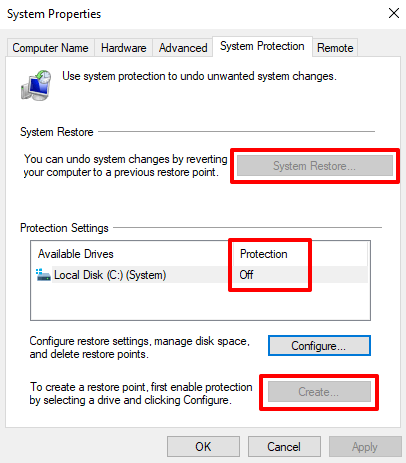
5. In the System Properties window, click on the “System Protection” tab.
6. Click on the “System Restore” button.
7. Choose a restore point from the list and click “Next.”
8. Review the restore point details and click “Finish” to start the restoration process.
9. Follow the on-screen instructions to complete the restore.
Running System Restore in Safe Mode can help resolve various Windows 10 system restore issues. It allows you to restore your computer to a previous working state, undoing any recent changes that may have caused problems.
Note: If you’re unable to access Windows or Safe Mode, you can also run System Restore using the Windows Recovery Environment (WinRE) or through a system image recovery.
Check System Protection Settings and Configure Disk Space Usage
Troubleshooting Windows 10 System Restore Issues
Check System Protection Settings and Configure Disk Space Usage
In order to troubleshoot System Restore issues in Windows 10, it is important to check the system protection settings and configure disk space usage appropriately. Here is a table summarizing the necessary steps:
| Step | Instructions |
|---|---|
| 1 | Open the System Protection settings |
| 2 | Check if system protection is enabled for the desired drive |
| 3 | Adjust the disk space usage for system protection |
| 4 | Ensure sufficient disk space is allocated |
| 5 | Click “Apply” or “OK” to save the changes |
| 6 | Restart the computer |
Check the Status of Volume Shadow Copy Service & System Restore Service
To check the status of the Volume Shadow Copy Service and System Restore Service in Windows 10, follow these steps:
1. Press the Windows key + R to open the Run dialog box.
2. Type “services.msc” and press Enter to open the Services management console.
3. Scroll down and locate the “Volume Shadow Copy” service. Check its status and ensure that it is set to “Running” or “Automatic.”
4. Similarly, find the “System Restore” service and check its status.
5. If either service is not running, right-click on it and select “Start” or “Restart” to enable it.
6. After ensuring that both services are running, close the Services management console.
7. You can now proceed with troubleshooting any System Restore issues you may be experiencing.
python

import subprocess
def check_windows_restore():
try:
# Run system restore command
subprocess.run(['sfc', '/scannow'], check=True)
# If the command executes successfully, display a success message
print("Windows Restore is working properly.")
except subprocess.CalledProcessError:
# If the command fails, display an error message
print("Windows Restore is not working properly.")
# Call the function to check Windows Restore
check_windows_restore()
In this code, we use the `subprocess` module to run the “sfc /scannow” command, which is a Windows System File Checker tool that can help identify and repair corrupted system files. If the command executes successfully, it indicates that Windows Restore is working properly. If the command fails, it suggests that Windows Restore might not be functioning correctly.
Repair Corrupted System Files
To repair corrupted system files in Windows 10, you can try the following solutions:
1. Run the System File Checker (SFC) tool:
– Press the Windows key + R, type “cmd“, and press Enter to open the Command Prompt.
– Type “sfc /scannow” and press Enter.
– Wait for the scan to complete and follow any on-screen instructions.
2. Use DISM (Deployment Image Servicing and Management) tool:
– Open Command Prompt as administrator.
– Type “dism /online /cleanup-image /restorehealth” and press Enter.
– Let the process finish and restart your PC.
If the above fixes don’t work, you can also try using System Restore or resetting your PC to its factory settings. These options can be accessed through the Advanced Options menu in the recovery environment, which you can boot into by pressing the F8 key during startup or using the Windows 10 installation media.
Use Windows System Restore Alternative – EaseUS Todo Backup
If you’re experiencing issues with Windows 10 System Restore, consider using EaseUS Todo Backup as an alternative solution. This software provides a reliable and efficient way to restore your system to a previous state.
To use EaseUS Todo Backup, follow these steps:
1. Download and install EaseUS Todo Backup on your computer.
2. Launch the software and select “System Backup” from the main menu.
3. Choose a destination where you want to save the system backup file.
4. Click “Proceed” to start the backup process.
Once the backup is complete, you can easily restore your system by following these steps:
1. Launch EaseUS Todo Backup and select “System Recovery” from the main menu.
2. Choose the backup file you created earlier.
3. Select the destination where you want to restore your system.
4. Click “Proceed” to start the system restore process.
Using EaseUS Todo Backup as an alternative to Windows System Restore can help you troubleshoot any issues you may be experiencing.
Check if System Restore is Enabled
1. Open the Start menu and search for “Create a restore point” to access System Properties Settings.
2. In the System Protection tab, you’ll see a list of available drives. Select the drive you want to check and click on “Configure.”
3. Make sure that the “Turn on system protection” option is selected. Adjust the maximum disk space usage if needed.
4. Click on “Apply” and then “OK” to save the changes.
If System Restore is already enabled but not working properly, you can try the following solutions:
1. Restart your computer and try again. Sometimes, a simple restart can fix the issue.
2. Run System Restore in Safe Mode by pressing the “F8” key during startup and selecting “Safe Mode” from the menu.
3. Use the System Restore feature in the Windows Recovery Environment (WinRE). Restart your computer and press the “F8” key repeatedly until you see the Advanced Options menu. Select “System Restore” or “System Image Recovery” to access the recovery options.
4. If none of the above solutions work, you may need to perform a factory reset or reinstall Windows 10.
Try Creating a Restore Point Manually
Creating a Restore Point Manually
If you are experiencing issues with the System Restore feature in Windows 10, you can try creating a restore point manually. This can help troubleshoot and fix any problems you may be facing. Here’s how you can do it:
1. Open the System Properties settings by pressing the Windows key + R, typing “sysdm.cpl”, and hitting Enter.
2. In the System Properties window, go to the System Protection tab.
3. Click on the “Create” button to manually create a restore point.
4. Give your restore point a descriptive name that will help you remember what it is for.
5. Click “Create” to create the restore point.
6. Wait for the process to complete, and you will receive a confirmation message.
By following these steps, you can manually create a restore point in Windows 10. This can be helpful in troubleshooting and resolving any system restore issues you may encounter.
Disable Antivirus Software
1. Press the Windows key + R to open the Run dialog box.
2. Type “msconfig” and press Enter to open the System Configuration window.
3. In the System Configuration window, go to the Services tab.
4. Scroll down and locate your antivirus software in the list of services.
5. Uncheck the box next to your antivirus software to disable it.
6. Click Apply and then OK to save the changes.
7. Restart your computer for the changes to take effect.
Note: Disabling your antivirus software temporarily can help troubleshoot Windows 10 System Restore issues. However, make sure to enable it again after troubleshooting to ensure your computer’s security.
If you’re still experiencing issues with System Restore, try other troubleshooting methods mentioned in this article.
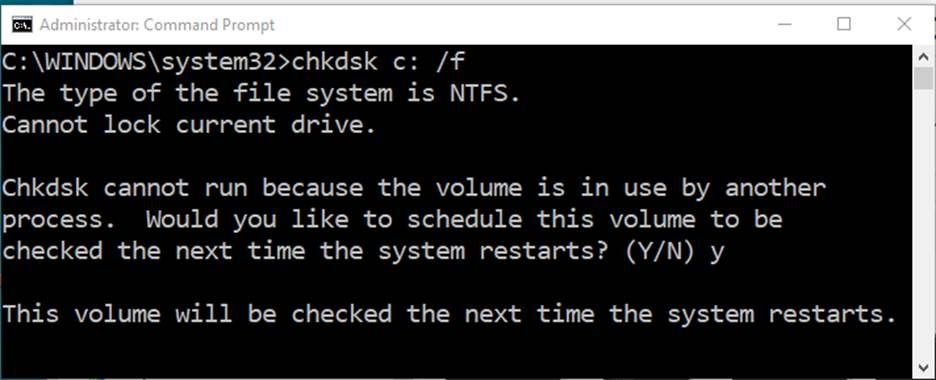
Check Hard Drive for Errors
- Performing a Disk Check: Use the built-in Windows utility to scan and fix hard drive errors.
- Identifying and Resolving File System Issues: Address any file system problems that may be preventing System Restore from functioning correctly.
- Checking for Corrupted System Files: Verify the integrity of critical system files using the System File Checker tool.
- Updating Hard Drive Drivers: Ensure your hard drive drivers are up to date to avoid compatibility issues.
- Disabling Antivirus Software: Temporarily turn off antivirus software to rule out any interference with System Restore.
- Running the Windows Memory Diagnostic: Test your computer’s memory for any errors that might be affecting System Restore.
- Checking for Available Disk Space: Ensure you have enough free space on your hard drive for System Restore to function properly.
- Performing a Clean Boot: Identify and disable any conflicting startup programs or services that could be causing issues.
- Creating a Restore Point Manually: Learn how to manually create a restore point to have a backup option available.
- Using System Restore from Safe Mode: Troubleshoot System Restore issues by accessing it from the Safe Mode environment.