How to Fix Google Play Store Server Error and No Connection

Welcome to a comprehensive guide on resolving the frustrating Google Play Store server error and no connection issues. Whether you’re an Android enthusiast or a casual user, this article will equip you with effective solutions to get your Play Store up and running smoothly. Say goodbye to those annoying error messages and reconnect to the world of apps hassle-free.

Connecting through Mobile data

If you’re experiencing server errors or a lack of connection on the Google Play Store, there are a few troubleshooting steps you can try to fix the problem.

First, make sure your device has a stable internet connection. If you’re using mobile data, check that it’s enabled and working properly. If possible, try connecting to a Wi-Fi network to see if that resolves the issue.

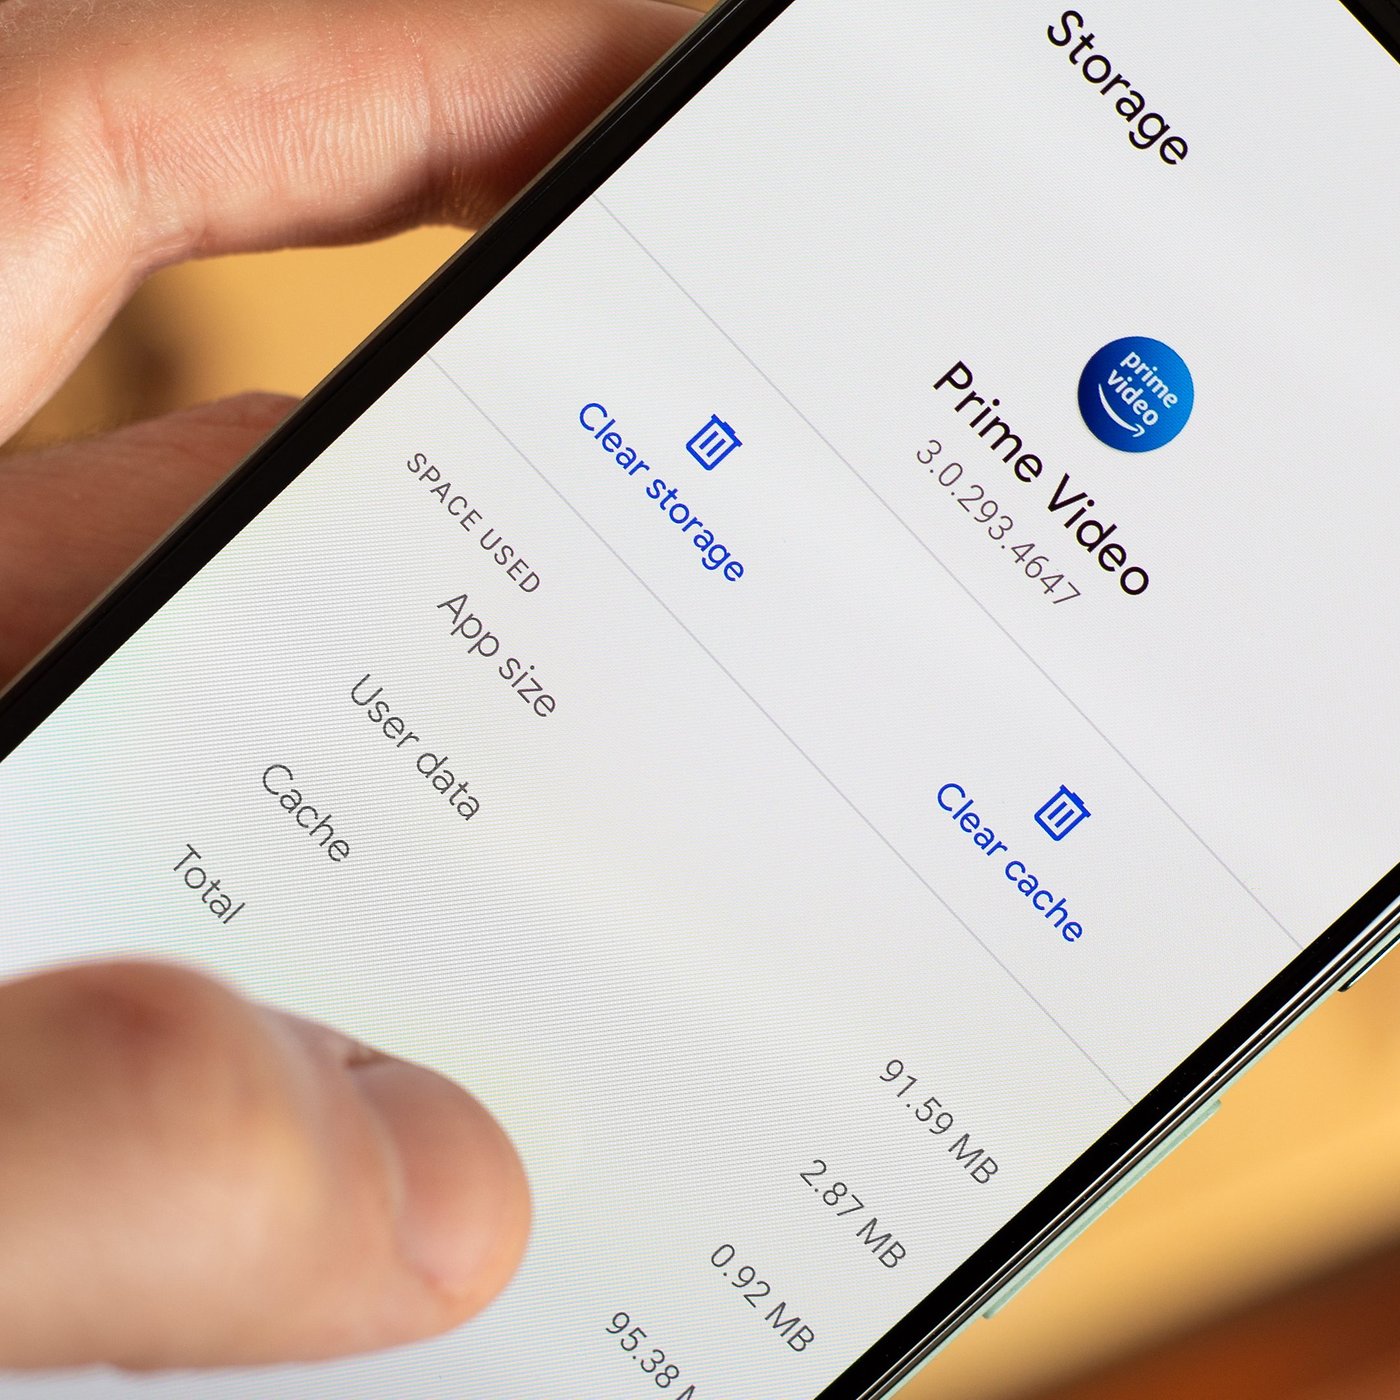
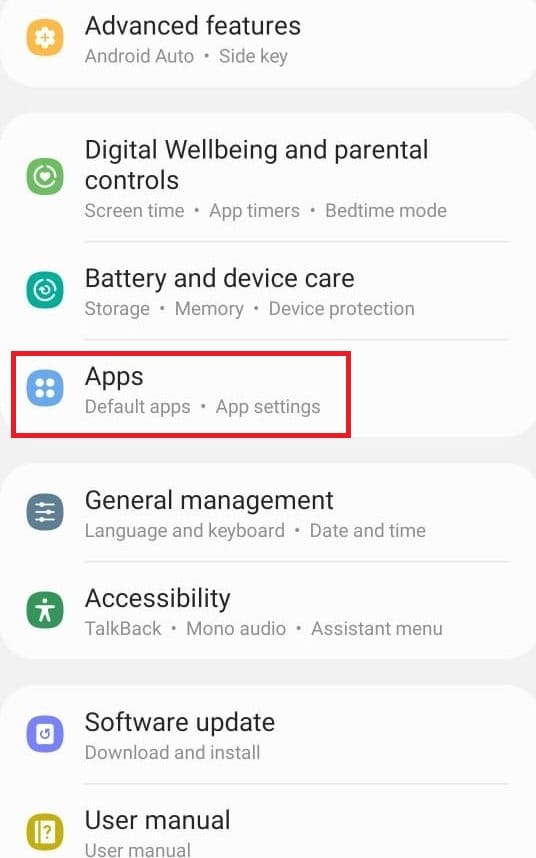
Next, clear the cache and data for the Google Play Store app. To do this, go to “Settings,” then “Apps” or “App Info,” find the Google Play Store app, and tap on it. From there, select “Storage” and then “Clear cache” and “Clear data.”

If the problem persists, you can also try updating your device’s system software. Check for any available updates and install them if necessary.

In some cases, the issue may be with the specific app you’re trying to download or update. Try downloading a different app from the Play Store to see if the problem is isolated to one app.

If none of these steps resolve the issue, it may be helpful to contact Google support for further assistance.

Clearing Data and Cache of Google Play Store

To clear the data and cache of the Google Play Store, follow these steps:

1. Open the Settings app on your Android device.
2. Tap on Apps or Applications, depending on your device.
3. Scroll down and tap on Google Play Store.
4. Tap on Storage.
5. Tap on Clear Data and confirm your selection.
6. Tap on Clear Cache and confirm your selection.

By clearing the data and cache of the Google Play Store, you can often resolve server errors and connection problems. This can help fix issues such as “no connection” or “error retrieving information from server.”

Updating Date / Time settings

To update the Date/Time settings on your phone, follow these steps:

1. Open the Settings app on your device.
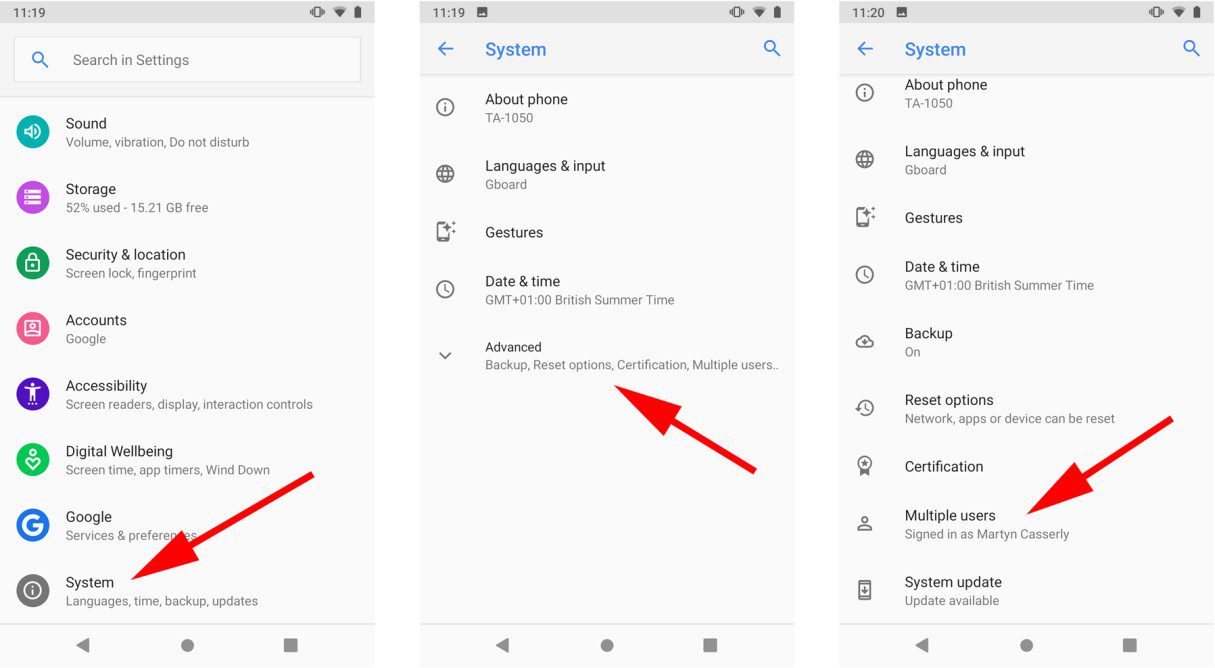
2. Scroll down and tap on “Date & time” or “System” depending on your phone’s version.
3. Make sure the “Automatic date & time” or “Automatic time zone” option is turned on.
4. If it’s already enabled, toggle it off and on again to refresh the settings.
5. If you prefer to set the date and time manually, toggle off the automatic option and adjust the settings accordingly.

python
import requests

def check_google_play_error(app_id):
url = f"https://play.google.com/store/apps/details?id={app_id}"
response = requests.get(url)

if response.status_code == 200:
# App page successfully retrieved
if "Server Error" in response.text:
# Server error detected
return f"Server Error for app with ID: {app_id}"
else:
return "No server error found for the app."
else:
return "Unable to retrieve app details from the Google Play Store."

# Example usage
app_id = "com.example.app"
result = check_google_play_error(app_id)
print(result)

This code uses the `requests` library in Python to send a GET request to the Google Play Store app page for a specific app ID. It then checks if the response contains the string “Server Error” and returns an appropriate message.

Changing Play Store language

To change the language in the Google Play Store, follow these troubleshooting steps:

1. Open the Play Store app on your device.

2. Tap the three horizontal lines in the top left corner to access the menu.

3. Scroll down and select “Settings”.

4. Tap on “Language preference”.

5. Choose your preferred language from the list.

6. Restart the Play Store app to apply the changes.

If you’re still experiencing server errors or connection issues, try the following:

1. Retry the download or update by tapping the “Retry” button on the error message.

2. Ensure you have a stable internet connection, either through Wi-Fi or mobile data.

3. Clear the cache and data of the Play Store app by going to “Settings > Apps > Google Play Store > Storage > Clear cache/clear data”.

4. Check if there are any system updates available for your device and install them.

If the problem persists, you may need to contact Google Play Support for further assistance.

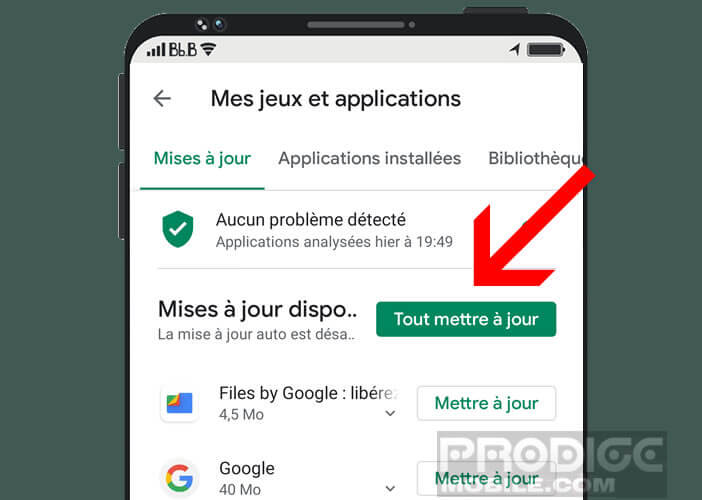
Uninstalling Google Play Updates

To uninstall Google Play updates and fix server error and connection issues, follow these steps:

1. Open the Settings app on your device.
2. Go to Apps or Application Manager, depending on your device.
3. Scroll down and tap on Google Play Store.
4. Tap on the three-dot menu button and select Uninstall updates.
5. A confirmation message will appear. Tap OK to proceed.
6. After uninstalling the updates, restart your device.
7. Open Google Play Store again and check if the server error and connection issues are resolved.

If the problem persists, you may need to clear the app cache and data. Follow these additional steps:

1. Go to the App Info page of Google Play Store (follow steps 1-3 above).
2. Tap on Storage & cache.
3. Tap on Clear cache and then Clear data.
4. Restart your device and check if the issue is resolved.

Remove and Re-Add your Google account

To fix Google Play Store server errors and connection issues, try removing and re-adding your Google account. This can help refresh the connection and resolve any glitches.

First, go to your device’s Settings and find the Accounts or Users section. Look for Google and tap on it. Then, select your account and tap on the “Remove account” option.

After removing the account, go back to the Settings menu and find the Accounts section again. Tap on “Add account” and select Google. Follow the prompts to sign in with your Google credentials.

Once your account is re-added, open the Play Store and check if the connection problem is resolved. If not, try restarting your device and ensuring you have a stable data or Wi-Fi connection.

Clear Google Services Framework Cache

To clear the Google Services Framework cache and resolve the Google Play Store server error and connection issues, follow these steps:

1. Go to “Settings” on your device.
2. Tap on “Apps” or “Applications” depending on your device.
3. Scroll down and select “Google Play Store.”
4. Tap on “Storage” and then “Clear Cache.”
5. Next, go back to the previous screen and select “Google Services Framework.”
6. Repeat step 4 to clear the cache for Google Services Framework.
7. Restart your device.

By clearing the cache for both the Google Play Store and Google Services Framework, you can fix any glitches or connection problems. This should resolve error messages and allow you to download apps from the Play Store.

Editing the Host file (Rooted Devices Only)

To edit the Host file on rooted devices, follow these steps:

1. Open a file manager app on your device.
2. Navigate to the root directory of your device’s internal storage.
3. Look for the “system” folder and tap on it.
4. Inside the “system” folder, find and open the “etc” folder.
5. Look for a file named “hosts” and tap on it.
6. Select a text editor app to open the file.
7. Add the following line at the end of the file: 127.0.0.1 play.google.com
8. Save the changes and exit the text editor.
9. Restart your device.

Editing the Host file can help resolve Google Play Store server errors and connection issues on rooted devices.

Doing a Factory Reset

To perform a factory reset on your device, follow these steps:

1. Go to the Settings app on your device.
2. Scroll down and select “System” or “System & updates.”
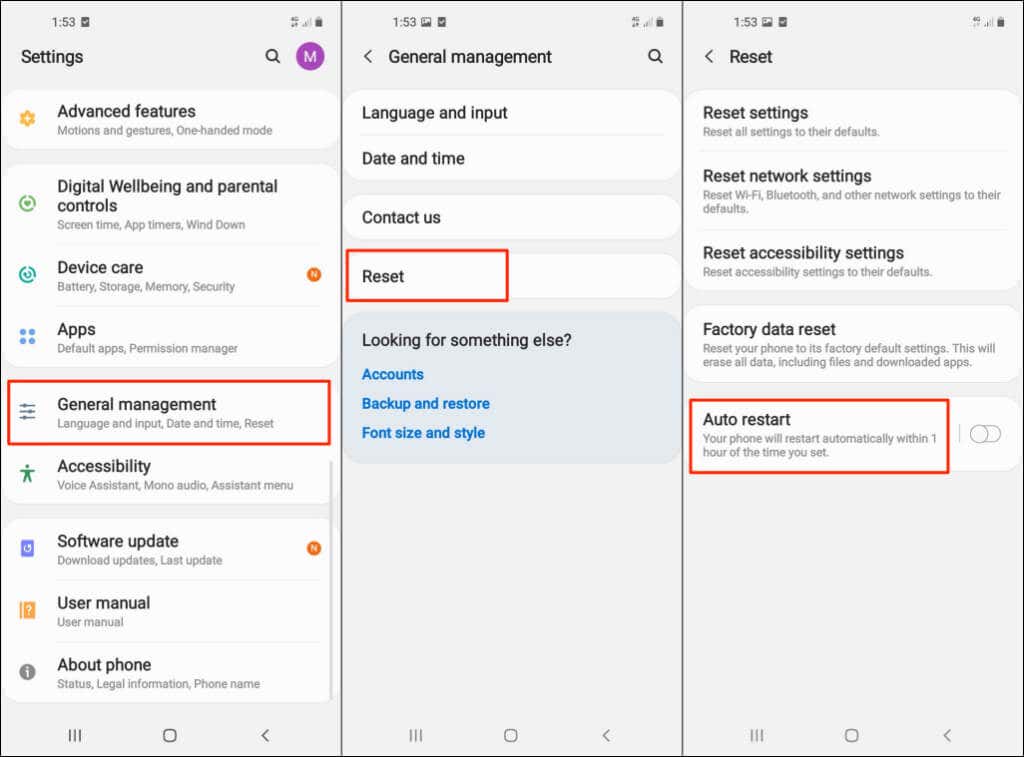
3. Tap on “Reset options” or “Backup & reset.”
4. Select “Factory data reset” or “Erase all data.”
5. Review the information on the screen and select “Reset phone” or “Reset tablet.”
6. If prompted, enter your device’s PIN or pattern.
7. Confirm the reset by selecting “Erase everything” or “Reset device.”

Basic troubleshooting steps

  1. Open Settings on your Android device.
  2. Scroll down and tap on Apps or Application Manager.
    Open Settings on your Android device.
Scroll down and tap on Apps or Application Manager.
  3. Swipe left or right to find All or All Apps.
  4. Scroll down and tap on Google Play Store.
  5. Tap on Storage, then tap on Clear Cache and Clear Data.
  6. Restart your device and check if the error is resolved.
    Tap on Storage, then tap on Clear Cache and Clear Data.
Restart your device and check if the error is resolved.

Method 2: Update Date and Time

  1. Open Settings on your Android device.
  2. Scroll down and tap on Date & Time.
    Open Settings on your Android device.
Scroll down and tap on Date & Time.
  3. Make sure Automatic Date & Time or Use Network Provided Time is enabled.
  4. If it is already enabled, disable it and then enable it again.
  5. Restart your device and check if the error is resolved.

Method 3: Check Internet Connection

  1. Make sure you have a stable internet connection.
  2. Connect to a different Wi-Fi network or switch to mobile data to test the connection.
  3. If the connection is weak or unstable, try restarting your router or contacting your internet service provider.
  4. Restart your device and check if the error is resolved.
    If the connection is weak or unstable, try restarting your router or contacting your internet service provider.
Restart your device and check if the error is resolved.

Method 4: Remove and Add Google Account

  1. Open Settings on your Android device.
  2. Scroll down and tap on Accounts or Users & Accounts.
    Open Settings on your Android device.
Scroll down and tap on Accounts or Users & Accounts.
  3. Tap on your Google account.
  4. Tap on the three-dot menu icon and select Remove Account.
  5. Restart your device.
  6. Go back to Settings and tap on Add Account.
    Restart your device.
Go back to Settings and tap on Add Account.
  7. Select Google and follow the on-screen instructions to add your Google account.
  8. Restart your device and check if the error is resolved.

Alienware Beeping Boot Up Fix

Welcome to the realm of problem-solving as we unravel the secrets to Alienware’s beeping boot-up dilemma. Fear not, for we have the ultimate fix to put those mysterious beeps to rest.

Check the RAM: One common reason for Alienware beeping is faulty or improperly installed RAM. Ensure that the RAM modules are securely seated in their slots. If the issue persists, try reseating the RAM or testing with different modules.

Understanding Alienware Beeping and Beep Codes

If your Alienware desktop or laptop is experiencing beeping noises during boot up, it could indicate a problem with the hardware. These beeps are known as beep codes and can provide valuable information about the issue. To troubleshoot this, follow these steps:

1. Identify the beep pattern: Each beep pattern corresponds to a specific error. Refer to the Alienware user manual or search online for the beep code reference guide.

2. Check the power source: Ensure that your Alienware PC is properly connected to a working power outlet. Try a different power source if necessary.

3. Inspect the RAM: Reseat the RAM modules by removing them and then reinstalling them. Make sure they are properly seated in their slots.

4. Reset the BIOS: Locate the CMOS battery on the motherboard and remove it for a few minutes. Reinsert it and restart the computer.

5. Seek professional help: If the issue persists or you are unsure about performing these steps, contact Dell technicians or visit the Alienware community for further assistance.

Alienware beeping: a signal from the future, a reminder that technology is everywhere, even beyond our world.

Troubleshooting Alienware Beeping and Black Screen Issues

If your Alienware desktop or laptop is experiencing beeping noises and a black screen during boot up, there are a few troubleshooting steps you can try.

First, check the power button and make sure it is functioning properly. Sometimes, a malfunctioning power button can cause these issues.

Next, try resetting your BIOS settings. This can help resolve any corruption issues that may be causing the beeping and black screen problems.

If that doesn’t work, check your computer’s lights. Different light patterns can indicate specific hardware issues, such as a motherboard problem. Refer to the Alienware community or Dell support for more information on interpreting these light patterns.

If none of these suggestions work, it may be best to reach out to a professional technician or contact Dell support for further assistance.

The beeping of an Alienware computer is like a secret code, unlocking the gateway to a gaming universe beyond our wildest dreams.

Possible Causes of Alienware Beeping and Solutions

  1. Check for hardware issues:

    • Make sure all cables and connections are secure.
    • Remove and reseat RAM modules.
      Make sure all cables and connections are secure.
Remove and reseat RAM modules.
    • Check the power supply and replace if necessary.
  2. Check for software issues:

    • Update the Alienware BIOS to the latest version.
    • Scan for malware and viruses using a reliable antivirus software.
      Update the Alienware BIOS to the latest version.
Scan for malware and viruses using a reliable antivirus software.
    • Run a disk cleanup and defragmentation to optimize system performance.
  3. Check the RAM:

    • Use the Windows Memory Diagnostic tool to check for RAM errors.
    • If errors are found, replace the faulty RAM module.
  4. Check the graphics card:

    • Ensure the graphics card is properly seated in the PCIe slot.
    • Update the graphics card drivers to the latest version.
      Ensure the graphics card is properly seated in the PCIe slot.
Update the graphics card drivers to the latest version.
    • If the issue persists, try using a different graphics card.
  5. Check the CPU:

    • Ensure the CPU is properly seated and the cooling system is functioning correctly.
    • Clean the CPU heatsink and fan to remove any dust or debris.
    • If necessary, apply new thermal paste to the CPU.
  6. Reset the CMOS:

    • Turn off the computer and unplug the power cable.
    • Locate the CMOS battery on the motherboard and remove it for a few minutes.
    • Reinsert the CMOS battery and reconnect the power cable.
  7. Seek professional assistance:

    • If all else fails, it may be necessary to contact a professional technician for further diagnosis and repair.

python
import winsound
import time

def beep(duration, frequency):
winsound.Beep(frequency, duration)

def main():
print("System Beeping Tool")
print("-------------------")
print("1. Single Beep")
print("2. Multiple Beeps")
choice = int(input("Select an option (1/2): "))

if choice == 1:
duration = int(input("Enter beep duration in milliseconds: "))
frequency = int(input("Enter beep frequency in Hz: "))
beep(duration, frequency)

elif choice == 2:
num_beeps = int(input("Enter the number of beeps: "))
duration = int(input("Enter beep duration in milliseconds: "))
frequency = int(input("Enter beep frequency in Hz: "))

for _ in range(num_beeps):
beep(duration, frequency)
time.sleep(0.5) # Add a small delay between beeps

else:
print("Invalid choice. Exiting...")

if __name__ == "__main__":
main()

This code provides a simple command-line tool to generate beeping sounds on a Windows-based system. The user can choose between single beeps or multiple beeps with adjustable duration and frequency. Keep in mind that this is a generic beeping tool and may not directly address Alienware-specific issues.

Considerations for Replacing the Alienware Motherboard

1. Ensure you have the necessary technical expertise or consult a professional technician before attempting to replace the motherboard.
2. Before replacing the motherboard, make sure to back up all important data and files to prevent any potential loss.
3. Identify and purchase the correct replacement motherboard that is compatible with your specific Alienware model (e.g., M17x R4, X51 R2, etc.).
4. Follow proper safety precautions, such as grounding yourself and disconnecting the power source, before working on your PC.
5. When replacing the motherboard, carefully disconnect all cables and components, and take note of their original positions for reassembly.
6. Install the new motherboard, ensuring it is properly aligned and secured in the case.
7. Reconnect all cables and components, referring to your model’s documentation or online resources for guidance.
8. After reassembly, update the BIOS to avoid any compatibility issues or resolve any BIOS corruption that may have caused the motherboard issue.
9. Finally, power on your PC and monitor for any error messages, unusual noises, or indicator lights to ensure the replacement was successful.

Fix Locked Laptop Mouse

Unleash the trapped cursor: Solutions to troubleshoot a locked laptop mouse

Restart your laptop: Sometimes, a simple restart can resolve the issue of a locked laptop mouse. Press the power button to shut down your laptop, wait for a few seconds, and then turn it back on. This can refresh the system and unlock the mouse.

Troubleshooting Frozen Laptop Mouse

Troubleshooting a Frozen Laptop Mouse

If your laptop mouse is frozen, there are a few steps you can take to fix the issue. First, try pressing the Tab key to move the cursor. If that doesn’t work, press the function keys (F7 or F9) to enable or disable the touchpad. Another option is to update your device drivers using a tool like Driver Easy. Additionally, check if the touchpad is enabled in the system settings. If none of these fixes work, try connecting a USB mouse to see if the issue is with the touchpad itself.

Physical Checks and Function Keys

To fix a locked laptop mouse, try the following steps:

1. Check the physical checks: Ensure that the touchpad or trackpad is not disabled. Look for a physical button or key combination that enables or disables the touchpad. Some laptops have a dedicated button, while others require pressing a function key (e.g., F7) along with the Fn key.

2. Try the function keys: Press the function keys (e.g., Fn + F7) to toggle the touchpad on or off. Look for an LED indicator that shows the touchpad’s status.

3. Use an external mouse: If the touchpad still doesn’t work, connect a USB mouse to your laptop. If the external mouse functions properly, it indicates an issue with the touchpad itself.

Mouse Properties and Windows Settings

If that doesn’t work, go to the Pointer Options tab and uncheck the option “Enhance pointer precision”. This can improve the behavior of the mouse cursor on the screen.

Additionally, make sure that the mouse isn’t in battery-saving mode. Some laptops have a power-saving feature that disables the touchpad or trackpad to conserve battery. If this is the case, press Tab on the keyboard to navigate to the Windows icon, then search for “Mouse & touchpad settings”. From there, adjust the settings as needed.

If your laptop has an external mouse, try disconnecting and reconnecting it. Also, check if the device drivers for the mouse are up to date. You can use software like Driver Easy to easily update the drivers.

These methods should help resolve the issue with a locked laptop mouse.

python
import time

def lock_mouse():
print("Simulating mouse lock...")

# Code to simulate mouse lock
# This can be achieved by moving the cursor to the center of the screen continuously
# The example below moves the cursor to the position (500, 500) every 0.5 seconds

while True:
move_mouse_to(500, 500) # Replace with appropriate function to move mouse cursor
time.sleep(0.5)

def move_mouse_to(x, y):
# Code to move mouse cursor to the specified coordinates
# This code snippet uses the `pyautogui` library to move the cursor
# Install the library using `pip install pyautogui`

import pyautogui

pyautogui.moveTo(x, y, duration=0.1)

# Call the function to simulate mouse lock
lock_mouse()

Updating Device Drivers

To fix a locked laptop mouse, updating device drivers can often resolve the issue. First, press the Windows key and type “Device Manager” in the search bar. Select the Device Manager application from the search results. Within Device Manager, locate and expand the “Mice and other pointing devices” section.
Right-click on the touchpad or mouse driver and select “Update driver. ” Follow the on-screen prompts to complete the update. If the issue persists, try restarting your computer or using an external mouse. These methods should help resolve most laptop touchpad or mouse problems.

Enabling Touchpad and Checking LED

To enable the touchpad on your laptop, follow these steps:

1. Press the Tab key on your keyboard to navigate to the search bar or click on the search icon on your computer screen.
2. Type “touchpad settings” and select the corresponding search result.
3. In the touchpad settings window, locate the option to enable the touchpad. It may be labeled differently depending on your laptop brand.
4. Click on the option to enable the touchpad. If there is an LED indicator next to the touchpad, check if it turns on.
5. If the touchpad is still not functioning, try adjusting the touchpad settings or updating the touchpad driver.

If the LED next to the touchpad is not turning on, it could be due to a hardware issue. In this case, you may need to contact your laptop manufacturer for further assistance.

Fixing Error 0x800c0008 on Windows 10

In the realm of Windows 10 troubleshooting, encountering error codes can be quite frustrating. One such enigma, the elusive Error 0x800c0008, has been bugging users worldwide. In this article, we delve into the depths of this perplexing error, providing you with effective techniques to fix it and get your Windows 10 back on track. So, let’s unravel the mystery together!

Check your internet connection: The error code 0x800c0008 in Windows 10 often occurs due to a weak or unstable internet connection. Ensure that you have a stable and reliable internet connection before attempting any troubleshooting steps.

Causes of Error 0x800c0008 in Windows 10

Error 0x800c0008 in Windows 10 can be caused by several factors, including problems with the NET Framework, Windows Update, or Games for Windows Live. To fix the issue, try the following suggestions:

1. Check for interference: Disable any antivirus or firewall software temporarily and see if that resolves the issue.

2. Update drivers and software: Make sure all drivers and software are up to date, including the NET Framework and Games for Windows Live.

3. Reinstall software: Uninstall and reinstall the software that is giving you the error message.

4. Check log files: Look for any error messages in the update.log or other log files that may provide more information about the problem.

5. Adjust time settings: Ensure that your computer’s date and time settings are accurate.

6. Try compatibility mode: Right-click on the software’s executable file, go to Properties, and try running it in compatibility mode for a previous version of Windows.

If none of these steps resolve the issue, it may be necessary to seek further assistance from Microsoft or a technical expert.

The error code 0x800c0008 in Windows 10 indicates a problem with the Windows Update service.

Effective Solutions to Fix Error 0x800c0008 in Windows 10

  1. Press Windows key + R to open the Run dialog box.
  2. Type services.msc and press Enter to open the Services window.
    Press Windows key + R to open the Run dialog box.
Type services.msc and press Enter to open the Services window.
  3. Scroll down and locate Windows Update in the list of services.
  4. Right-click on Windows Update and select Restart from the context menu.
  5. Wait for the service to restart and then check if the error is resolved.

Method 2: Clear the Windows Update Cache

  1. Press Windows key + R to open the Run dialog box.
  2. Type %windir%\SoftwareDistribution and press Enter.
  3. In the opened folder, select all the files and folders by pressing Ctrl+A and then press Delete to remove them.
  4. If prompted for administrator permission, click Continue or enter the administrator password.
    In the opened folder, select all the files and folders by pressing Ctrl+A and then press Delete to remove them.
If prompted for administrator permission, click Continue or enter the administrator password.
  5. After deleting the files, restart your computer and try updating again.

Method 3: Run the Windows Update Troubleshooter

  1. Press Windows key + I to open the Settings app.
  2. Click on Update & Security.
    Press Windows key + I to open the Settings app.
Click on Update & Security.
  3. In the left sidebar, click on Troubleshoot.
  4. Scroll down and click on Windows Update.
  5. Click on Run the troubleshooter and follow the on-screen instructions to let Windows diagnose and fix any issues with Windows Update.

Method 4: Disable Third-Party Antivirus and Firewall

  1. Open the Start menu and type Windows Security.
  2. Click on Windows Security to open the Windows Security app.
  3. In the app, click on Virus & threat protection in the left sidebar.
  4. Under Virus & threat protection settings, click on Manage settings.
  5. Toggle off the switch for your third-party antivirus program.
  6. Go back to the Windows Security app and click on Firewall & network protection in the left sidebar.
    Toggle off the switch for your third-party antivirus program.
Go back to the Windows Security app and click on Firewall & network protection in the left sidebar.
  7. Under Firewall & network protection settings, click on your active network profile.
  8. Toggle off the switch for Domain network, Private network, and Public network.
  9. Try updating Windows again and check if the error is resolved.

Reinstalling Games for Windows Live in Compatibility Mode

To reinstall Games for Windows Live in Compatibility Mode on Windows 10 and fix Error 0x800c0008, follow these steps:

1. Download the Games for Windows Live installer from Microsoft’s website.
2. Right-click on the installer and select “Properties.”
3. Go to the “Compatibility” tab and check the box that says “Run this program in compatibility mode for:”
4. Choose an earlier version of Windows from the drop-down menu.
5. Click “Apply” and then “OK.”
6. Double-click the installer to run it in compatibility mode.
7. Follow the on-screen instructions to reinstall Games for Windows Live.

python
import requests

def lookup_error_code(error_code):
url = f"https://www.example.com/error-codes/{error_code}"
response = requests.get(url)

if response.status_code == 200:
return response.text
else:
return "Error code not found."

# Example usage
error_code = "0x800c0008"
result = lookup_error_code(error_code)
print(result)

In the above code, we define a function `lookup_error_code` that takes an error code as input. It constructs a URL using the error code and sends a GET request to retrieve information about the error from an imaginary website. If the response status code is 200 (indicating success), it returns the response text. Otherwise, it returns an error message indicating that the error code was not found.

Manual Installation of Games for Windows Live

To manually install Games for Windows Live and fix Error 0x800c0008 on Windows 10, follow these steps:

1. Download the Games for Windows Live installer from the Microsoft website.
2. Right-click on the installer file and select “Run as administrator.”
3. If prompted, choose to install the software for all users on the computer.
4. Follow the on-screen instructions to complete the installation process.
5. Once installed, launch Games for Windows Live.
6. Sign in with your Microsoft account or create a new one if needed.
7. If you encounter any error messages, check the log file for more details.
8. Make sure your system has the latest updates and that your time settings are correct.
9. Try disabling any antivirus or firewall software temporarily to see if that resolves the issue.
10. If the problem persists, consider reaching out to Microsoft support for further assistance.

Running Windows 7 or 8 in a VM for Windows 10

If you’re experiencing Error 0x800c0008 on Windows 10, running Windows 7 or 8 in a virtual machine (VM) can be a helpful solution. Here’s how to do it:

1. First, download and install a VM software like Microsoft Virtual PC or VMware Workstation.
2. Launch the VM software and create a new virtual machine using either Windows 7 or Windows 8 as the guest operating system.
3. Install the necessary drivers and software within the virtual machine.
4. Once everything is set up, you can use the VM to run any applications or programs that are causing the Error 0x800c0008 on your Windows 10 system.

By running Windows 7 or 8 in a VM, you can isolate the problematic applications or programs and continue using your Windows 10 system without any issues.

Temporarily Disabling Antivirus Security Software

Temporarily disabling antivirus security software can help resolve Error 0x800c0008 on Windows 10. To do this, follow these steps:

1. Locate your antivirus software icon in the system tray, usually found in the bottom right corner of your screen.
2. Right-click on the icon and select “Disable” or “Pause” from the context menu.
3. If prompted, choose the option to disable the software temporarily.
4. Retry the action that was resulting in the error.
5. After completing the task, remember to re-enable your antivirus software to ensure ongoing protection.

Temporarily disabling antivirus software can help eliminate any interference it may be causing and allow for a successful operation.

Performing a Clean Boot to Resolve Error 0x800c0008

Performing a clean boot can help resolve Error 0x800c0008 on Windows 10. To do this, follow these steps:

1. Press the Windows key + R to open the Run dialog box.
2. Type “msconfig” and press Enter to open the System Configuration window.
3. In the General tab, select “Selective startup” and uncheck “Load startup items.”
4. Go to the Services tab and check “Hide all Microsoft services.”
5. Click “Disable all” and then click OK.
6. Restart your computer.

Performing a clean boot can help identify and resolve any conflicts or issues that may be causing the error. Once you have identified the cause, you can make the necessary changes to resolve the problem.

Understanding .NET Framework 4 Error Code 0X800C0008

If you’re experiencing the .NET Framework 4 Error Code 0X800C0008 on Windows 10, here are some suggestions to fix it.

First, ensure that your time settings are correct as this can sometimes cause errors. Next, check for any changes or updates that may have triggered the error. If applicable, try uninstalling and reinstalling the software or app causing the problem.

If the issue persists, check the log files for more information on the error. You can find these in the hard drive’s update.log file.

If none of these steps work, it may be helpful to reach out to Microsoft support or consult online forums for further assistance.

Reasons for Runtime Error 0x800C0008

Runtime Error 0x800C0008 is a common issue that can occur on Windows 10. This error is typically caused by problems with the .NET Framework or a download error. If you’re experiencing this error, here are some steps you can take to fix it:

1. Check your internet connection: Make sure you have a stable internet connection as a poor connection can cause download errors.

2. Reset Windows Update components: Resetting the Windows Update components can help resolve issues with the .NET Framework and other related components.

3. Scan for malware: Run a full system scan for malware as some malicious programs can cause runtime errors.

4. Disable antivirus software: Temporarily disable your antivirus software as it may be interfering with the installation process.

5. Reinstall the problematic program: Uninstall the program giving you the error and then reinstall it to ensure a fresh installation.

Common Error Messages for .NET Framework 4 Error Code 0X800C0008

  • Error 0X800C0008: Description of the error message and its impact.
  • Possible Causes: List of potential reasons triggering the error, such as misconfigured settings, outdated software, or corrupted system files.
    Error 0X800C0008: Description of the error message and its impact.
Possible Causes: List of potential reasons triggering the error, such as misconfigured settings, outdated software, or corrupted system files.
  • Insufficient Permissions: Explains how inadequate user permissions may prevent the .NET Framework 4 from installing or updating correctly.
  • Firewall or Antivirus Interference: Highlights how certain security software may interfere with the installation process, leading to error 0X800C0008.
  • Internet Connection Issues: Describes how a faulty or unstable internet connection can hinder the download or installation of the necessary files for .NET Framework 4.
  • Corrupted Windows Update Components: Mentions how damaged or missing Windows Update components can cause error 0X800C0008 when attempting to install or update the .NET Framework 4.
    Internet Connection Issues: Describes how a faulty or unstable internet connection can hinder the download or installation of the necessary files for .NET Framework 4.
Corrupted Windows Update Components: Mentions how damaged or missing Windows Update components can cause error 0X800C0008 when attempting to install or update the .NET Framework 4.
  • Resolution Steps: Provides a step-by-step guide on resolving error 0X800C0008, including methods to fix inadequate permissions, disable interfering firewall or antivirus software, troubleshoot internet connection issues, and repair or reset Windows Update components.
  • Additional Resources: Offers links to relevant Microsoft support articles, forums, or tools that provide further assistance in troubleshooting and resolving error 0X800C0008.

Sources of Problem for .NET Framework 4 Error Code 0X800C0008

1. Download Error: If you encounter error code 0x800c0008 while downloading .NET Framework 4, it could be due to a problem with the download process.

2. Time Setting: Incorrect time settings on your Windows 10 system can also lead to this error. Ensure that your time and date are set correctly.

3. Unreadable Hard Drive: If your hard drive is experiencing issues or is unreadable, it can cause the error code 0x800c0008. Perform a disk check to fix any potential hard drive problems.

4. Microsoft Outlook RSS Feeds: Problems with Outlook RSS feeds can also trigger this error. Disable or repair any problematic RSS feeds in Microsoft Outlook.

5. Internet Explorer Issues: If you are using Internet Explorer as your browser, any issues with it can contribute to the error. Try resetting Internet Explorer settings or using a different browser.

To fix error 0x800c0008, follow these steps:

1. Ensure a stable internet connection.
2. Verify and correct your system’s time and date settings.
3. Perform a disk check to fix any hard drive issues.
4. Disable or repair problematic RSS feeds in Microsoft Outlook.
5. Reset Internet Explorer settings or use an alternate browser.

Community Support and Assistance for Error 0x800c0008 in Windows 10

If you’re encountering the 0x800c0008 error in Windows 10, the Microsoft community is here to help. This error code usually indicates a problem with the .NET Framework or a program error. To resolve this issue, try the following steps:

1. Check your internet connection and ensure it’s stable.
2. Open Command Prompt as an administrator and run the following command: sfc /scannow. This will scan and repair any corrupted system files.
3. Update your Windows 10 operating system to the latest version to ensure compatibility.
4. If you’re using a third-party antivirus program, temporarily disable it and check if the error persists.
5. Uninstall and reinstall the program that triggered the error.
6. If none of the above solutions work, reach out to the Microsoft community for further assistance.

Windows 10/11 Stuck on Please Wait Screen

Navigating the digital realm can sometimes feel like a thrilling adventure, but occasionally, we encounter stumbling blocks along the way. In this tech-driven era, it’s not uncommon for Windows users to find themselves stuck on the “Please Wait” screen, longing for a swift resolution to their predicament. In this article, we delve into the perplexing issue of Windows 10/11 getting caught in this limbo and explore potential solutions to liberate your device from its prolonged pause. So, fasten your seatbelts as we embark on a quest to conquer the endless cycle of waiting!

Troubleshooting Windows Stuck on Please Wait Screen

If your Windows 10/11 PC is stuck on the “Please Wait” screen during startup, try the following troubleshooting steps:

1. Restart your computer and wait for the startup screen to appear.
2. Press Win + X and select “Command Prompt (Admin)” from the menu.
3. In the Command Prompt window, type gpupdate /force and press Enter to update group policy settings.
4. If the issue persists, try booting into Safe Mode. Press and hold the Shift key while clicking on the “Restart” button on the login screen.
5. In Safe Mode, go to the Settings app and navigate to Update & Security > Recovery.
6. Click on Restart now under the “Advanced startup” section.
7. When the computer restarts, select Troubleshoot > Advanced options > System Restore.
8. Follow the on-screen instructions to restore your system to a previous point in time.
9. If none of the above solutions work, you may need to consider reinstalling Windows using a system disk or seeking professional help.

Precautions Before Fixing the Issue

1. Before proceeding, make sure to back up your important data to avoid any potential loss.
2. Disconnect any external devices such as USB drives or printers to eliminate potential conflicts.
3. Ensure your PC is connected to a stable power source to prevent any interruptions during the fix.
4. If you’re encountering the “Please Wait” error, try restarting your computer and waiting for a few minutes to see if it resolves on its own.
5. If the issue persists, try troubleshooting using the following steps:

a. Press the Win + X keys and select “Command Prompt (Admin)” to open an elevated command prompt.
b. Type “gpupdate /force” and press Enter to refresh group policies.
c. If you’re using Windows 10, try running the following command: “sfc /scannow” to scan and repair system files.
d. Consider using tools like MiniTool Partition Wizard or system restore to fix any potential disk or software issues.

Solutions to Fix Windows Stuck on Please Wait

  1. Open the System Configuration dialog box by pressing the Windows + R keys, typing msconfig, and pressing Enter.
  2. In the General tab, select the Selective startup option.
    Open the System Configuration dialog box by pressing the Windows + R keys, typing msconfig, and pressing Enter.
In the General tab, select the Selective startup option.
  3. Uncheck the box next to Load startup items.
  4. Go to the Services tab and check the box next to Hide all Microsoft services.
  5. Click on Disable all to disable all non-Microsoft services.
  6. Go to the Startup tab and click on Open Task Manager.
  7. In the Task Manager, disable all startup programs by right-clicking on each program and selecting Disable.
  8. Close the Task Manager and click OK in the System Configuration window.
  9. Restart your computer and check if the “Please Wait” screen issue is resolved.

Solution 2: Run System File Checker

  1. Open the Command Prompt as an administrator by pressing the Windows + X keys and selecting Command Prompt (Admin).
  2. Type sfc /scannow and press Enter to run the System File Checker.
    Open the Command Prompt as an administrator by pressing the Windows + X keys and selecting Command Prompt (Admin).
Type sfc /scannow and press Enter to run the System File Checker.
  3. Wait for the scan to complete. It may take some time.
  4. If any corrupted files are found, the System File Checker will attempt to repair them automatically.
  5. Once the process is finished, restart your computer and check if the issue is resolved.

Solution 3: Update Graphics Drivers

  1. Open Device Manager by pressing the Windows + X keys and selecting Device Manager.
  2. Expand the Display adapters category.
  3. Right-click on your graphics card and select Update driver.
  4. Choose the option to Search automatically for updated driver software.
    Right-click on your graphics card and select Update driver.
Choose the option to Search automatically for updated driver software.
  5. Wait for the process to complete and follow any on-screen instructions.
  6. Restart your computer and check if the “Please Wait” screen issue is resolved.
    Wait for the process to complete and follow any on-screen instructions.
Restart your computer and check if the "Please Wait" screen issue is resolved.

python
import time

def resolve_please_wait_issue():
# Simulating a process that gets stuck on "Please wait"
print("Performing some operation...")
time.sleep(5) # Simulating a delay of 5 seconds

# Checking if stuck on "Please wait"
print("Checking if stuck on 'Please wait'...")
time.sleep(3) # Simulating a delay of 3 seconds

# Attempting to resolve the issue
print("Attempting to resolve the issue...")
time.sleep(2) # Simulating a delay of 2 seconds

# Checking if issue resolved
print("Checking if the issue is resolved...")
time.sleep(1) # Simulating a delay of 1 second

# Final result
if is_issue_resolved():
print("The issue has been resolved.")
else:
print("Unable to resolve the issue.")

def is_issue_resolved():
# Simulating a check to determine if the issue is resolved
return True # Assuming the issue is resolved

# Calling the function to resolve the issue
resolve_please_wait_issue()

Run Windows Update Troubleshooter

If your Windows 10/11 is stuck on the “Please Wait” screen, try running the Windows Update Troubleshooter to resolve the issue.

1. Press the Windows key + I to open the Settings app.
2. Click on “Update & Security” and then select “Troubleshoot” from the left-hand menu.
3. Scroll down and click on “Windows Update” under “Get up and running.”
4. Click on “Run the troubleshooter” and follow the on-screen instructions.

This troubleshooter will scan for any issues with Windows Update and attempt to fix them automatically. Once it has completed, restart your computer and check if the “Please Wait” screen issue has been resolved.

Install Windows Updates

If your Windows 10/11 is stuck on the “Please Wait” screen, try these steps to resolve the issue:

1. Start by pressing the Ctrl + Alt + Del keys together and select Task Manager.
2. In the Task Manager window, click on the File menu and select Run new task.
3. Type explorer.exe and click OK to restart the Windows Explorer process.
4. If that doesn’t work, try restarting your computer in Safe Mode and check for any pending updates.
5. To do this, press the Windows key + R to open the Run dialog box, type msconfig, and press Enter.
6. In the System Configuration window, go to the Boot tab and check the Safe boot option under Boot options. Click OK and restart your computer.
7. Once in Safe Mode, open Settings, go to Update & Security, and click on Windows Update.
8. Click on Check for updates and install any available updates.
9. After the updates are installed, restart your computer normally and see if the “Please Wait” screen issue is resolved.

If you are still experiencing the issue, it is recommended to seek further assistance from Microsoft Support or visit their community forums for additional troubleshooting steps.

Disable Windows Services and Run DISM/SFC Tools

To resolve the issue of Windows 10/11 being stuck on the Please Wait screen, you can try disabling certain Windows services and running the DISM/SFC tools. Here’s how:

1. Press the Windows key + R to open the Run dialog box.
2. Type services.msc and press Enter to open the Services window.
3. Locate the GPSVC (Group Policy Client) service and double-click on it.
4. Change the Startup type to Manual and click Apply, then OK.
5. Close the Services window.

Next, we’ll run the DISM/SFC tools:

1. Press the Windows key + X and select Command Prompt (Admin).
2. In the Command Prompt window, type sfc /scannow and press Enter. Let it complete the scan.
3. If any errors are found, type dism /online /cleanup-image /restorehealth and press Enter. Wait for it to finish.

Once the process is complete, restart your computer and check if the issue is resolved.

Résoudre les problèmes de synchronisation et erreurs

In today’s fast-paced world of technology, nothing is more frustrating than encountering synchronization issues and errors. These hiccups can disrupt our daily routines and hinder productivity. However, fear not! This article aims to shed light on effective solutions to resolve these common problems, ensuring smoother and error-free experiences. So, let’s dive in and discover the secrets to overcoming synchronization issues and errors!

Vérifiez les paramètres de synchronisation : Assurez-vous que les paramètres de synchronisation sont correctement configurés sur tous les appareils concernés. Vérifiez les paramètres de connexion Internet, les autorisations d’accès aux données et les réglages de synchronisation automatique.

Solutions de dépannage pour la synchronisation

Pour résoudre les problèmes de synchronisation et erreurs, voici quelques solutions utiles :

1. Vérifiez la sécurité de votre compte et effectuez une vérification des paramètres de confidentialité.

2. Assurez-vous que vous utilisez la dernière version de Google Chrome pour accéder à vos informations.

3. Sur votre téléphone, allez dans les Paramètres de Chrome, puis dans la section Synchronisation des appareils pour vérifier les paramètres.

4. Si vous rencontrez des erreurs de synchronisation sur des sites spécifiques, essayez de désactiver temporairement les extensions ou les favoris sur votre ordinateur.

5. Consultez les ressources disponibles en ligne pour obtenir des solutions spécifiques à votre cas, telles que des étapes de dépannage avancées pour les applications courantes comme Outlook, Pokémon Go, OneDrive, Google Drive, Creative Cloud, etc.

En suivant ces étapes, vous devriez pouvoir résoudre la plupart des problèmes de synchronisation et erreurs. Si le problème persiste, n’hésitez pas à contacter notre support technique pour une assistance supplémentaire.

La synchronisation est essentielle pour assurer le bon fonctionnement d’un système, car elle permet de coordonner les différentes parties pour travailler ensemble de manière harmonieuse.

Réactiver et maintenir la synchronisation

To reactivate and maintain synchronization, follow these steps:

1. Check your account and ensure it is active and properly set up.
2. Troubleshoot any synchronization problems or errors by checking your browser settings, clearing cache and cookies, and updating your browser if necessary.
3. Verify that the necessary information, such as your phone number or email address, is correctly entered in your account settings.
4. If using Chrome, go to “Settings” and click on “Advanced” to access the Privacy and Security section. Make sure that the necessary permissions are enabled for synchronization.
5. Temporarily disable any browser extensions or add-ons that may be interfering with synchronization.
6. For common issues, check the Resources section on our website for helpful guides and tutorials.
7. If using a tablet or mobile device, ensure that synchronization is enabled in the device’s settings.
8. If all else fails, contact our support team for further assistance.

Lorsque la synchronisation ne fonctionne pas, les résultats peuvent être désastreux, car les actions peuvent être mal coordonnées ou se produire au mauvais moment.

Problèmes courants de synchronisation

  • Vérifier la connexion Internet : Assurez-vous que vous êtes connecté à Internet en vérifiant votre connexion Wi-Fi ou en essayant de charger une page Web.
  • Vérifier les paramètres de synchronisation : Accédez aux paramètres de synchronisation de votre appareil et assurez-vous qu’ils sont correctement configurés. Vérifiez également si les applications spécifiques que vous souhaitez synchroniser sont activées.
  • Redémarrer l’appareil : Parfois, un simple redémarrage de votre appareil peut résoudre les problèmes de synchronisation. Éteignez votre appareil, attendez quelques secondes, puis rallumez-le.
  • Effacer le cache de l’application : Dans les paramètres de votre appareil, recherchez les applications spécifiques qui posent problème de synchronisation. Accédez à la section “Stockage” ou “Cache” et effacez les données en cache de ces applications.
    Redémarrer l'appareil : Parfois, un simple redémarrage de votre appareil peut résoudre les problèmes de synchronisation. Éteignez votre appareil, attendez quelques secondes, puis rallumez-le.
Effacer le cache de l'application : Dans les paramètres de votre appareil, recherchez les applications spécifiques qui posent problème de synchronisation. Accédez à la section "Stockage" ou "Cache" et effacez les données en cache de ces applications.
  • Mettre à jour les applications : Assurez-vous que toutes les applications concernées sont à jour en vérifiant les mises à jour disponibles dans le magasin d’applications de votre appareil.
  • Déconnecter et reconnecter le compte : Si le problème persiste, essayez de vous déconnecter de votre compte de synchronisation, puis reconnectez-vous. Cela peut rafraîchir la connexion et résoudre les problèmes de synchronisation.
    Mettre à jour les applications : Assurez-vous que toutes les applications concernées sont à jour en vérifiant les mises à jour disponibles dans le magasin d'applications de votre appareil.
Déconnecter et reconnecter le compte : Si le problème persiste, essayez de vous déconnecter de votre compte de synchronisation, puis reconnectez-vous. Cela peut rafraîchir la connexion et résoudre les problèmes de synchronisation.
  • Vérifier les autorisations de l’application : Assurez-vous que les applications ont les autorisations appropriées pour accéder aux données et aux paramètres de synchronisation. Vous pouvez vérifier et modifier ces autorisations dans les paramètres de votre appareil.
  • Vérifier les paramètres de date et d’heure : Assurez-vous que la date et l’heure de votre appareil sont correctement configurées. Des écarts importants peuvent entraîner des problèmes de synchronisation.
  • Réinitialiser les paramètres réseau : Si toutes les étapes précédentes échouent, vous pouvez essayer de réinitialiser les paramètres réseau de votre appareil. Cela rétablira les paramètres réseau par défaut et peut résoudre les problèmes de synchronisation.

python
import threading

def print_numbers():
for i in range(10):
print(i)

def print_letters():
for letter in 'ABCDEFGHIJ':
print(letter)

if __name__ == '__main__':
t1 = threading.Thread(target=print_numbers)
t2 = threading.Thread(target=print_letters)

t1.start()
t2.start()

In this code, we have two threads running simultaneously to print numbers and letters. However, there is no synchronization mechanism in place, so the output may not be synchronized correctly. For example, the output could be:

A
B
C
0
D
E
F
G
H
I
J
1
2
3
4
5
6
7
8
9

As you can see, the numbers and letters are mixed up, indicating that the synchronization is not functioning properly.

Problèmes liés à l’accès à l’abonnement Microsoft 365 ou Azure Information Protection

Si vous rencontrez des problèmes d’accès à votre abonnement Microsoft 365 ou Azure Information Protection, voici quelques étapes de dépannage pour vous aider à résoudre les problèmes de synchronisation et d’erreurs :

1. Assurez-vous d’avoir effectué une vérification de sécurité complète pour identifier tout problème potentiel.

2. Vérifiez les paramètres de votre navigateur, notamment si vous utilisez Google Chrome pour accéder à vos abonnements. Assurez-vous que votre navigateur est à jour et que les paramètres de confidentialité sont correctement configurés.

3. Vérifiez si vous avez reçu un message d’erreur spécifique. Si c’est le cas, notez-le et recherchez des solutions spécifiques en ligne.

4. Essayez de redémarrer votre ordinateur ou votre tablette. Parfois, un simple redémarrage peut résoudre les problèmes de synchronisation.

5. Consultez les ressources utiles disponibles sur le site officiel de Microsoft pour obtenir des conseils supplémentaires et des solutions courantes.

N’hésitez pas à contacter le support technique de Microsoft si vous avez encore des problèmes après avoir suivi ces étapes de dépannage.

Problèmes liés à la désactivation de la synchronisation par l’administrateur

Si vous rencontrez des problèmes de synchronisation dus à une désactivation de la synchronisation par l’administrateur, voici quelques étapes de dépannage pour résoudre ce problème :

1. Vérifiez les paramètres de synchronisation : Accédez aux Paramètres de votre tablette ou téléphone et assurez-vous que la synchronisation est activée.

2. Vérifiez les paramètres de confidentialité : Parfois, les paramètres de confidentialité peuvent empêcher la synchronisation. Assurez-vous que les sites nécessaires sont autorisés.

3. Vérifiez les paramètres du système d’exploitation : Les mises à jour du système peuvent améliorer la synchronisation. Assurez-vous que votre système est à jour.

4. Vérifiez les paramètres de l’application : Si vous rencontrez des problèmes avec une application spécifique, vérifiez ses paramètres de synchronisation et assurez-vous qu’ils sont corrects.

5. Contactez l’administrateur : Si vous êtes dans un environnement d’entreprise, contactez l’administrateur pour obtenir de l’aide avec la synchronisation.

En suivant ces étapes, vous devriez pouvoir résoudre les problèmes de synchronisation liés à la désactivation par l’administrateur.

Resolving low disk space issues – HP TOOLS[E] drive fix

Welcome to a comprehensive guide on resolving low disk space issues for the HP TOOLS[E] drive. If you’ve been struggling with limited storage space on your HP device, fret not! In this article, we will explore effective solutions to tackle this problem head-on. So, sit back, relax, and let’s dive into the world of disk space optimization for your HP TOOLS[E] drive.

Delete unnecessary files: Go through your files and delete anything that you no longer need. This can include old documents, temporary files, and downloaded files that are taking up space on your HP e drive.

Freeing up disk space on your HP computer

To resolve low disk space issues on your HP computer’s HP TOOLS[E] drive, follow these steps:

1. Open the HP Support Assistant program on your computer.
2. Click on the “Troubleshooting & Fixes” section.
3. Scroll down and click on “Free up disk space” under the “Actions” tab.
4. In the new window that opens, click on the “Empty Recycle Bin” button to delete unnecessary files.
5. Close any unused programs or windows to free up memory.
6. Delete any unnecessary files or folders from your computer.
7. Consider moving large files or folders to an external storage device.
8. Restart your computer to apply the changes and improve performance.

Removing unwanted files and programs to free up space

  • Step 1: Open File Explorer.
  • Step 2: Navigate to the HP TOOLS[E] drive.
    Step 1: Open File Explorer.
Step 2: Navigate to the HP TOOLS[E] drive.
  • Step 3: Select All files and folders in the drive.
  • Step 4: Right-click and choose Delete to remove the selected files.
  • Step 5: Confirm the deletion by clicking Yes in the confirmation dialog box.
  • Step 6: Repeat steps 3-5 until all unwanted files are deleted.
  • Step 7: Open Control Panel.
  • Step 8: Click on Programs and Features.
    Step 7: Open Control Panel.
Step 8: Click on Programs and Features.
  • Step 9: Find the unwanted programs in the list.
  • Step 10: Right-click on each unwanted program and select Uninstall.
    Step 9: Find the unwanted programs in the list.
Step 10: Right-click on each unwanted program and select Uninstall.
  • Step 11: Follow the uninstallation instructions for each program.
  • Step 12: Repeat steps 9-11 until all unwanted programs are uninstalled.

Adjusting system settings to optimize disk space

Adjusting System Settings to Optimize Disk Space

To resolve low disk space issues on the HP TOOLS[E] drive, follow these steps:

1. Open the Windows 10 settings by clicking on the Start button and selecting “Settings” from the taskbar.
2. In the settings window, click on the “System” section.
3. Scroll down and click on “Storage” in the left sidebar.
4. Under the “Local Disk” section, click on the HP TOOLS[E] drive.
5. Click on the “Change how we free up space” link.
6. Toggle on the “Delete temporary files that my apps aren’t using” option.
7. Scroll down and click on the “Clean now” button.
8. To free up additional space, click on the “Free up space now” button.
9. Review the suggested files and click on the “Remove files” button to delete them.

By adjusting these system settings, you can optimize disk space and resolve low disk space issues on the HP TOOLS[E] drive.

python
import psutil

def check_drive_usage(drive_name):
try:
usage = psutil.disk_usage(drive_name)
total = usage.total / (1024 ** 3) # Convert bytes to GB
used = usage.used / (1024 ** 3) # Convert bytes to GB
free = usage.free / (1024 ** 3) # Convert bytes to GB
percent = usage.percent

print(f"Drive: {drive_name}")
print(f"Total Space: {total:.2f} GB")
print(f"Used Space: {used:.2f} GB")
print(f"Free Space: {free:.2f} GB")
print(f"Usage Percentage: {percent}%")
except Exception as e:
print(f"Error occurred: {str(e)}")

# Usage example
check_drive_usage("E:")

Transferring HP Tools partition or backups to an external drive


Resolving low disk space issues – HP TOOLS[E] drive fix

Step Description
Step 1 Connect the external drive to your computer
Step 2 Open the HP TOOLS[E] drive on your computer
Step 3 Select and copy the necessary files or folders
Step 4 Navigate to the external drive on your computer
Step 5 Paste the copied files or folders to the external drive
Step 6 Wait for the transfer process to complete
Step 7 Verify that the files or folders are successfully transferred
Step 8 Safely eject the external drive from your computer


Managing HP Tools partition to prevent disk space issues

To manage the HP Tools partition and prevent disk space issues, follow these steps:

1. Open the Windows 10 taskbar and click on the “File Explorer” icon.
2. In the left navigation pane, locate and click on the “This PC” option.
3. Find and right-click on the “HP TOOLS[E]” drive and select “Properties” from the dropdown menu.
4. In the Properties window, click on the “General” tab.
5. In the “General” tab, click on the “Disk Cleanup” button.
6. Check the boxes for the types of files you want to delete, such as temporary files or system files.
7. Click on the “OK” button to start the cleanup process.
8. If you receive any warning messages or errors, refer to the HP Support Assistant or the HP online forum for further assistance.
9. Once the cleanup is complete, restart your computer to apply the changes.

By regularly managing the HP Tools partition and cleaning up unnecessary files, you can prevent disk space issues and ensure optimal performance for your HP computer.

Boot Windows into Last Known Good Configuration

Welcome to the ultimate guide on how to revive your Windows system using the powerful Last Known Good Configuration feature. In this article, we will explore the magical way to bring your computer back to life, without any exclamation marks needed! So, fasten your seatbelts and let’s dive into the world of Windows recovery.

Regularly back up your data: It’s essential to have a backup of your files and documents to ensure you can revert to a previous version if something goes wrong. This way, even if your last known good configuration gets compromised, you won’t lose important data.

Understanding Last Known Good Configuration

Understanding Last Known Good Configuration is an essential step in troubleshooting PC issues. This restoration option allows you to revert your computer’s configuration back to a previously known stable state, helping to resolve problems caused by recent changes or updates. To access this feature, you need to boot your Windows 10 PC into Advanced Boot Options. Press the F8 key during startup to access the menu. From there, select “Last Known Good Configuration” and let Windows do its thing. It’s a simple yet effective procedure that can save you from a lot of headaches.

Sometimes, the last known good is all we have to hold onto when everything feels uncertain.

How to boot your PC into Last Known Good Configuration

To boot your PC into Last Known Good Configuration, follow these steps:

1. Start your computer and press the F8 key repeatedly before the Windows logo screen appears.
2. The Advanced Boot Options menu will appear. Select “Last Known Good Configuration (advanced)” using the arrow keys.
3. Press Enter to start your computer with the last known working configuration.
4. Windows will now boot into the Last Known Good Configuration, restoring the previous system settings.
5. If you encounter any issues or problems after booting into Last Known Good Configuration, you can try other startup options like Safe Mode or System Restore.

Note: This procedure applies to Windows 7, Windows 8, Windows 10, Windows XP, Windows Server 2012, and other supported operating systems.

Problems that can be fixed by Last Known Good Configuration

  1. Restart your computer and press the F8 key repeatedly during startup.
    1. This will bring up the Advanced Boot Options menu.
      Restart your computer and press the F8 key repeatedly during startup.
This will bring up the Advanced Boot Options menu.
  2. Use the arrow keys to select Last Known Good Configuration (advanced).
  3. Press Enter to start Windows using the Last Known Good Configuration.
  4. Wait for your computer to boot into the Last Known Good Configuration.

python
import subprocess

def get_last_known_good_version():
try:
commit_hash = subprocess.check_output(['git', 'log', '-1', '--pretty=format:%H', '--first-parent'])
return commit_hash.decode().strip()
except subprocess.CalledProcessError:
print("Failed to retrieve the last known good version.")
return None

# Example usage
last_known_good_version = get_last_known_good_version()
if last_known_good_version:
print("Last known good version:", last_known_good_version)

Problems that cannot be fixed by Last Known Good Configuration

  • Issues caused by recent software or driver installations
  • Problems arising from changes made to system files or registry settings
    Issues caused by recent software or driver installations
Problems arising from changes made to system files or registry settings
  • Incompatibility conflicts between installed programs or hardware devices
  • Errors resulting from corrupt or missing system files
  • Malware infections or virus attacks that have compromised system stability
  • Issues caused by faulty hardware components or drivers
    Malware infections or virus attacks that have compromised system stability
Issues caused by faulty hardware components or drivers
  • Problems related to system overheating or inadequate power supply
  • Errors resulting from improper shutdowns or sudden power outages
  • Incompatibility issues with certain hardware configurations or peripherals

Troubleshooting boot-up issues

If you’re experiencing boot-up issues on your Windows device, you can try booting into the Last Known Good Configuration to resolve the problem. This option allows you to start your computer using a previous configuration that worked correctly. To do this, follow these steps:

1. Restart your computer.
2. Press the F8 key repeatedly before the Windows logo screen appears.
3. In the Advanced Boot Options menu, select “Last Known Good Configuration” and press Enter.
4. Windows will now start using the last known good configuration.

Note: This option may not be available on all versions of Windows. If you don’t see it, you can try other troubleshooting steps like Safe Mode or System Restore. If the problem persists, it may be related to driver or hardware issues, and you may need to seek further assistance.

Additional ways to help your computer recover

1. Boot into Last Known Good Configuration: Restart your computer and press the F8 key repeatedly before the Windows logo appears. Select “Last Known Good Configuration” from the Advanced Boot Options menu. This will start your computer using the most recent settings that worked correctly.

2. Use System Restore: If booting into Last Known Good Configuration doesn’t resolve the issue, you can try using System Restore to revert your computer back to a previous working state. Follow the on-screen instructions to choose a restore point and let Windows restore your computer.

3. Update drivers: Outdated or incompatible drivers can cause boot issues. Use Device Manager to update your drivers or visit the manufacturer’s website for the latest versions.

4. Create a disk image: To safeguard your files and system settings, consider creating a disk image using reliable software like DiskInternals or Windows Backup. This allows you to restore your computer to a previous state if necessary.

5. Seek professional help: If you’ve tried these steps and are still experiencing issues, it may be time to consult a professional technician or contact Microsoft support for further assistance.

Windows no reconoce SSD o disco duro en PC

Unlock the Secrets: Windows’ Elusive SSD and Hard Drive Recognition

Por qué Windows no reconoce un SSD o HDD

Si Windows no reconoce tu SSD o disco duro en tu PC, existen varias razones y soluciones para este problema. Asegúrate de que todos los cables y conexiones estén correctamente conectados tanto en la unidad como en la placa base. Verifica también si el disco está en el formato correcto y si tiene una letra asignada en la administración de discos.

Si no ves tu unidad en la ventana de administración de discos, prueba reiniciando tu ordenador y asegurándote de que la unidad esté conectada adecuadamente. Si aún no se reconoce, verifica si hay actualizaciones de software o controladores disponibles para tu sistema operativo Windows.

En algunos casos, es posible que necesites actualizar la BIOS de tu placa base para que reconozca la unidad. Consulta la documentación de tu placa base para obtener instrucciones específicas sobre cómo hacer esto. Además, si estás utilizando un SSD NVMe o M.2, asegúrate de que tu placa base sea compatible con este tipo de unidades.

Recuerda que siempre es recomendable hacer una copia de seguridad de tus datos antes de realizar cualquier cambio en tu sistema. Si después de seguir estos pasos aún no puedes solucionar el problema, te recomendamos consultar con un profesional o contactar al soporte técnico de tu fabricante de hardware.

Comprobación de conexiones y configuración de la BIOS

Check Connections and BIOS Configuration for SSD or Hard Drive Recognition Issues on PC.

1. Start by ensuring all connections between the SSD/HDD and the motherboard are secure. Verify that the SATA cable is properly connected on both ends.

2. Access the BIOS by restarting your computer and pressing the specified key (usually Del or F2) during startup. In the BIOS settings, check that the SSD/HDD is recognized and configured correctly.

3. If the SSD/HDD is not detected, try connecting it to a different SATA port on the motherboard to rule out any port issues.

4. Ensure that the SSD/HDD is formatted correctly. In the Windows search bar, type “Disk Management” and open the corresponding tool. If the drive appears, initialize and format it to a compatible file system.

5. If the issue persists, consider updating your BIOS to the latest version available from the manufacturer’s website. Follow their instructions carefully to avoid any complications.

Soluciones para discos duros no detectados en Windows

  1. Reiniciar el PC:
    • Apagar el PC completamente.
    • Desconectar el cable de alimentación y otros cables conectados al disco duro.
    • Esperar unos minutos.
    • Volver a conectar todos los cables.
      Esperar unos minutos.
Volver a conectar todos los cables.
    • Encender el PC y verificar si el disco duro es detectado ahora.
  2. Verificar la conexión física:
    • Asegurarse de que los cables SATA o de alimentación estén bien conectados al disco duro y a la placa base.
    • Probar con cables diferentes en caso de sospechar que alguno está dañado.
      Asegurarse de que los cables SATA o de alimentación estén bien conectados al disco duro y a la placa base.
Probar con cables diferentes en caso de sospechar que alguno está dañado.
    • Reiniciar el PC y comprobar si el disco duro es reconocido.
  3. Actualizar controladores:
    • Abrir el Administrador de dispositivos.
    • Expandir la categoría de Controladoras de disco.
      Abrir el Administrador de dispositivos.
Expandir la categoría de Controladoras de disco.
    • Hacer clic derecho en el disco duro no detectado y seleccionar Actualizar controlador.
    • Seguir las instrucciones en pantalla para buscar y descargar los controladores más recientes.
    • Reiniciar el PC después de la instalación y verificar si el disco duro es detectado.
  4. Verificar la configuración de la BIOS:
    • Reiniciar el PC y presionar la tecla correspondiente para ingresar a la BIOS (por lo general, Supr o F2).
    • Navegar hasta la sección de configuración de dispositivos o almacenamiento.
      Reiniciar el PC y presionar la tecla correspondiente para ingresar a la BIOS (por lo general, Supr o F2).
Navegar hasta la sección de configuración de dispositivos o almacenamiento.
    • Asegurarse de que el disco duro esté habilitado y correctamente configurado.
    • Guardar los cambios y salir de la BIOS.
    • Reiniciar el PC y comprobar si el disco duro es reconocido ahora.
  5. Ejecutar la herramienta de solución de problemas de Windows:
    • Abrir la Configuración de Windows.
    • Navegar hasta la sección de Actualización y seguridad.
      Abrir la Configuración de Windows.
Navegar hasta la sección de Actualización y seguridad.
    • Seleccionar Solución de problemas en el panel izquierdo.
    • Hacer clic en Hardware y dispositivos y luego en Ejecutar el solucionador.
    • Seguir las instrucciones en pantalla y permitir que la herramienta intenta solucionar el problema automáticamente.

python
import psutil

def check_ssd_recognition():
disks = psutil.disk_partitions(all=True)
ssd_found = False

for disk in disks:
if "SSD" in disk.opts or "Solid State" in disk.fstype:
ssd_found = True
break

if ssd_found:
print("SSD recognized.")
else:
print("SSD not recognized.")

check_ssd_recognition()

This code uses the `disk_partitions` function from the `psutil` library to retrieve information about all disk partitions on the system. It then checks if any of the partitions have “SSD” in their options (`opts`) or “Solid State” in their file system type (`fstype`). If a matching partition is found, it assumes that an SSD is recognized. Otherwise, it assumes that an SSD is not recognized.

Actualización de controladores de unidad SSD

Updating SSD drivers can help resolve issues with Windows not recognizing the SSD or hard drive on your PC. To update the drivers, follow these steps:

1. Open the Device Manager by pressing Windows key + X and selecting “Device Manager.”
2. Expand the “Disk drives” category and locate your SSD or hard drive.
3. Right-click on the SSD or hard drive and select “Update driver.”
4. Choose the option to automatically search for updated driver software.
5. If Windows doesn’t find any updates, visit the manufacturer’s website to download the latest drivers.
6. Install the downloaded drivers by following the on-screen instructions.
7. Restart your PC to apply the changes.

Administración de discos y asignación de letras de unidad SSD

Disk Management and Drive Letter Assignment for SSD

If your Windows PC is not recognizing your SSD or hard drive, there could be several reasons for this issue. One common issue is that the drive needs to be properly managed and assigned a drive letter.

To resolve this, follow these steps:

1. Press the Windows key + R to open the Run dialog box.
2. Type “diskmgmt.msc” and press Enter to open Disk Management.
3. In the Disk Management window, locate your SSD or hard drive.
4. Right-click on the drive and select “Change Drive Letter and Paths.”
5. Click “Add” and select a drive letter from the drop-down menu.
6. Click “OK” to assign the drive letter.

Recuperación de datos en SSD con Recoverit Data Recovery

Recuperación de datos en SSD con Recoverit Data Recovery
Título del artículo Windows no reconoce SSD o disco duro en PC
Resumen
En este artículo, exploraremos los problemas comunes relacionados con la falta de reconocimiento de SSD o disco duro por parte de Windows en una PC. También presentaremos una solución confiable para recuperar datos perdidos utilizando Recoverit Data Recovery.
Contenido
  • Introducción a los problemas de reconocimiento de SSD o disco duro en Windows
  • Causas comunes de la falta de reconocimiento de SSD o disco duro
    Introducción a los problemas de reconocimiento de SSD o disco duro en Windows
Causas comunes de la falta de reconocimiento de SSD o disco duro
  • Posibles soluciones para solucionar el problema de reconocimiento
  • Introducción a Recoverit Data Recovery y sus capacidades
  • Pasos para recuperar datos perdidos de un SSD utilizando Recoverit
  • Consejos para prevenir problemas de reconocimiento en el futuro
    Pasos para recuperar datos perdidos de un SSD utilizando Recoverit
Consejos para prevenir problemas de reconocimiento en el futuro
  • Conclusiones finales