Fix Android Text Message Notifications Not Working

Having trouble with Android text message notifications not working? Let’s dive into some possible solutions.

Examine Notification and Network Settings

To fix Android text message notifications not working, first check your notification settings. Go to Settings on your device, then Apps & Notifications, and select the messaging app you are using. Make sure notifications are enabled.

Next, ensure your network settings are properly configured. Check your Wi-Fi or data connection to make sure you are connected to the internet. If you are having trouble receiving messages, try toggling airplane mode on and off to reset your connection.

If the issue persists, consider restarting your device to refresh the system. Sometimes a simple reboot can resolve notification problems. Additionally, check for any software updates that may address notification issues.

By examining your notification and network settings, you can troubleshoot and fix Android text message notifications that are not working.

Resolve Software and Storage Conflicts

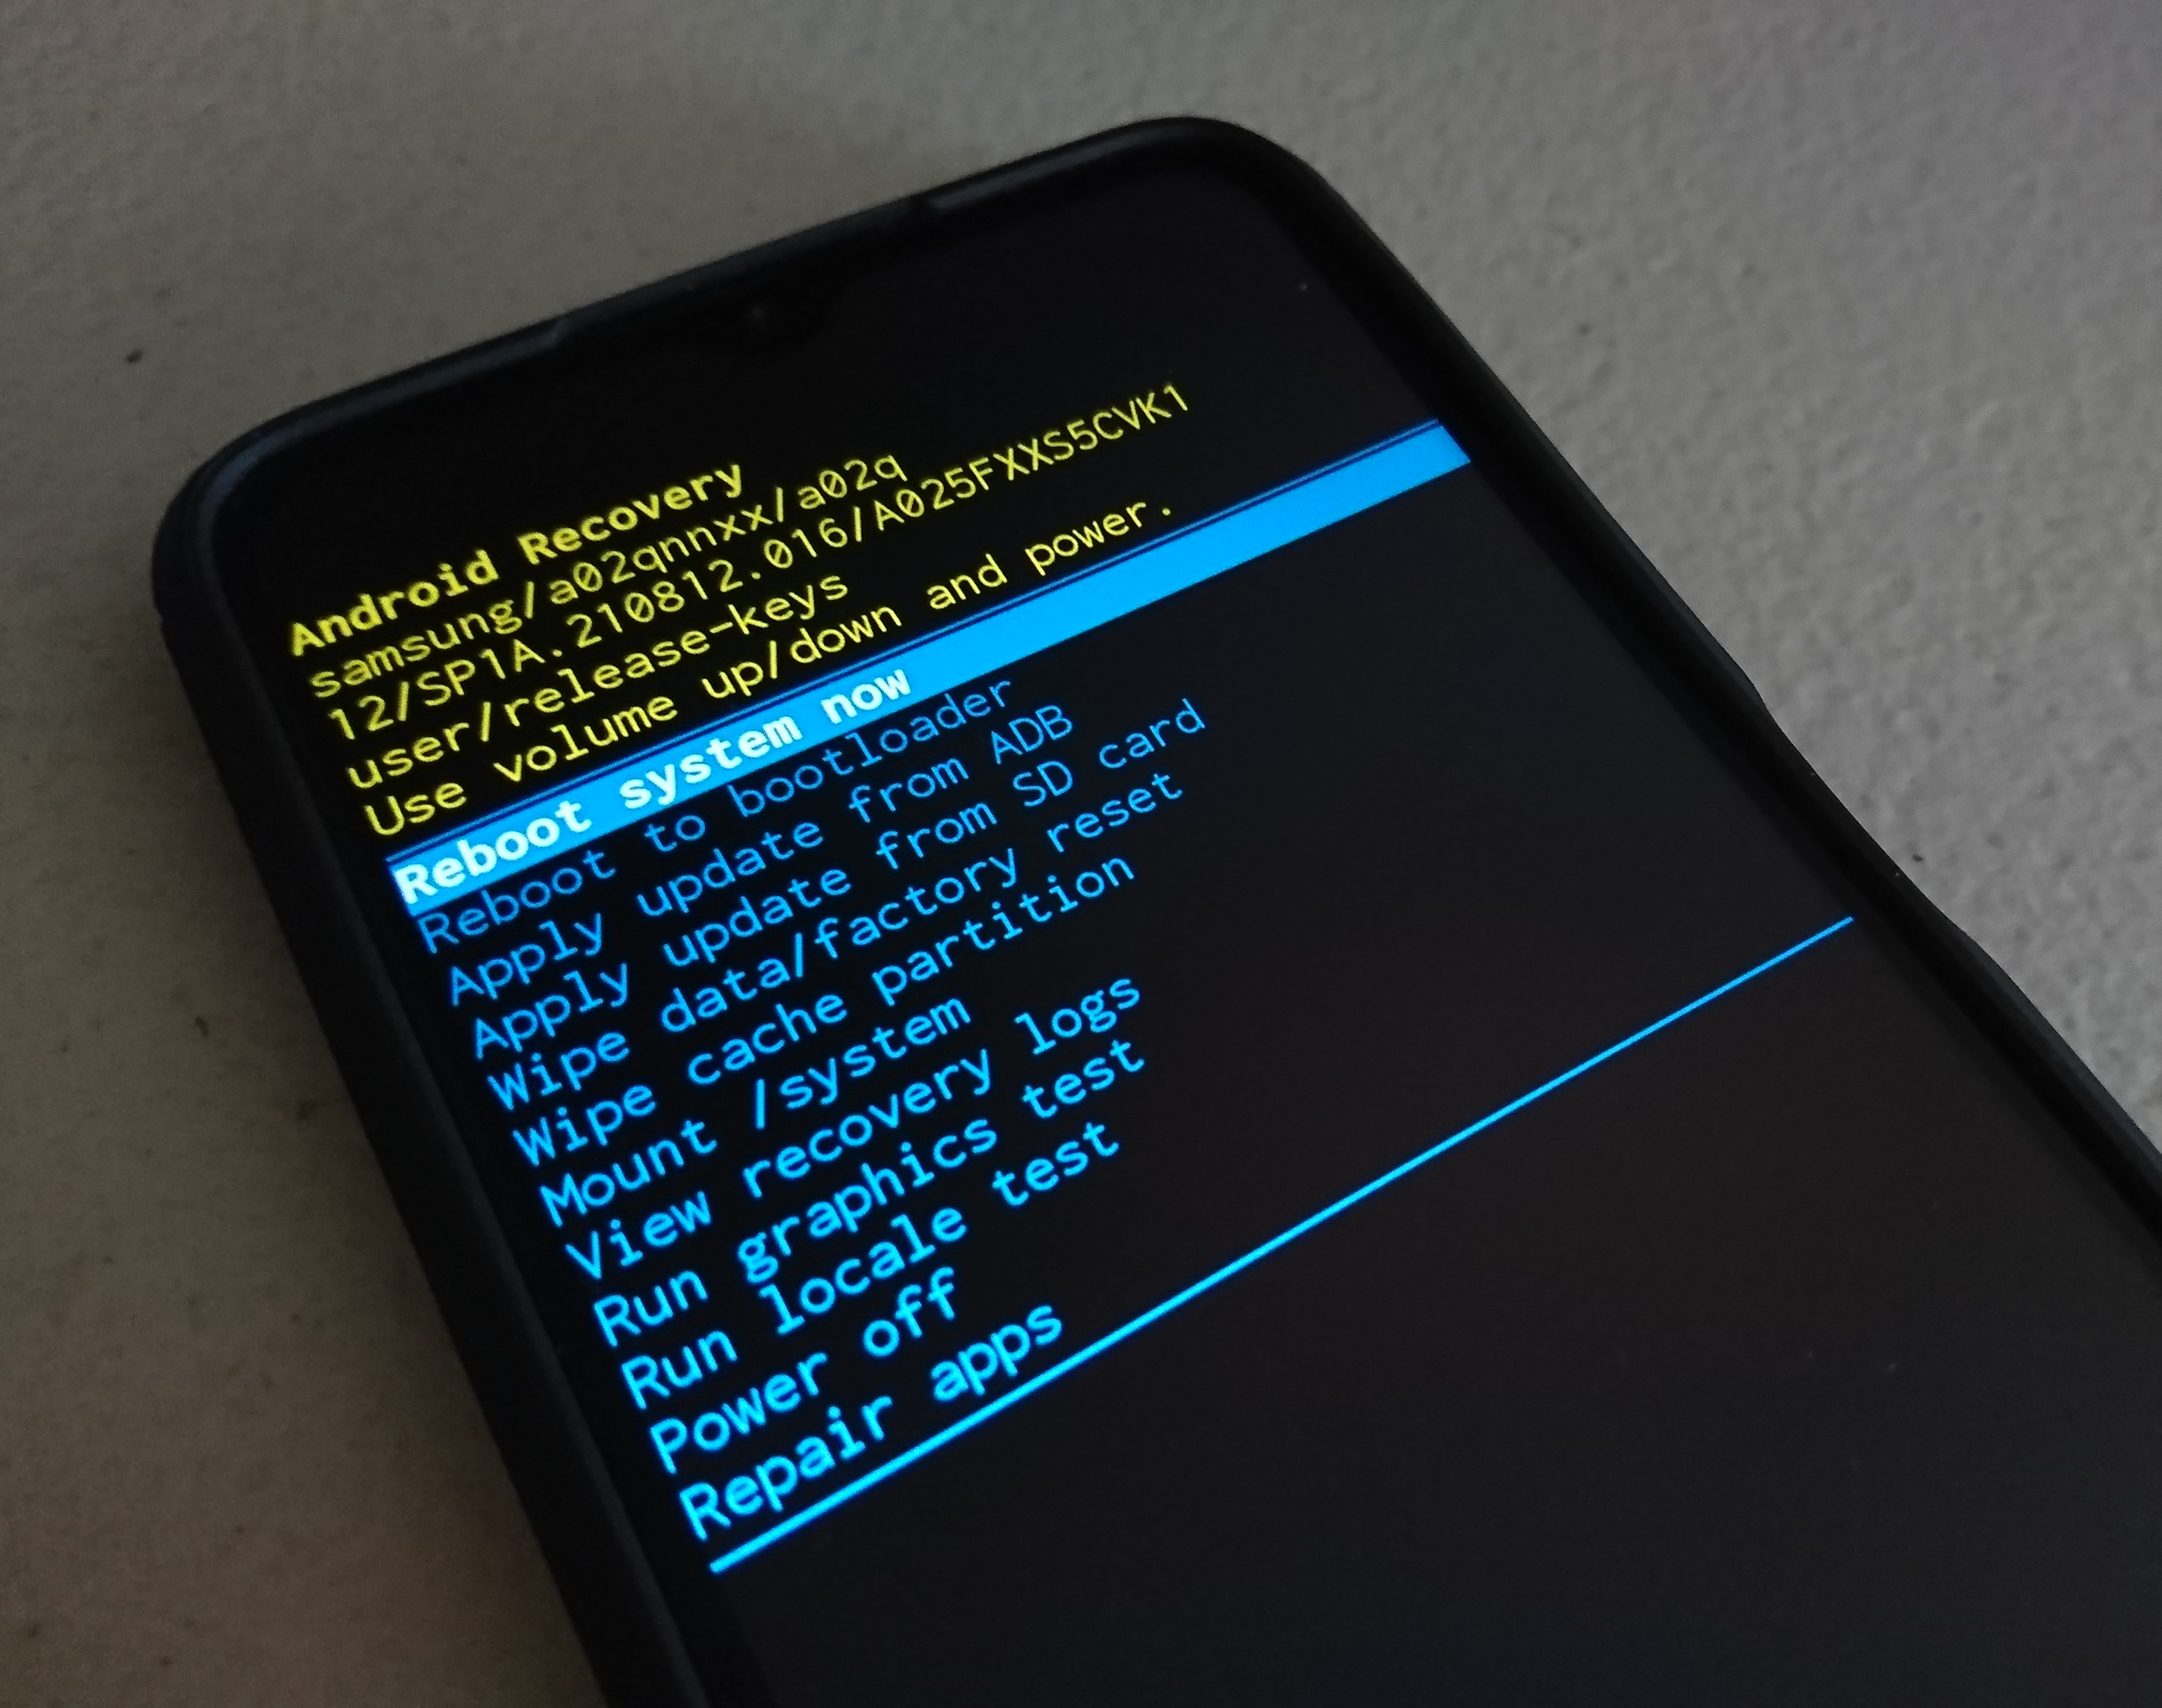
  • Clear Cache Partition:
    • Turn off the device.
    • Press and hold the Volume Up, Power, and Home buttons simultaneously.
    • Release the buttons when the Android System Recovery screen appears.
    • Use the Volume Down button to navigate to Wipe Cache Partition and press the Power button to select it.
    • Restart the device once the process is complete.
  • Uninstall Unused Apps:
    • Go to Settings on your device.
    • Tap on Apps or Applications.
    • Select the app you want to uninstall and tap Uninstall.
    • Repeat this process for all unused apps.
  • Update Android OS:
    • Go to Settings on your device.
    • Tap on System and then Software Update.
    • If an update is available, download and install it.
    • Restart your device after the update is complete.

Adjust Power and Disturbance Settings

Adjust the volume settings to ensure that your text message notifications are not muted or set too low.

Next, check the notification settings for your messaging app. Make sure that notifications are enabled and configured to your liking.

If you are still experiencing issues, consider adjusting the disturbance settings. Turn off Do Not Disturb mode and ensure that your messaging app is not on a blacklist that could be blocking notifications.

After making these adjustments, test your text message notifications to see if they are now working properly. If not, you may need to further troubleshoot or seek assistance from the manufacturer or a tech support professional.

Update System and Messaging Apps

To fix Android text message notifications not working, make sure to update your system and messaging apps regularly. Outdated software can cause notification issues.

Check for updates in the Play Store: Go to the Play Store, tap on the menu icon, and select “My apps & games.” Update any available system and messaging apps.

Reset app preferences: Go to Settings > Apps > Menu (three dots) > Reset app preferences. This will reset app permissions and notification settings.

Clear app cache: Go to Settings > Apps > select messaging app > Storage > Clear cache. This can resolve any temporary issues causing notifications not to work.

If the problem persists, consider restarting your phone or contacting customer support for further assistance. Keeping your system and apps updated is crucial for optimal performance.

F.A.Q.

Why am I not getting notifications even though they are turned on?

You are not receiving notifications even though they are turned on because Do Not Disturb or Airplane Mode may be activated, system or app notifications could be disabled, power or data settings may be blocking notifications, or outdated apps/OS software could be causing issues with notifications.

Why is my phone not notifying me when I get text messages from one person?

Your phone may not be notifying you when you receive text messages from one person because they might be accidentally blocked. Check your blocked contacts list in Settings > Messages and unblock them if necessary. Also, ensure that your phone is not on silent or do not disturb mode, as this can prevent text message alerts from coming through.

Why does my phone not make a sound when I get a text message?

Your phone may not make a sound when receiving a text message if it is in silent or vibrate-only mode, or if the sound or vibration for text message notifications has been turned off in the phone’s settings.

How do I get text notifications on my Android?

To get text notifications on your Android, you can adjust your notification settings in the Settings app. Open Settings, tap on Apps & notifications, then select the desired app for text notifications. From there, you can choose the type of notification (alerting or silent) and customize your preferences.

Fix Nexus 5X Battery Not Charging Guide

Having trouble with your Nexus 5X battery not charging? Here’s a comprehensive guide to help you fix the issue.

Check the Battery and Charger

If the battery is completely drained, you may need to leave it plugged in for a few minutes before it starts charging. Once the charging process begins, you should see the battery icon on your Nexus 5X screen.

If the battery is not charging, try using a different USB cable or charger to see if the issue lies with the original ones. Sometimes, a faulty cable or charger can prevent the battery from charging properly.

You can also try cleaning the charging port on your Nexus 5X. Use a lint-free cloth or a small brush to remove any dust or debris that may be blocking the connection.

If none of these steps work, it is recommended to contact Google Nexus support or check the warranty status of your device. They can provide further assistance and help you determine if the issue is with the battery itself.

Clean the Charging Port

A close-up image of a charging port with dust or debris.

1. Power off your smartphone. This will prevent any potential damage during the cleaning process.

2. Use a flashlight to visually inspect the charging port for any lint, dust, or debris. If you see any, proceed to the next steps.

3. Take a thin, non-metallic object such as a toothpick or plastic pick. Gently insert it into the charging port and carefully scrape along the sides to remove any accumulated lint or debris. Be cautious not to damage the port or any internal components. Avoid using metal objects as they can potentially cause short circuits.

4. You can also use compressed air to blow into the charging port, helping to dislodge any stubborn particles. Ensure you hold the can upright and use short bursts of air to prevent any moisture from entering the port.

5. After cleaning, inspect the charging port again to ensure it is free from any remaining debris.

6. Once you are satisfied with the cleanliness of the port, you can safely plug in your USB charger and connect it to a power source.

By properly cleaning the charging port, you can resolve issues related to the Nexus 5X not charging.

Boot into Safe Mode or Wipe Cache Partition

If you’re experiencing issues with your Nexus 5X battery not charging, there are a couple of troubleshooting steps you can try before seeking professional assistance. Two common solutions are booting into Safe Mode and wiping the cache partition. Here’s how to do each:

Booting into Safe Mode:
1. Press and hold the power button on your Nexus 5X until the power menu appears.
2. Tap and hold the “Power off” option until the “Reboot to safe mode” prompt appears.
3. Tap “OK” to confirm and your Nexus 5X will restart in Safe Mode.
4. In Safe Mode, only the pre-installed apps will be running, allowing you to determine if a third-party app is causing the battery charging issue.
5. If your Nexus 5X charges normally in Safe Mode, then a third-party app is likely the culprit. Uninstall recently installed apps one by one until the issue is resolved.

Wiping the cache partition:
1. Power off your Nexus 5X completely.
2. Press and hold the volume down button and the power button simultaneously until the bootloader screen appears.
3. Use the volume buttons to navigate to “Recovery mode” and press the power button to select it.
4. When the Android logo with a red exclamation mark appears, press and hold the power button, then press the volume up button once.
5. Use the volume buttons to highlight “Wipe cache partition” and press the power button to select it.
6. Once the cache partition is wiped, “Reboot system now” will be highlighted. Press the power button to restart your Nexus 5X.

Perform a Factory Reset

Performing a factory reset on your Nexus 5X can help resolve battery charging issues. Here’s how you can do it:

1. Turn off your Nexus 5X by pressing and holding the power button.
2. Connect your Nexus 5X to a computer using a USB cable. Make sure the USB hardware is working properly.
3. While the Nexus 5X is connected, press and hold the volume down button and power button simultaneously.
4. Release both buttons when the bootloader screen appears.
5. Use the volume buttons to navigate to “Recovery mode” and press the power button to select it.
6. When an Android robot with a red exclamation mark appears, press and hold the power button, then press the volume up button once.
7. Use the volume buttons to navigate to “Wipe data/factory reset” and press the power button to select it.
8. Confirm the factory reset by selecting “Yes – delete all user data.”
9. Once the reset is complete, select “Reboot system now” to restart your Nexus 5X.

Remember to backup any important data before performing a factory reset, as it will erase all data on your device. If the battery charging issue persists after the reset, it might be a hardware problem. Consider contacting the manufacturer or checking your warranty for further assistance.

F.A.Qs

Why won’t my Nexus 5X power on?

The Nexus 5X may not power on if there is a problem with the battery or charger. It is recommended to check these components first.

Samsung Galaxy S5 Black Screen Fix – 11 Solutions [2023]

Are you experiencing a black screen issue with your Samsung Galaxy S5? In this article, I will provide 11 solutions to fix this problem in 2023.

Troubleshooting Black Screen Causes

If you are experiencing a black screen on your Samsung Galaxy S5, there are several potential causes to consider. First, check if the phone’s battery is charged and the device is turned on. If the screen remains black, try rebooting the phone by holding down the power button for at least 10 seconds.

Another possible cause could be a software issue, so try booting the phone in safe mode by holding down the power button and then tapping and holding the “Power Off” option. If the screen works in safe mode, an app may be causing the problem.

You could also try removing the SD card and rebooting the phone, as a corrupted SD card can sometimes cause the screen to go black. If all else fails, you may need to perform a factory reset to resolve the issue. These troubleshooting steps should help you identify and fix the cause of the black screen on your Samsung Galaxy S5.

Performing a Soft Reset

To perform a soft reset on your Samsung Galaxy S5, follow these steps. First, press and hold the Power button and the Volume Down button simultaneously for about 10-15 seconds. This will force the device to restart and may fix the black screen issue. If the soft reset doesn’t work, you can also try removing the battery for a few minutes and then reinserting it before turning on the phone. This can help to reset the device and resolve any software glitches causing the black screen.

Alternatively, you can try booting the phone into Safe Mode to see if a third-party app is causing the issue. To do this, press and hold the Power button, then tap and hold the “Power off” option until “Restart in Safe Mode” appears. Select this option and see if the black screen problem persists.

Managing Apps and Settings

Samsung Galaxy S5 apps and settings

  • Restart your Samsung Galaxy S5
  • Check for software updates
  • Boot into safe mode to identify any problematic apps
  • Clear cache partition
  • Reset app preferences
  • Adjust brightness and screen timeout settings
  • Perform a factory reset as a last resort
  • Check for any hardware issues by contacting Samsung support

Seeking Professional Assistance

Professional technician working on Samsung Galaxy S5

If you have tried all the solutions and still have a black screen on your Samsung Galaxy S5, it may be time to seek professional assistance. Contact Samsung customer support or visit a certified Samsung service center for help. They have the expertise and tools to diagnose and fix more complex hardware or software issues that may be causing the black screen problem.

Another option is to consult with a professional smartphone repair technician who is experienced in dealing with Samsung Galaxy devices. They can provide a thorough assessment of the problem and offer a solution that is tailored to your specific situation.

If your Samsung Galaxy S5 is still under warranty, it is best to reach out to Samsung or your mobile carrier to explore your options for repair or replacement. They may be able to provide assistance or guidance on the best course of action to take.

In some cases, the black screen issue may be related to a faulty battery or other hardware component. A professional technician can perform a diagnostic test to identify and replace any defective parts that may be causing the problem.

Frequently Asked Questions

What is the black screen of death?

The black screen of death refers to a common error that can occur when running Windows. It is characterized by a completely black screen after starting the device, with varying symptoms.

How do I fix the black screen of death on my Samsung Galaxy a5?

To fix the black screen of death on your Samsung Galaxy A5, you can attempt a force restart by pressing and holding the Power key and the Volume Down key simultaneously for more than 7 seconds. This should restart your device without affecting any stored data.

What to do if my phone screen is black but still works?

If your phone screen is black but still works, you can try cleaning the charging port, recharging the battery, force restarting the phone, removing the battery and stylus, and rebooting your phone into Safe mode. Also, make sure the buttons on your device are not jammed and try squeezing your phone.

Why is my Samsung working but the screen is black?

Your Samsung might be working but the screen is black because the battery could be dead or the device may need to be reset.

iPhone Stuck on Activation Screen – Top 5 Ways to Fix

Are you experiencing an issue with your iPhone being stuck on the activation screen? Check out the top 5 ways to fix this problem and get your device up and running again.

Troubleshooting Activation Lock Issues

1. Check Wi-Fi Connection: Make sure your iPhone is connected to a stable Wi-Fi network. If the Wi-Fi is working properly, proceed to the next step. If not, troubleshoot your Wi-Fi connection.

2. Restart Your iPhone: Turn off your iPhone and then turn it back on. If the activation lock issue persists, move on to the next solution.

3. Check Apple’s Activation Server: Visit Apple’s system status page to see if there are any ongoing issues with the activation server. If the server is working fine, proceed to the next step. If there is an issue, wait for Apple to resolve it.

4. Update iOS: Ensure that your iPhone has the latest version of iOS installed. If your iOS is up to date, move on to the next solution. If not, update your iOS to the latest version.

5. Contact Apple Support: If none of the above solutions work, contact Apple Support for further assistance. If you’re still experiencing issues, reach out to Apple for help with resolving the activation lock problem.

Resolving Connectivity and System Status Checks

  • Ensure that your iPhone is connected to a stable Wi-Fi or cellular network.
  • If using Wi-Fi, try reconnecting to the network or switching to a different network.
  • If using cellular data, make sure your data plan is active and you have a strong signal.

2. Restart iPhone

  • Press and hold the power button until the “slide to power off” slider appears.
  • Slide the slider to turn off your iPhone.
  • Wait a few seconds, then press and hold the power button again until the Apple logo appears.

3. Update iOS

  • Open Settings and go to General.
  • Select Software Update to check for and install any available updates.
  • Follow the on-screen instructions to complete the update process.

4. Reset Network Settings

  • Open Settings and go to General.
  • Scroll down and select Reset.
  • Choose Reset Network Settings and enter your passcode if prompted.

5. Contact Apple Support

  • If none of the above steps resolve the issue, contact Apple Support for further assistance.
  • Provide them with details about your specific activation screen problem and any troubleshooting steps you have already tried.

Utilizing iTunes and iCloud for Activation

iTunes and iCloud interface

If your iPhone is stuck on the activation screen, you can try utilizing iTunes and iCloud to fix the issue.

One way to fix this problem is by connecting your iPhone to your computer and opening iTunes. Once connected, you can follow the on-screen instructions to activate your device.

Another option is to use iCloud to activate your iPhone. You can do this by accessing iCloud on another device and removing your iPhone from your account. Then, restart your iPhone and follow the on-screen instructions to activate it using iCloud.

If you’re still experiencing issues, you can try resetting your iPhone’s network settings. This can be done by going to Settings, General, Reset, and selecting “Reset Network Settings.”

In some cases, updating your iPhone’s software can help resolve activation issues. You can do this by going to Settings, General, and selecting “Software Update.”

If all else fails, you may need to contact Apple Support or your mobile carrier for further assistance.

By utilizing iTunes and iCloud, you can hopefully fix your iPhone’s activation issue and get back to using your device as normal.

Seeking Assistance from Apple and Carriers

Apple customer service and phone carrier logos

If you are experiencing trouble with your iPhone getting stuck on the activation screen, you may need to seek assistance from Apple and your carrier to resolve the issue. Here are the top 5 ways to fix this problem:

1. Contact Apple Support: Reach out to Apple’s customer support for help with troubleshooting and resolving the activation issue. They can provide step-by-step guidance and may be able to offer a solution over the phone or through online support.

2. Check with Your Carrier: Contact your mobile carrier to ensure that your SIM card is activated and properly provisioned. They can also assist with any network-related issues that may be causing the activation problem.

3. Update Your iPhone: Make sure your iPhone has the latest software update installed. Go to Settings > General > Software Update to check for and install any available updates.

4. Reset Network Settings: Resetting your iPhone’s network settings can sometimes resolve activation issues. Go to Settings > General > Reset > Reset Network Settings. Note that this will reset Wi-Fi networks and passwords, cellular settings, and VPN settings.

5. Restore Your iPhone: If all else fails, you may need to restore your iPhone to its factory settings using iTunes on a Mac or PC. Make sure to back up your data before doing this, as it will erase all content and settings on your device.

By seeking assistance from Apple and your carrier, and trying these top 5 ways to fix the activation issue, you should be able to get your iPhone unstuck from the activation screen and back to normal functioning.

F.A.Qs

How do I fix ESIM stuck on activating?
To fix ESIM stuck on activating, first turn Airplane Mode on and off. Then, go to Settings > Cellular and check if the number you’re trying to activate is shown. If it is, turn off the line and then turn it back on again. Finally, restart your device.

Why is my iPhone activation taking so long?
Your iPhone activation may be taking a long time if the SIM card is not inserted correctly or if the SIM card is damaged. Try reinserting the SIM card with a SIM card ejector to fix the issue.

How do you unlock an iPhone that is stuck in the activation lock?
To unlock an iPhone that is stuck in the activation lock, you can use AnyUnlock – iPhone Password Unlocker on your computer. Simply click the Bypass iCloud Activation Lock on the main screen, connect your iPhone to the computer with a USB cable, and then follow the on-screen instructions to initiate the process.

How to Stop Apps From Crashing on Android Phone

Are you tired of your Android apps crashing unexpectedly? Learn some simple tips to prevent this frustrating issue and keep your phone running smoothly.

Identifying the Root Causes of Crashes

When facing app crashes on your Android phone, it’s important to identify the root causes to effectively stop them. Often, crashes can be caused by software bugs, lack of internet access, or even issues with the phone’s memory. Begin by checking for software updates in the Google Play Store to ensure that your apps are running on the latest versions.

Next, clear the cache of the app that is crashing to remove any temporary data that may be causing the issue. If the problem persists, try restarting your phone to clear any temporary software glitches.

If the crashes continue, it might be a good idea to uninstall and reinstall the problematic app to see if that resolves the issue.

Additionally, consider performing a factory reset if all else fails, but be sure to back up your data beforehand as this will erase everything on your phone.

Optimizing Internet and Storage Resources

Managing internet and storage settings

– Optimizing your internet and storage resources can help prevent apps from crashing on your Android phone.
– To optimize your internet resources, make sure you have a stable Wi-Fi connection or a strong mobile data signal.
– Clearing the cache of Google Play Services can also help improve the performance of your apps.
– You can do this by going to Settings > Apps > Google Play Services > Storage > Clear Cache.
– Optimizing your storage resources involves regularly cleaning up unnecessary files and apps from your phone.
– You can do this by going to Settings > Storage > Free up space.
– You can also uninstall unused apps to free up space and improve the overall performance of your phone.
– By optimizing your internet and storage resources, you can reduce the likelihood of apps crashing on your Android phone.

Managing App Permissions and Settings

To prevent apps from crashing on your Android phone, it’s important to manage app permissions and settings properly. Start by checking the app permissions for each installed app. Go to Settings > Apps > [App Name] > Permissions and disable any unnecessary permissions that could be causing the app to crash.

Next, clear the app cache for any problematic apps. Navigate to Settings > Apps > [App Name] > Storage > Clear Cache to free up space and potentially resolve crashing issues.

If the app continues to crash, consider uninstalling and reinstalling it to see if that resolves the problem. Use the Settings > Apps > [App Name] > Uninstall option to remove the app, then reinstall it from the app store.

In some cases, a software bug may be causing the app to crash. Check for any available updates for both the app and your Android operating system. Go to the Play Store > My apps & games > Update to update the app, and navigate to Settings > System > Software Update to check for updates for your Android OS.

By managing app permissions and settings, you can help prevent apps from crashing on your Android phone and ensure a smoother user experience.

Performing Force Stops and Cache Clearance

If you’re experiencing app crashes on your Android phone, performing force stops and cache clearance can often resolve the issue. To force stop an app, go to Settings, then Apps, select the app causing the problem, and tap Force Stop.

Clearing the cache can also help. Go to Settings, then Apps, select the app, and tap Storage. From there, tap Clear Cache.

After force stopping and clearing the cache, try reopening the app to see if the issue has been resolved. If not, you may need to consider other troubleshooting steps such as updating the app or the Android operating system.

Updating Software and Uninstalling Problematic Updates

To stop apps from crashing on your Android phone, you’ll want to make sure your software is up to date and uninstall any problematic updates. To update your software, go to Settings > System > Advanced > System update and check for any available updates. Keeping your software current can help to fix any bugs or issues that may be causing apps to crash.

If you’ve recently updated an app and it’s now causing problems, you can uninstall the update by going to Settings > Apps & notifications > See all [number] apps, selecting the app, and then tapping on three dots menu > Uninstall updates. This will revert the app to its previous version, which may resolve the crashing issue.

By updating your software and uninstalling problematic updates, you can help to prevent apps from crashing on your Android phone. These simple steps can often resolve issues without the need for more extensive troubleshooting or factory resets.

Restart Strategies: Reboot and Safe Mode

Restart Strategies: If your Android apps keep crashing, one of the first things you can try is to restart your phone. This simple step can often resolve minor software issues and help improve performance.

If a regular restart doesn’t solve the problem, you can try rebooting your phone in safe mode. This will start your device with only the essential system apps, which can help you determine if a third-party app is causing the crashes.

To reboot your phone in safe mode, press and hold the power button until the power options appear. Then, press and hold the “Power off” option until you see the “Reboot to safe mode” prompt. Once in safe mode, you can test your apps to see if they still crash. If they don’t, you may need to uninstall or update the problematic app.

Remember to regularly update your apps and the Android operating system to ensure optimal performance and security.

By using these restart strategies, you can troubleshoot app crashes on your Android phone and get back to using your device without interruptions.

Advanced Solutions: Reinstallation and Factory Reset

Android phone factory reset

  • Reinstallation: Uninstall the app causing the crashes and then reinstall it from the Google Play Store.
  • Clear Cache: Clear the app’s cache and data from the Settings menu to remove any corrupted files causing crashes.
  • Update OS: Ensure your Android phone has the latest operating system updates installed to resolve any compatibility issues with the app.
  • Factory Reset: If all else fails, perform a factory reset on your Android phone to remove any software conflicts causing app crashes.

Issues Downloading Photos From iPhone To PC Fix

Struggling to download photos from your iPhone to your PC? I’ve got some fixes for you.

Make sure your iPhone and PC are connected to the same Wi-Fi network to enable easy file sharing.

Identifying Import Obstacles

When trying to download photos from your iPhone to your PC, you may encounter some import obstacles. One common issue is the iPhone not being recognized by the computer. This can be due to a faulty USB connection or outdated device drivers. Another obstacle could be iCloud settings preventing the photos from being downloaded to the PC.

To fix these issues, start by ensuring that your USB connection is secure and the USB hardware is functioning properly. If the problem persists, update the device drivers on your computer. Additionally, check your iCloud settings to make sure they are not restricting the photo download.

If you are still having trouble, try using a different USB port on your PC or consider using a cloud computing service like iCloud or Google Photos to upload and access your photos.

If you are encountering issues with a specific app like WhatsApp, make sure the app has the necessary permissions to access your photos and that it is up to date. By addressing these potential obstacles, you should be able to successfully download your photos from your iPhone to your PC.

The only way to do great work is to love what you do.” – Steve Jobs

Checking Connections and Trust Settings

Issue Potential Solution
iPhone not recognized by PC 1. Make sure the iPhone is unlocked and connected to the PC using a certified USB cable.

2. Check if the “Trust This Computer” prompt appears on the iPhone and tap “Trust” if it does.

3. Restart the iPhone and PC, and try a different USB port.
Unable to import photos 1. Open the Photos app on the iPhone and check if the photos are visible.

2. On the PC, open the Photos app or File Explorer and look for the iPhone under “This PC” or “Devices and drives”.

Alternative Transfer Methods

  • Download and install iCloud for Windows from the Apple website.
  • Open iCloud for Windows and sign in with your Apple ID.
  • Select Photos and click Options to choose the photos you want to download.
  • Click Apply and then Download to save the photos to your PC.

Use Email or Messaging Apps

  • Open the Photos app on your iPhone.
  • Select the photos you want to download and tap Share.
  • Choose your email or messaging app and send the photos to yourself.
  • Open your email or messaging app on your PC and download the photos.

Use Third-Party Apps

  • Download a third-party file transfer app from the App Store on your iPhone.
  • Follow the app’s instructions to connect your iPhone and PC to transfer the photos.
  • Select the photos you want to download and initiate the transfer process.
  • Once the transfer is complete, save the photos to your PC.

Troubleshooting Transfer Issues

iPhone connected to a PC with an error message on the screen

If you’re experiencing issues transferring photos from your iPhone to your PC, there are a few troubleshooting steps you can take to resolve the issue. First, make sure that your iPhone is unlocked and that the screen is on when you’re trying to transfer the photos. Additionally, ensure that you have the latest version of iTunes installed on your PC.

If you’re using a USB cable to transfer the photos, try using a different USB port on your computer or a different USB cable. Sometimes, faulty hardware can cause transfer issues. You can also try restarting both your iPhone and your computer to see if that resolves the problem.

Another potential solution is to update the device driver for your iPhone on your PC. To do this, go to Device Manager, locate your iPhone under Portable Devices, right-click on it, and select Update Driver. This can sometimes fix issues with transferring photos.

If you’re still experiencing problems, consider using a different method to transfer the photos, such as using iCloud or a third-party app like Google Photos. These alternative methods may be able to bypass any issues you’re experiencing with the direct transfer from iPhone to PC.

How to Fix My Photo Stream Not Showing Up on iPhone

Struggling with your Photo Stream not showing up on your iPhone? Let’s troubleshoot the issue and get it fixed.

Understanding My Photo Stream

iPhone Photo Stream interface

If your Photo Stream is not showing up on your iPhone, it can be frustrating and inconvenient. Understanding how Photo Stream works can help you troubleshoot the issue.

First, check your Wi-Fi and Internet connection to ensure that your device has access to the internet. Photo Stream relies on internet access to upload and sync photos across your devices.

Next, make sure that Photo Stream is enabled on your device. Go to Settings, then Photos, and make sure that My Photo Stream is turned on. If it’s already on, try turning it off and then back on again to reset the connection.

If you’re still having trouble, it may be helpful to sign out of your Apple ID and then sign back in. This can help refresh your account and resolve any syncing issues.

If you’re using an older device or operating system, such as an iPhone 5C or iOS 8, you may encounter compatibility issues with Photo Stream. Consider updating your device to a newer version of iOS if possible.

It’s also a good idea to check the battery level on your device. If your device has a low battery, it may not be able to upload photos to Photo Stream.

If you’re still experiencing issues, consider restarting your device or even resetting it to its factory settings. Just be sure to back up your photos and data before doing so.

Troubleshooting Accessibility Issues

If your Photo Stream is not showing up on your iPhone, there are a few troubleshooting steps you can try to resolve the issue. First, make sure that your device is running the latest version of iOS. Sometimes, updating your software can fix accessibility issues.

Check your Wi-Fi connection to ensure that you have a stable internet connection. Poor connectivity can prevent your Photo Stream from syncing properly. If you’re using a cellular data connection, try switching to Wi-Fi to see if that resolves the problem.

Additionally, make sure that your Apple ID is properly configured on your device. Go to Settings > [Your Name] > iCloud and ensure that Photo Stream is turned on. If it’s already on, try turning it off and then back on again to refresh the connection.

If you’re still experiencing issues, try signing out of your Apple ID and then signing back in. This can sometimes refresh the connection and resolve any underlying issues.

If you use iCloud Photo Library, check to see if it’s enabled on your device. Go to Settings > [Your Name] > iCloud > Photos and ensure that iCloud Photo Library is turned on. If it’s already on, try turning it off and then back on again to see if that resolves the problem.

Finally, if none of the above steps work, consider restarting your device. Sometimes, a simple reboot can fix accessibility issues.

Ensuring Proper iCloud Configuration

Step Description
1 Ensure iCloud is enabled on your iPhone. Go to Settings > [your name] > iCloud and make sure iCloud is turned on.
2 Check My Photo Stream settings. Go to Settings > [your name] > iCloud > Photos and make sure My Photo Stream is turned on.
3 Verify iCloud storage. Go to Settings > [your name] > iCloud > Manage Storage and check if you have enough storage for My Photo Stream.
4 Check internet connection. Ensure that your iPhone is connected to a stable Wi-Fi or cellular network for My Photo Stream to work properly.
5 Update iOS. Make sure your iPhone is running the latest version of iOS to avoid any compatibility issues with My Photo Stream.

Resolving Connectivity and Power Concerns

iPhone with no photo stream

  • Check Wi-Fi and Cellular Data
    • Ensure that Wi-Fi is turned on and connected to a network
    • If using cellular data, make sure it is turned on and has good reception
  • Restart iPhone
    • Press and hold the power button until the “slide to power off” slider appears
    • Slide the slider to turn off the iPhone
    • After the iPhone is off, press and hold the power button again until the Apple logo appears
  • Reset Network Settings
    • Open Settings and tap on General
    • Scroll down and tap on Reset
    • Tap on Reset Network Settings
    • Enter your passcode if prompted, then confirm the reset

Recovering Lost Photos and Data Recovery Tools

If you are experiencing the issue of your Photo Stream not showing up on your iPhone, there are a few steps you can take to recover any lost photos and data. First, make sure that you have internet access and that your device is connected to a network.

If your photos are not showing up on your iPhone, you can try recovering them by using data recovery tools. There are several applications available for both Mac and Windows computers that can help you retrieve lost photos from your iPhone.

One option is to use a data recovery tool such as iMyFone D-Back, which is compatible with both Mac and Windows computers. This software can help you retrieve lost photos from your iPhone, iPad, or iPod Touch.

Another option is to use iCloud or iTunes to restore your device from a backup. If you have previously backed up your iPhone using iCloud or iTunes, you can restore your device to a previous backup to recover any lost photos.

If you are still unable to recover your lost photos, it may be helpful to contact Apple Support for further assistance. They can help you troubleshoot the issue and provide additional support for recovering your lost photos.

Can’t Update Apps on iPhone or Android? Fix it Here

Are you having trouble updating apps on your iPhone or Android? Find the solutions here.

Verify Internet Connectivity

If you’re connected to Wi-Fi but still experiencing issues, try opening a web page or refreshing your social media feed to see if the internet is working properly. For mobile data, test it by opening a browser and accessing a website. If the page loads, your internet connection is likely fine.

You can also try resetting your internet connection by turning off your Wi-Fi or mobile data for a few seconds, then turning it back on. For Wi-Fi, you can also try forgetting the network and reconnecting to it.

It’s important to ensure a stable internet connection when updating apps on your smartphone, so verifying your internet connectivity is a crucial step in troubleshooting this issue.

Ensure Sufficient Storage Space

Smartphone with storage space bar showing available space

If you are using an iPhone, you can go to Settings > General > iPhone Storage to see a breakdown of what is using your storage. From there, you can offload unused apps or delete large files to free up space.

For Android users, you can go to Settings > Storage to see a similar breakdown of your storage usage. From there, you can clear app cache or delete old files to free up space.

If you still need more space, consider backing up your photos and videos to a cloud storage service or to your computer. This can help free up a significant amount of space on your device.

By ensuring you have sufficient storage space on your iPhone or Android, you should be able to update your apps without any issues.

Manage Automatic Updates

  • Check Wi-Fi Connection
    • Make sure your device is connected to a stable Wi-Fi network.
    • If you are using cellular data, ensure that you have enough data and a strong signal.
  • Update App Manually
    • Open App Store on iPhone or Google Play Store on Android.
    • Go to the Updates section.
    • Manually update the apps by tapping on Update next to each app.
  • Check Storage Space
    • Go to Settings and then Storage on your device.
    • Delete unnecessary files or apps to free up space for app updates.

Adjust Date and Time Settings

To adjust the date and time settings on your iPhone or Android device, follow these simple steps. On an iPhone, go to “Settings” and then “General.” From there, select “Date & Time” and make sure that the “Set Automatically” option is turned on. If you need to manually adjust the date and time, toggle the “Set Automatically” switch off and then use the provided options to set the correct date and time.

On an Android device, the process may vary slightly depending on the manufacturer, but generally, you can adjust the date and time settings by going to “Settings,” then “System” or “General Management,” and finally “Date & Time.” From there, you can enable the “Automatic date & time” option or manually set the date and time if needed.

If you’re having trouble updating apps on your device, ensuring that the date and time are accurately set is essential. Many app updates require the correct date and time to be in place for security and functionality reasons.

Resolve Play Store Issues

Clear the Play Store Cache: One common issue with updating apps on iPhone or Android is a cache problem in the Play Store. To resolve this, go to your device’s settings, then to the “Apps” or “Applications” section. Find the Play Store app and tap on it. Then, select “Storage” and tap on “Clear Cache.”

Check Internet Connection: Sometimes, app updates fail due to a poor internet connection. Make sure your smartphone is connected to a stable and strong Wi-Fi or mobile data network before attempting to update your apps.

Restart Your Device: A simple restart of your smartphone can resolve many app-related issues. Turn off your device, wait a few seconds, and then turn it back on. Once it’s rebooted, try updating your apps again.

If you’re still unable to update apps on your iPhone or Android after trying these steps, it’s recommended to seek assistance from a tech expert or reach out to the support team of your device’s manufacturer.

Review Data Usage Settings

Review Data Usage Settings
Article Title Can’t Update Apps on iPhone or Android? Fix it Here
Section Review Data Usage Settings
Subsections
  • Check Data Usage Settings on iPhone
  • Check Data Usage Settings on Android
  • Adjust Data Usage Settings

Fix iPhone Disabled Connect to iTunes 4 Ways Unlock

If your iPhone is disabled and prompting you to connect to iTunes, there are a few ways to unlock it and regain access to your device.

Connect your iPhone to iTunes on a computer using a USB cable.

Understanding the “iPhone is Disabled” Message

If you see the “iPhone is Disabled” message on your device, it means that your iPhone has been locked for security reasons. This can happen if you enter the wrong passcode too many times in a row.

To fix this issue, you can connect your iPhone to iTunes and follow the prompts to unlock it. If you haven’t synced your iPhone with iTunes before, you may need to use recovery mode to unlock it.

Another way to fix the “iPhone is Disabled” message is by using iCloud. If you have Find My iPhone enabled, you can erase your device remotely and then restore it from a backup.

If you don’t have a backup of your iPhone, you may need to restore it to factory settings using iTunes. Keep in mind that this will erase all data on your device, so make sure you have a backup before proceeding.

If you’re still unable to unlock your iPhone, you may need to contact Apple Support for further assistance. They can help you troubleshoot the issue and provide guidance on how to proceed.

Unlocking with iTunes and Finder

To unlock your disabled iPhone using iTunes or Finder, you can follow a few simple steps. First, make sure you have the latest version of iTunes or Finder installed on your computer. Then, connect your iPhone to the computer using a USB cable.

Once your iPhone is connected, you can open iTunes or Finder and look for your device. If your iPhone is disabled, you may see a message prompting you to connect to iTunes. In this case, you will need to restore your iPhone to its factory settings.

To do this, select your iPhone in iTunes or Finder and choose the option to restore it. This will erase all the data on your iPhone, including the passcode, and install the latest version of iOS. Keep in mind that this will also remove all your personal data, so make sure you have a backup available.

After the restore process is complete, you can set up your iPhone as a new device or restore it from a backup if you have one. If you choose to set it up as a new device, you will need to go through the initial setup process, including creating a new passcode.

If you have a backup available, you can choose to restore your iPhone from that backup during the setup process. This will bring back all your personal data and settings to your iPhone, including your passcode.

Once your iPhone is restored and set up, it should no longer be disabled, and you should be able to use it again. If you encounter any issues during the process, you can always reach out to Apple Support for assistance.

Resetting Your Device without iTunes

  • Enter Recovery Mode by connecting your iPhone to your computer and holding down the Home and Power buttons until the iTunes logo appears.
  • Select “Restore” on the pop-up window in iTunes to erase all data and reset your device to its factory settings.
  • If you don’t have iTunes, use a third-party software like Dr.Fone to reset your device without needing iTunes.
  • Another option is to use the Find My iPhone feature on iCloud to remotely erase your device and reset it without using iTunes.

Resolving Connection Issues with iTunes

Issue Resolution
iPhone not recognized by iTunes Update iTunes to the latest version and restart both the iPhone and the computer.
Unable to connect to iTunes Store Check internet connection and ensure that iTunes is not blocked by firewall or antivirus software.
Error message when syncing with iTunes Try using a different USB cable or port, and make sure the iPhone is unlocked and trust the computer.
iTunes crashes when connecting iPhone Reinstall iTunes and make sure it is compatible with the operating system.

Preventing Future iPhone Lockouts

Here are 4 ways to prevent future iPhone lockouts:

1. Set up a strong password or passcode: A strong password or passcode can help prevent unauthorized access to your iPhone. Make sure to use a combination of letters, numbers, and special characters to make it more secure.

2. Enable Touch ID or Face ID: If your iPhone supports Touch ID or Face ID, consider enabling these features for added security. This will allow you to unlock your phone using your fingerprint or facial recognition, which can help prevent future lockouts.

3. Regularly update your iOS: Keeping your iOS up to date is important for security reasons. Apple releases regular updates to patch security vulnerabilities and improve overall performance. To update your iOS, go to Settings > General > Software Update.

4. Backup your iPhone regularly: It’s important to back up your iPhone regularly to prevent data loss in case of a lockout. You can back up your iPhone using iCloud or iTunes. To back up using iCloud, go to Settings > [your name] > iCloud > iCloud Backup. To back up using iTunes, connect your iPhone to your computer and open Finder (Mac) or iTunes (Windows). Then, select your device and click “Back Up Now.”

Fix Message Expired or Not Available for Text Messages

Have you ever encountered the issue of a message expiring or not being available for text messages? It can be frustrating when you’re unable to access important communication. Let’s explore some potential solutions to this common problem.

Check your network connection to ensure that you have a strong and stable signal before attempting to resend the message.

Troubleshooting Message Retrieval Issues

If you’re experiencing issues with retrieving text messages that are showing as expired or not available, there are a few troubleshooting steps you can try to resolve the issue.

First, make sure that your device has a stable internet connection, whether it’s through Wi-Fi or your mobile network. Sometimes, message retrieval issues can be caused by a weak or unstable connection.

Next, try clearing the cache and data of your messaging app. To do this, go to Settings > Apps > select your messaging app > Storage > Clear Cache and Clear Data.

If the issue persists, try restarting your device or removing and reinserting your SIM card. Sometimes, a simple reboot or reseating of the SIM card can resolve messaging issues.

If none of these steps work, you may want to consider contacting your mobile network provider for further assistance. They may be able to troubleshoot the issue on their end or provide additional guidance for resolving the problem.

Sorry, the text message you are trying to access has expired and is no longer available.

Resolving MMS Download Errors

Error message on phone screen

If you are experiencing MMS download errors on your Android device, there are a few steps you can take to resolve the issue. First, check your network connection to ensure that you have a strong Wi-Fi or mobile data connection. If you are roaming, try connecting to a different network to see if the issue persists.

If the problem persists, try clearing the cache and data for your messaging app. To do this, go to Settings > Apps > [Your Messaging App] > Storage > Clear Cache. If that doesn’t work, try clearing the app’s data as well.

If you are still experiencing issues, try restarting your device. Sometimes a simple reboot can resolve connectivity problems.

If none of the above steps work, you may need to consider a factory reset of your device. Before doing this, be sure to back up any important data as a factory reset will erase all of your personal information.

Optimizing APN and Roaming Settings

APN and Roaming settings

To optimize APN and roaming settings, start by checking your APN settings. Go to “Settings” on your device, then “Network & Internet,” and “Mobile network.” Select “Advanced” and then “Access Point Names.” Make sure the correct APN is selected for your network provider. If you’re roaming, ensure the roaming option is enabled in the same menu.

Next, reset your network settings to clear any potential issues. Go to “Settings,” then “System,” and “Reset options.” Select “Reset Wi-Fi, mobile & Bluetooth” to reset your network settings.

If you’re still experiencing issues with text messages, consider updating your device’s software to the latest version. Check for software updates in the “System” or “About phone” section of your settings.

If the problem persists, contact your network provider for further assistance. They may need to troubleshoot any network issues on their end.

Understanding Message Delivery Status

Status Description
Delivered The message has been successfully delivered to the recipient’s device.
Failed The message delivery has failed and was not successfully delivered to the recipient.
Pending The message is still in the process of being delivered and the status is pending.
Expired The message has expired and was not delivered to the recipient’s device.
Not Available The recipient’s device is not available to receive the message at the moment.

Clearing Cache to Improve Messaging Functionality

  • Open the Settings app on your device
  • Scroll down and tap on Apps or Application Manager
  • Find and tap on the messaging app that is experiencing issues
  • Tap on Storage
  • Select Clear Cache
  • Restart your device