Fix Slow Windows 10 Boot Up

Are you tired of waiting for your Windows 10 computer to boot up? Let’s explore some ways to fix slow boot times and get your system up and running faster.

Disable Fast Startup and High-Impact Startup Processes

To disable high-impact startup processes, open Task Manager by pressing Ctrl + Shift + Esc. Go to the “Startup” tab and disable any programs that have a high startup impact by right-clicking on them and selecting “Disable.”

These steps can help speed up the boot process of your Windows 10 computer.

Update Graphics Card Drivers

To update your graphics card drivers, first open the Device Manager by pressing the Windows key + X and selecting “Device Manager.” Look for the “Display adapters” section and right-click on your graphics card. Select “Update driver” from the context menu and choose to search automatically for updated driver software. If Windows doesn’t find any updates, visit the manufacturer’s website to download and install the latest drivers manually.

Once the new drivers are installed, restart your computer and check if the slow boot issue has been resolved. Updating drivers can often improve overall system performance and stability. If you continue to experience slow boot times, consider checking for other factors such as malware, startup programs, or hardware issues that may be affecting your computer’s performance. Regular maintenance and troubleshooting can help keep your system running smoothly.

Optimize Virtual Memory and Hard Drive

  • Adjust Virtual Memory Settings
    • Open Control Panel and click on System and Security.
    • Click on System and then Advanced system settings.
    • Under the Advanced tab, click on Settings under the Performance section.
    • Go to the Advanced tab again and click on Change under the Virtual Memory section.
    • Uncheck the box that says Automatically manage paging file size for all drives.
    • Select the Custom size option and set the Initial size and Maximum size to the recommended values (found in the same window).
    • Click OK to apply the changes.
  • Defragment and Optimize Hard Drive
    • Open File Explorer and right-click on the C: drive.
    • Select Properties and go to the Tools tab.
    • Under the Optimize and defragment drive section, click on Optimize.
    • Select the drive you want to optimize and click on Analyze.
    • If optimization is needed, click on Optimize to defragment the drive.

Perform a Clean Install of Windows 10

Next, restart your computer and boot from the USB drive. Press the necessary key (usually F2, F12, or Del) during boot up to access the BIOS settings. Change the boot order to prioritize the USB drive. Save the changes and exit the BIOS settings.

Follow the on-screen instructions to begin the Windows 10 installation process. When prompted, select “Custom: Install Windows only (advanced)” to perform a clean install. Choose the drive where you want to install Windows and format it to erase all existing data.

Continue with the installation process and let Windows set up your system. You may need to enter your product key during the installation. Once Windows is installed, make sure to install all necessary drivers for your hardware components.

After completing the installation, your Windows 10 should boot up faster without the clutter and issues that may have been causing the slow boot up.

Remove Viruses and Malware

Next, check your Task Manager to see if any suspicious programs are running in the background. You can access the Task Manager by pressing Ctrl + Shift + Esc on your keyboard. Look for any unfamiliar processes or applications and end them if necessary.

If your computer is still slow to boot up after running a scan and closing any suspicious programs, consider checking for malware that may be embedded in your operating system. Use a malware removal tool to scan for and remove any hidden threats.

Additionally, you can optimize your boot up time by disabling unnecessary startup programs. To do this, right-click on the taskbar and select Task Manager. Go to the Startup tab and disable any programs that you don’t need to run at startup.

Upgrade to SSD for Faster Startup

SSD upgrade kit

Upgrade to a Solid-state drive (SSD) for faster startup: Upgrading your hard disk drive (HDD) to an SSD can significantly improve your Windows 10 boot-up time. SSDs are faster and more efficient than traditional HDDs, allowing for quicker access to your operating system and applications.

To upgrade to an SSD: First, back up all your important files and data. Then, open your computer and locate the HDD. Remove it and replace it with the new SSD.

After installing the SSD: Install Windows 10 on the new drive. You can do this by creating a bootable USB drive with the Windows installation files.

Once Windows is installed on the SSD: Your computer will now boot up faster and run more smoothly. Enjoy the improved performance of your system with the new SSD.

Utilize System File Checker for Updates Issues

To utilize System File Checker for update issues in Windows 10:

First, open the Command Prompt as an administrator by searching for “cmd” in the Windows search bar, right-clicking on Command Prompt, and selecting “Run as administrator.”

Next, type the command “sfc /scannow” and press Enter. This will initiate a system scan to check for and repair any corrupted system files.

Wait for the scan to complete, which may take some time depending on the size of your system files and the speed of your computer.

Once the scan is finished, restart your computer to apply any repairs that were made by the System File Checker.

By using the System File Checker, you can address update issues that may be causing slow boot-up times in Windows 10. It is a useful tool for troubleshooting system performance and ensuring that your operating system functions properly.

FAQs

Why does my Windows 10 computer take so long to boot up?

Your Windows 10 computer may be taking a long time to boot up due to missing or corrupted system files. You can easily check and repair these files using the Windows System File Checker Tool.

Why does my PC take so long to get running from boot up?

Your PC may be taking a long time to get running from boot up due to a full boot drive, too many programs starting alongside Windows, or aging hardware. Apply solutions to pinpoint the specific issue.

Why is my computer so slow all of a sudden Windows 10?

Your computer is running slow all of a sudden on Windows 10 because there may be too many programs running at once, malware or virus infections, hardware issues, high memory usage, and other factors that are affecting your PC’s performance.

Why is my computer suddenly so slow to start?

Your computer is suddenly slow to start because there may be issues with your RAM, disk drive space, hard drive, background programs, or startup programs.

Lag Up Definition & Usage Examples

In this article, I will discuss the definition of lag up and provide examples of its usage.

Examples and Definitions

In the world of golf, “lag up” is a term used to describe the act of hitting a golf ball with a short swing in order to control the distance and trajectory of the shot. This technique is commonly used when a player is faced with a difficult lie or when they need to hit the ball high in the air to clear an obstacle.

One example of using the “lag up” technique is when a golfer is trying to hit a shot over a bunker onto the green. By taking a short backswing and focusing on accelerating through the ball at impact, the player can generate the necessary height and distance to clear the hazard and land the ball softly on the green.

Another example of “lagging up” a shot is when a player is trying to control the spin of the ball on a wedge shot around the green. By using a short, controlled swing and focusing on making clean contact with the ball, the player can create the necessary backspin to stop the ball quickly on the putting surface.

Synonyms and Variations

  • Delay
  • Hold up
  • Slow down
  • Set back
  • Postpone

Antonyms and Contrasts

Two opposite arrows pointing in opposite directions

An antonym is a word that has the opposite meaning of another word. In the context of lag up, some antonyms to consider are “advance,” “progress,” or “accelerate.”

Contrasts can also be made between lag up and similar phrases or concepts. For example, while lag up suggests a delay or slow movement, phrases like “speed up,” “move forward,” or “make progress” indicate the opposite.

When exploring antonyms and contrasts for lag up, it’s essential to consider the context in which the term is being used. Understanding the nuances of language and how words interact with each other can help clarify meaning and improve communication.

Usage in Context

When using the term “lag up” in a sentence, it is important to ensure that it is used correctly to convey the intended meaning. For example, you could say, “I need to lag up my golf swing to improve my performance on the course.”

In this context, “lag up” is being used as a verb to describe the action of improving or enhancing something, specifically a golf swing. It is important to note that “lag up” is not a commonly used phrase in everyday English and may be more commonly found in discussions related to golf or sports.

Additionally, you could use “lag up” as a noun to describe the process of adding or increasing something. For instance, “The lag up in my headphone’s latency has improved my listening experience.”

It is always helpful to consult a thesaurus or dictionary to find synonyms or similar phrases that can be used in place of “lag up” if needed. This can help to expand your vocabulary and ensure that you are using the most appropriate language for the context.

F.A.Qs

What is the mean lag?

The mean lag serves as a summary measure of the lag structure in dynamic models, estimating the average delay in transmitting shocks like income, oil prices, or interest rates to other variables.

Why do people say lag?

People say “lag” to refer to the time delay between initiating an action and seeing the effect, especially in internet gaming when the latency is greater than usual.

What does it mean for a person to lag?

It means for a person to lag when they are unable to keep up with others, falling behind or not measuring up in terms of speed or progress.

Troubleshooting and Improving Virtual Machine Performance

Virtual machine performance can greatly impact the efficiency and productivity of computer systems. Identifying and resolving issues related to performance can lead to enhanced virtual machine operations and overall system performance. In this article, I will delve into troubleshooting techniques and strategies to improve virtual machine performance.

Optimizing CPU and Memory Allocation

To optimize CPU and memory allocation for virtual machine performance, there are several key factors to consider. Firstly, ensure that your hardware supports hardware virtualization and that it is enabled in the BIOS settings. This will allow for better performance and efficiency when running virtual machines.

Next, consider the number of virtual CPUs and the amount of memory allocated to each virtual machine. Ensure that you are not overcommitting resources by allocating more CPU cores or memory than your physical host can handle. It is important to find the right balance between performance and resource allocation.

Additionally, consider the operating system running on your virtual machines. Different operating systems have different resource requirements, so it is important to allocate resources accordingly. For example, Windows Server or a database application may require more CPU cores and memory compared to a Windows 10 workstation.

Monitoring resource usage is crucial for troubleshooting and optimizing performance. Use tools like VMware ESXi or VMware Workstation to monitor CPU and memory utilization. Pay attention to metrics such as CPU usage, memory usage, and memory paging.

If you notice high CPU or memory usage, consider adjusting resource allocation. This can be done by changing the number of virtual CPUs or adjusting memory settings for each virtual machine. Be cautious not to allocate too many resources, as this can lead to resource contention and decreased performance.

Enhancing Storage and Disk Performance

Issue Possible Causes Solutions
Slow disk performance Inadequate disk I/O capacity
High disk latency
Fragmented disk space
Upgrade to faster storage
Optimize disk I/O workload
Defragment disk space
Insufficient storage space Running out of disk space
Unoptimized disk usage
Allocate more storage
Implement storage thin provisioning
Optimize disk usage through compression or deduplication
Storage connectivity issues Loose or faulty cables
Incorrect storage configuration
Network congestion
Check and secure cable connections
Verify storage configuration settings
Resolve network congestion issues

Streamlining Network and Antivirus Configurations

To streamline network and antivirus configurations for improved virtual machine performance, follow these steps:

1. Optimize your network settings:
– Disable unnecessary network services and protocols.
– Use a dedicated virtual switch for each virtual machine to isolate network traffic.
– Enable jumbo frames for increased network performance.
– Use VMware ESXi’s network I/O control feature to prioritize network traffic.

2. Fine-tune antivirus configurations:
– Exclude virtual machine files and folders from real-time scanning to reduce performance impact.
– Schedule antivirus scans during off-peak hours to minimize disruption.
– Configure antivirus software to use low-resource scanning settings.

3. Utilize hardware virtualization features:
– Ensure that hardware virtualization is enabled in the BIOS settings of your physical server.
– Use a multi-core processor to take advantage of parallel processing capabilities.
– Allocate sufficient memory (RAM) to each virtual machine for optimal performance.

4. Optimize storage performance:
– Use solid-state drives (SSDs) instead of traditional hard disk drives (HDDs) for faster read/write speeds.
– Implement disk caching techniques to improve I/O performance.
– Consider using VMware Workstation’s shared virtual hard disks to reduce storage overhead.

Monitoring and Testing for Improved Performance

  • Step 1: Identify Performance Issues

    • Monitor the virtual machine’s performance metrics, such as CPU usage, memory utilization, and disk I/O.
    • Check for any abnormal spikes or consistently high resource utilization.
      Monitor the virtual machine's performance metrics, such as CPU usage, memory utilization, and disk I/O.
Check for any abnormal spikes or consistently high resource utilization.
    • Compare the current performance with the expected or baseline performance.
  • Step 2: Analyze Resource Utilization

    • Review the virtual machine’s resource allocation and utilization.
    • Identify any bottlenecks or resource constraints.
    • Consider adjusting resource allocations, such as increasing CPU cores or memory.
  • Step 3: Check for Software Conflicts

    • Identify any software applications or services that may be conflicting with the virtual machine’s performance.
    • Terminate unnecessary or resource-intensive processes.
      Identify any software applications or services that may be conflicting with the virtual machine's performance.
Terminate unnecessary or resource-intensive processes.
    • Disable any conflicting services or applications temporarily for testing purposes.
  • Step 4: Update Virtualization Software

    • Check for any available updates or patches for the virtualization software.
    • Apply the updates to ensure compatibility and performance improvements.
    • Restart the virtual machine after the update installation.
  • Step 5: Optimize Disk Performance

    • Defragment the virtual machine’s disks to improve disk access and read/write speeds.
    • Remove unnecessary files or applications from the virtual machine’s disk.
    • Consider allocating additional disk space if the current capacity is nearing its limit.

FAQ

Why is my virtual machine so laggy?

Your virtual machine may be laggy due to insufficient hardware resources, specifically CPU and memory. If you haven’t allocated enough CPU resources to the VM, the software running inside it may experience slow performance and lag. To address this issue, you can increase the number of CPU cores assigned to the VM or add more virtual processors.

How can I improve my virtual machine performance?

To improve virtual machine performance, you can:
– Enable integration services specific to your virtualization platform.
– Opt for fixed VHD files instead of dynamically expanding ones.
– Avoid relying on snapshots as a backup solution.
– Configure appropriate paging file sizes.
– Limit the number of virtual network switches.
– Prevent overloading the management operating system.
– Close any unnecessary applications running on the virtual machine.

What are the performance issues in virtualization?

Performance issues in virtualization can arise from improper allocation of resources to virtual machines (VMs), which can lead to bottlenecks, contention, or wastage.

How to Fix Windows 10 Slow PC Performance

Are you frustrated with the slow performance of your Windows 10 PC? Here are some practical solutions to help improve its speed and efficiency.

Optimize Power Settings

Power button icon

To improve the performance of your Windows 10 PC, optimizing the power settings can make a significant difference. By adjusting the power settings, you can prioritize performance over energy saving and enhance the overall speed and responsiveness of your computer.

Here are some steps to optimize power settings in Windows 10:

1. Open the Control Panel by typing “Control Panel” in the search bar and selecting it from the results.

2. In the Control Panel, click on “Power Options.”

3. Select the power plan that suits your needs. You can choose between Balanced, Power Saver, and High Performance. For better performance, select the High Performance power plan.

4. Customize the power plan by clicking on “Change plan settings” next to the selected power plan.

5. Adjust the settings according to your preferences. For example, you can set the display and sleep times to longer intervals to prevent your PC from entering low power states too quickly.

6. Click on “Change advanced power settings” to access more options.

7. In the Advanced settings, you can fine-tune various power options. Expand the categories and modify the settings based on your requirements.

8. To disable background applications that consume power, go to the “Multimedia settings” category and set “When playing video” and “When playing audio” to “Optimize performance.”

9. Adjust the processor power management settings under the “Processor power management” category. Set the minimum and maximum processor state to 100% for maximum performance.

10. Disable USB selective suspend to prevent USB devices from entering a low power state. Expand the “USB settings” category and set “USB selective suspend setting” to “Disabled.”

11. Apply the changes and exit the Control Panel.

By optimizing the power settings, you can ensure that your Windows 10 PC is operating at its full potential. This can help eliminate any sluggishness or lag you may have been experiencing.

Remember to periodically check for Windows updates as these can include performance improvements and bug fixes that can further enhance your PC’s performance.

Additionally, consider keeping your computer hardware clean and free from dust, as excessive heat can also impact performance. Regularly defragmenting your hard disk drive and using tools like ReadyBoost to improve disk performance can also help.

Following these steps and implementing these optimizations can significantly improve the speed and performance of your Windows 10 PC, allowing you to enjoy a smoother and more efficient computing experience.

Manage Startup Programs

Windows startup logo

  • Identify unnecessary startup programs
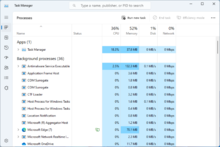
  • Access the Task Manager
  • Click on the “Startup” tab
  • Disable unwanted startup programs
  • Right-click on the program
    Enable essential startup programs
Right-click on the program
  • Select “Disable” from the context menu
  • Enable essential startup programs
  • Right-click on the program
    Enable essential startup programs
Right-click on the program
  • Select “Enable” from the context menu
  • Consider removing non-essential programs from startup
    Select "Enable" from the context menu
Consider removing non-essential programs from startup
  • Restart your computer

Restore Previous System State

To restore the previous system state on Windows 10 and fix slow PC performance, follow these steps:

1. Open the Control Panel by clicking on the Start button and typing “Control Panel”. Press Enter to open it.

2. In the Control Panel, click on “System and Security” and then on “System”.

3. In the System window, click on “System Protection” on the left-hand side.

4. In the System Properties window, under the “System Protection” tab, click on “System Restore”.

5. Click on “Next” in the System Restore window.

6. You will see a list of restore points available. Choose a restore point that you believe will help fix the slow PC performance. Typically, it is recommended to choose the most recent restore point before the performance issue started.

7. Click on “Next” and then on “Finish” to start the system restore process.

8. Windows will restart your computer and begin the system restore process. This may take some time, so be patient.

9. Once the system restore process is complete, Windows will restart again. After the restart, check if the PC performance has improved.

10. If the performance issue persists, you may need to try other troubleshooting methods or consider seeking professional help.

Remember to regularly create restore points to have a recent backup of your system state. This can be done by following the same steps mentioned above and clicking on “Create” in the System Protection tab.

Enhance Disk Caching with ReadyBoost

ReadyBoost is a feature in Windows 10 that can significantly improve your PC’s performance by using a USB flash drive or SD card as additional cache memory. This can be particularly helpful if you have a slow PC and want to speed up disk access times.

To enhance disk caching with ReadyBoost, follow these steps:

1. Connect a USB flash drive or insert an SD card into your computer. Make sure it has enough free space to be used for caching.

2. Right-click on the drive in File Explorer and select “Properties.”

3. In the Properties window, go to the “ReadyBoost” tab.

4. Check the box that says “Use this device” and adjust the slider to allocate the desired amount of space for caching. Keep in mind that ReadyBoost works best with at least 1-2 GB of cache space.

5. Click “Apply” and then “OK” to save the changes.

By enabling ReadyBoost, Windows will use the USB flash drive or SD card as additional cache memory, which can help speed up disk access times and improve overall performance.

It’s important to note that ReadyBoost is most effective on systems with low memory (RAM) and slower hard drives. If you have a fast SSD or ample RAM, the benefits of ReadyBoost may be minimal.

Additionally, if you have an external hard drive connected to your computer, it’s recommended to disable ReadyBoost for that drive. ReadyBoost is designed to work best with flash-based storage devices, not traditional hard disk drives.

Remember to periodically check the performance of your computer and adjust the ReadyBoost settings if needed. As your usage patterns change or if you add more memory to your system, you may want to reevaluate the allocated cache space.

By following these steps, you can enhance disk caching with ReadyBoost and potentially improve the performance of your Windows 10 PC. Give it a try and see if it makes a difference for you.

If you have any further questions or encounter any issues, refer to the Windows 10 documentation or consult Microsoft’s support resources for troubleshooting tips.

Remember, ReadyBoost is just one of many potential solutions for improving PC performance. Be sure to also consider other factors such as OneDrive syncing, regular defragmentation, installing Windows updates, and optimizing your startup programs.

Efficient disk caching can have a significant impact on your PC’s overall performance, so it’s worth exploring different options and finding what works best for your specific setup.

Turn Off Windows Tips

1. Open the Settings app by pressing the Windows key + I on your keyboard.

2. In the Settings window, click on “System” and then select “Notifications & actions” from the left-hand menu.

3. Scroll down to the “Get notifications from these senders” section and find “Get tips, tricks, and suggestions as you use Windows.” Toggle the switch to the off position to disable Windows tips.

4. Additionally, you can also disable specific tips by scrolling further down to the “Tips” section and toggling off any tips you don’t want to see.

5. Once you have turned off Windows tips, you should notice an improvement in your PC’s performance as it will no longer spend resources on displaying these tips.

Remember, if you ever want to re-enable Windows tips in the future, simply follow the same steps and toggle the switches back on.

By turning off Windows tips, you can optimize your Windows 10 PC’s performance and eliminate any potential distractions or interruptions caused by these tips.

Control OneDrive Syncing

1. Open the OneDrive settings: Right-click on the OneDrive icon in the notification area of the taskbar and select “Settings”.

2. Choose which folders to sync: In the “Account” tab, click on “Choose folders” and uncheck any folders that you don’t need to sync to your PC. This will reduce the amount of data being synced and free up system resources.

3. Pause syncing: In the “Settings” tab, click on “Pause syncing” to temporarily stop OneDrive from syncing files. This can be useful when you need your PC’s resources for other tasks.

4. Adjust backup settings: In the “Backup” tab, you can choose whether to back up your important folders like Desktop, Documents, and Pictures to OneDrive. Consider disabling backup for large folders that are not essential to your workflow.

5. Optimize OneDrive performance: In the “Settings” tab, click on “Optimize” and select “Files on-demand”. This feature allows you to access your OneDrive files without actually downloading them to your PC, saving storage space and reducing the impact on performance.

Remember to periodically check your OneDrive settings and adjust them based on your needs. By controlling OneDrive syncing, you can optimize your PC’s performance and reduce the strain on system resources.

Additionally, consider implementing these general tips to further improve your Windows 10 PC performance:

– Defragment your hard drive: Use the built-in Windows Disk Defragmenter to optimize the placement of files on your hard drive, improving read and write speeds.

– Keep Windows up to date: Regularly install Windows updates as they often include performance improvements and bug fixes.

– Manage startup programs: Open the Task Manager by pressing Ctrl + Shift + Esc and go to the “Startup” tab. Disable any unnecessary programs from starting up with your PC to reduce boot time.

– Remove unnecessary software: Uninstall any unused or unnecessary applications from your PC to free up storage space and improve performance.

– Clean up your Windows Registry: Use a trusted registry cleaner tool to remove invalid entries and optimize your system’s performance.

– Consider upgrading your hardware: If your PC’s performance is consistently slow, it may be time to upgrade your hardware components like RAM, hard drive, or processor.

Enable OneDrive Files On-Demand

1. Open the OneDrive settings by right-clicking on the OneDrive icon in the system tray and selecting “Settings”.
2. In the Settings tab, check the box next to “Save space and download files as you use them” under the Files On-Demand section.
3. Click “OK” to save the changes.

Enabling OneDrive Files On-Demand allows you to access your files in the cloud without having to download them to your computer. This can help improve the performance of your Windows 10 PC by reducing the amount of storage space used and speeding up file access.

By using Files On-Demand, you can see all your files in File Explorer, even if they are not stored locally on your PC. When you open a file that is not currently downloaded, it will be downloaded on-demand and available for use. This means you can access all your files without taking up unnecessary space on your hard drive.

Files On-Demand is especially useful if you have limited storage on your PC or if you work with large files that you don’t need to have constantly available. It allows you to free up space on your computer while still having easy access to all your files through the OneDrive app.

In addition to enabling Files On-Demand, there are other steps you can take to improve the performance of your Windows 10 PC. Regularly defragmenting your hard drive, keeping Windows and your applications up to date with the latest updates, and optimizing your startup programs can all help improve overall performance.

If you’re experiencing slow PC performance, it’s also worth checking for any malware or viruses that could be affecting your system. Running a full scan with your antivirus software can help identify and remove any potential threats.

Taking these steps and enabling OneDrive Files On-Demand can help optimize your Windows 10 PC and improve its overall performance. By managing your files efficiently and keeping your system updated, you can ensure a smoother and faster computing experience.

Disable Search Indexing

Windows search icon crossed out

1. Open the Control Panel by pressing the Windows key + X and selecting “Control Panel” from the menu.

2. In the Control Panel, click on “Indexing Options.”

3. In the Indexing Options window, click on the “Modify” button.

4. Uncheck the box next to the drive or folder that you want to disable indexing for. You can also click on “Show all locations” to see a list of all indexed locations on your PC.

5. Click on “OK” to save your changes.

6. If prompted, select “Apply changes to drive X:\, subfolders and files” (where X is the drive you disabled indexing for) and click on “OK.”

7. Repeat steps 4-6 for any other drives or folders that you want to disable indexing for.

By disabling search indexing, you are preventing Windows from constantly scanning and indexing files on your PC, which can help improve its overall performance. However, keep in mind that search functionality within Windows and certain applications may be affected.

If you ever need to re-enable search indexing, simply follow the same steps and check the box next to the drive or folder you want to enable indexing for.

Remember that there are also other factors that can contribute to a slow PC performance, such as outdated software, unnecessary startup programs, or a fragmented hard drive. It’s a good idea to regularly update your Windows operating system and applications, run disk defragmentation, and consider removing any unnecessary programs or files.

If you’re using a laptop, optimizing your power settings can also help improve performance. Adjusting your power plan to “High performance” or customizing it to balance performance and battery life can make a noticeable difference.

Clean Hard Disk Space

One common cause of slow PC performance in Windows 10 is a cluttered hard disk. Over time, your hard disk can become filled with unnecessary files and data, which can impact the overall speed and responsiveness of your computer.

To clean up your hard disk space and improve your Windows 10 PC’s performance, follow these steps:

1. Open the Windows Disk Cleanup tool. You can do this by typing “Disk Cleanup” into the search bar on your taskbar and selecting the Disk Cleanup app from the search results.

2. Select the drive you want to clean. The Disk Cleanup tool will scan the selected drive for unnecessary files that can be safely deleted.

3. Review the list of file types. The Disk Cleanup tool will present you with a list of file types that can be deleted. You can select the file types you want to remove, or you can choose “Clean up system files” to include additional files such as Windows Update files and system error memory dump files.

4. Click “OK” to start the cleanup process. The Disk Cleanup tool will begin deleting the selected files from your hard disk.

5. Remove unnecessary applications. In addition to cleaning up files, it’s also a good idea to remove any unnecessary applications or programs from your PC. To do this, open the Control Panel and select “Uninstall a program” under the “Programs” section. From there, you can select the applications you want to remove and click “Uninstall” to free up space on your hard disk.

6. Clear your browser cache. Web browsers store temporary files, cookies, and other data as you browse the internet. Over time, this cache can become bloated and slow down your browsing experience. To clear your browser cache, open your web browser’s settings, locate the option to clear browsing data, and select the appropriate checkboxes to remove cache files.

By following these steps, you can clean up your hard disk space and help improve the performance of your Windows 10 PC. Regularly performing these maintenance tasks can help keep your PC running smoothly and efficiently.

Registry Cleanup

1. Open the Registry Editor by pressing the Windows key + R, typing “regedit” in the Run dialog box, and hitting Enter.

2. Before making any changes, it’s crucial to back up your registry. Go to File > Export, choose a location to save the backup file, and give it a descriptive name.

3. Once you have a backup, navigate to the following key: HKEY_LOCAL_MACHINE\SOFTWARE\Microsoft\Windows\CurrentVersion\Run.

4. Here, you’ll find a list of programs that start automatically when your PC boots up. Carefully review the list and delete any entries that belong to programs you no longer use or recognize. Right-click on the entry and select Delete.

5. Repeat step 4 for the following keys:

– HKEY_CURRENT_USER\Software\Microsoft\Windows\CurrentVersion\Run
– HKEY_LOCAL_MACHINE\SOFTWARE\Wow6432Node\Microsoft\Windows\CurrentVersion\Run

6. Next, clean up invalid file associations. In the Registry Editor, go to HKEY_CLASSES_ROOT and look for file extensions that are no longer associated with any program. Right-click on the extension and select Delete.

7. Remove unnecessary startup services by going to HKEY_LOCAL_MACHINE\SYSTEM\CurrentControlSet\Services. Again, carefully review the list and delete any services that are no longer needed. Right-click on the service and select Delete.

8. Finally, clean up orphaned registry keys. These are keys that are left behind by uninstalled programs. In the Registry Editor, go to Edit > Find and type in the name of the program you’ve uninstalled. Delete any registry keys associated with it.

Remember to proceed with caution when editing the registry. Making incorrect changes can cause serious issues with your system. If you’re not confident in your abilities, it’s best to seek professional help or use a trusted registry cleaning tool.

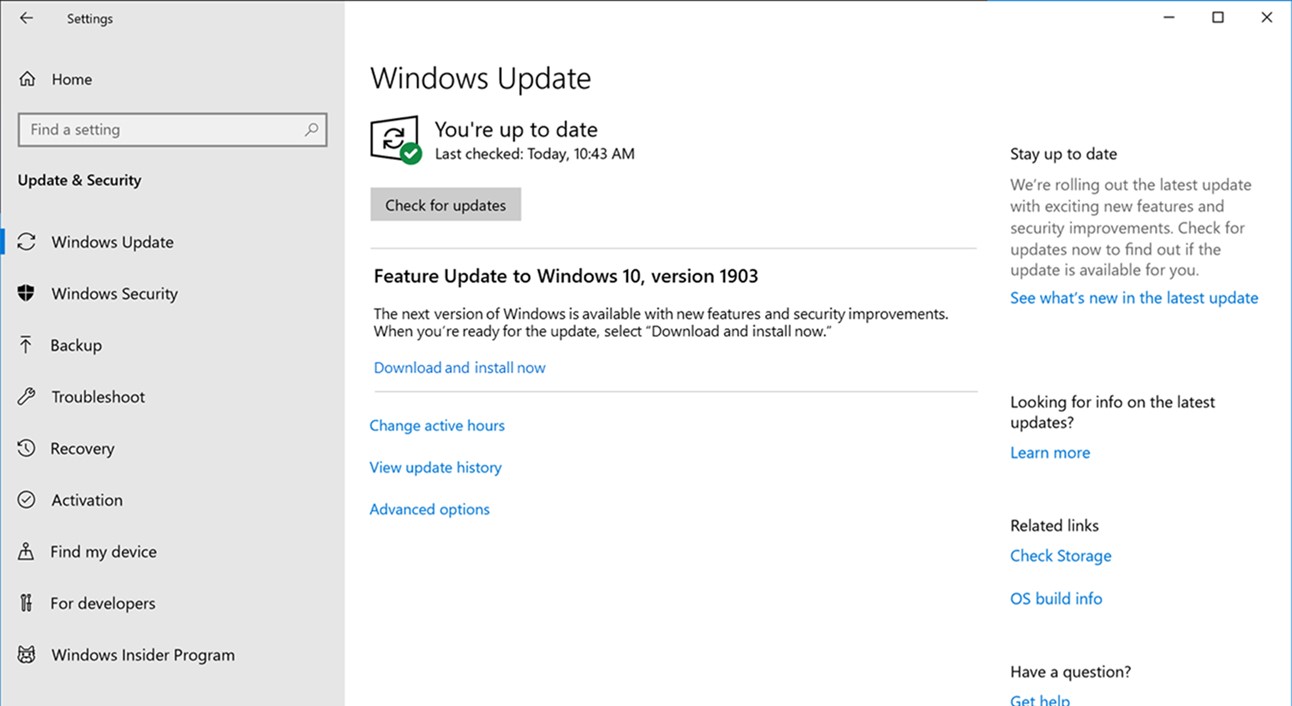
In addition to cleaning the registry, it’s also important to regularly update your Windows operating system. Windows updates often include performance improvements and bug fixes that can help speed up your PC. To check for updates, go to Settings > Update & Security > Windows Update and click on “Check for updates”.

By performing regular registry cleanups and keeping your Windows 10 up to date, you can optimize your PC’s performance and enjoy a faster and smoother computing experience.

Simplify Visual Effects

  • Disable unnecessary visual effects: Adjust the visual settings of Windows 10 to improve performance.
  • Turn off transparency effects.
  • Reduce or disable animations.
  • Disable live tiles.
  • Optimize the Start menu.
  • Minimize the number of open windows and running applications.
  • Remove unnecessary desktop icons.
  • Use a basic or solid color desktop background.
    Remove unnecessary desktop icons.
Use a basic or solid color desktop background.
  • Disable unnecessary startup programs.
  • Regularly clean up temporary files and unnecessary system files.

Turn Off Transparency

Windows settings icon

1. Open the Settings menu by clicking on the Windows Start button and selecting “Settings.”

2. In the Settings menu, click on “Personalization.”

3. From the left-hand menu, select “Colors.”

4. Scroll down until you see the “Transparency effects” option. Toggle the switch to turn it off.

5. After turning off transparency, you should notice a difference in the responsiveness and speed of your PC.

Disabling transparency can alleviate the strain on your system resources, allowing your computer to run more smoothly. This is especially beneficial for older laptops or computers with limited hardware capabilities.

In addition to turning off transparency, there are other steps you can take to optimize your Windows 10 PC’s performance. These include disabling unnecessary startup programs, cleaning up your hard drive, and updating your device drivers. By regularly maintaining your PC and optimizing its settings, you can ensure that it runs efficiently.

If you’re experiencing persistent issues with slow performance, it may be worth considering upgrading to Windows 11 or consulting with a professional for further assistance. However, for many users, disabling transparency can provide a noticeable improvement without the need for more drastic measures.

Remember, these steps are specific to Windows 10. If you’re using a different operating system, the process may vary. Always refer to the appropriate documentation or seek professional advice to ensure you’re making the right changes for your specific system.

Update Device Drivers

One common cause of slow PC performance in Windows 10 is outdated or faulty device drivers. Device drivers are software programs that allow your computer’s operating system to communicate with and control the hardware devices attached to your system. When these drivers are outdated or not working properly, it can lead to sluggish performance and other issues.

To update your device drivers and improve your Windows 10 PC’s performance, follow these steps:

1. Identify the outdated drivers: Open the Device Manager by pressing the Windows key + X and selecting “Device Manager.” Look for any devices with a yellow exclamation mark or a red X next to them. These symbols indicate that the device drivers are outdated or not working correctly.

2. Download the latest drivers: Visit the manufacturer’s website for each device with outdated drivers and locate the drivers section. Look for the latest driver version compatible with your Windows 10 operating system. Download the drivers onto your computer.

3. Install the new drivers: Once the drivers are downloaded, double-click on the driver file and follow the on-screen instructions to install them. If prompted, restart your computer to complete the installation.

4. Use third-party driver update software: If manually updating drivers seems overwhelming, you can use third-party driver update software to automate the process. These programs scan your system, identify outdated drivers, and download and install the latest versions for you. Be sure to select a reputable software from a trusted source.

5. Windows Update: Windows 10 also provides automatic driver updates through Windows Update. To access this feature, go to Settings > Update & Security > Windows Update. Click on “Check for updates” and let Windows search for the latest drivers available for your system. If any updates are found, follow the prompts to install them.

Updating your device drivers can significantly improve your Windows 10 PC’s performance. By ensuring that your hardware devices are running on the latest software, you can enhance their compatibility with the operating system and optimize their performance.

Remember to regularly check for driver updates and keep your PC’s drivers up to date. This will help prevent future performance issues and ensure that your system is running smoothly.

Schedule Automatic Maintenance

1. Open the Control Panel by pressing the Windows key + X on your keyboard and selecting “Control Panel” from the menu.

2. In the Control Panel, click on “System and Security” and then select “Security and Maintenance.”

3. Under the “Maintenance” section, click on “Change maintenance settings.”

4. In the maintenance settings window, you can choose the time and frequency for automatic maintenance to run. Check the box next to “Automatic maintenance” if it’s not already selected.

5. You can also choose to allow maintenance to wake up your PC from sleep mode to perform the tasks. Check the box next to “Allow scheduled maintenance to wake up my computer at the scheduled time” if desired.

6. Click on the “OK” button to save your changes and close the window.

By scheduling automatic maintenance, Windows 10 will perform several tasks in the background to keep your PC running smoothly. These tasks include software updates, system diagnostics, disk cleanup, and disk defragmentation. It’s important to note that automatic maintenance requires your PC to be turned on and connected to a power source during the scheduled time.

Regularly scheduling automatic maintenance can help prevent software bloat, clear temporary files, and optimize the performance of your PC. It is especially useful for laptops and desktop computers that are frequently used and may accumulate unnecessary files over time.

If you have any specific questions or issues related to scheduling automatic maintenance on Windows 10, you can refer to the FAQ section on the Microsoft Windows website or seek help from online forums and communities.

Remove Unnecessary Software

  • Uninstall unnecessary programs: Remove any software or applications that you no longer use or need.
  • Disable startup programs: Prevent unnecessary programs from launching at startup, slowing down your PC.
  • Clear out temporary files: Delete temporary files and folders that take up valuable disk space and contribute to slower performance.
  • Remove bloatware: Get rid of pre-installed software that came with your PC and is often unnecessary or resource-heavy.
  • Disable visual effects: Turn off unnecessary visual effects that can consume system resources and impact performance.
  • Update or remove outdated drivers: Ensure that all your hardware drivers are up to date, improving compatibility and performance.
  • Remove browser extensions: Disable or uninstall unnecessary browser extensions that can slow down your web browsing experience.
  • Disable unnecessary services: Stop unnecessary background services that run automatically and consume system resources.
  • Clean up your desktop: Remove icons and files from your desktop that can slow down your PC’s performance.
  • Perform a malware scan: Use reliable antivirus software to scan and remove any malware or viruses that may be slowing down your PC.

F.A.Qs

How do I clean up my computer to make it run faster?

To make your computer run faster, you can prevent programs from automatically running at startup, uninstall unnecessary programs, clean up hard disk space by deleting unnecessary files, save old pictures or videos to the cloud or an external drive, and run a disk cleanup or repair.

Why is my PC so slow all of a sudden Windows 10?

Your PC may be slow all of a sudden on Windows 10 due to various reasons such as multiple programs running simultaneously, virus infection, malware, hardware issues, or high memory usage.

How do I fix slowness on Windows 10?

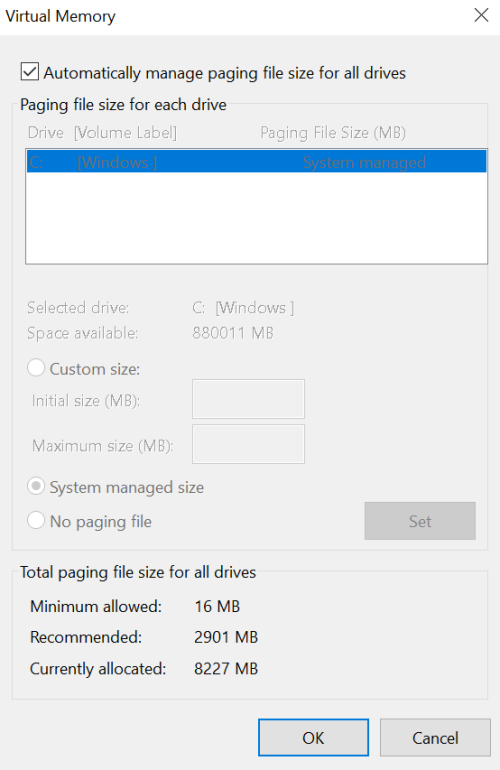
To fix slowness on Windows 10, ensure you have the latest updates for Windows and device drivers, restart your PC and only open necessary apps, utilize ReadyBoost for performance improvement, manage the page file size, and check for low disk space and free up space.

Fix Windows PC Randomly Restarting Without Warning

Are you frustrated by your Windows PC randomly restarting without warning? It can be a major inconvenience, but there are steps you can take to fix this issue.

Resolving Power Issues and Connection Problems

Power outlet with plug

To resolve power issues and connection problems causing your Windows PC to randomly restart without warning, start by checking the power supply unit (PSU) and ensuring it is functioning properly. Inspect the power cord for any damage and consider using a surge protector to prevent power surges.

Next, check the motherboard for any signs of damage or capacitor plague, which could be causing the random restarts. Run a root cause analysis to identify any underlying issues, such as malware or hardware problems.

Make sure to update your antivirus software and perform a full system scan to check for any computer virus or ransomware that may be causing the problem. Additionally, ensure that your Windows Update is up to date to fix any software bugs or security vulnerabilities.

Finally, monitor the computer’s temperature to ensure it is not overheating, as this could also cause random restarts. Consider using an uninterruptible power supply (UPS) to prevent power failures from causing unexpected shutdowns.

Managing System Features: Turning Off Automatic Restart and Disabling Fast Startup

To prevent your Windows PC from randomly restarting without warning, you can manage system features such as turning off automatic restart and disabling fast startup. To turn off automatic restart, right-click on the Start button and select System. Then, click on Advanced system settings, go to the Advanced tab, and click on Settings under Startup and Recovery. Finally, uncheck the box next to Automatically restart and click OK.

To disable fast startup, open the Control Panel and go to Power Options. Then, click on Choose what the power buttons do and select Change settings that are currently unavailable. Scroll down and uncheck the box next to Turn on fast startup (recommended), then click Save changes.

Ensuring Hardware Health: Checking RAM and Power Supply

RAM and power supply

Component Steps to Check
RAM 1. Open the computer case and locate the RAM modules.
2. Remove and reseat the RAM modules to ensure they are properly connected.
3. Use a memory testing tool to check for any errors in the RAM.
Power Supply 1. Check all power connections to ensure they are secure.
2. Use a multimeter to test the voltage output from the power supply.
3. Inspect the power supply for any signs of damage or overheating.

Keep Your System Up-to-Date: Installing Windows Updates and Driver Updates

Windows update installation

To prevent your Windows PC from randomly restarting without warning, it’s crucial to keep your system up-to-date. This means regularly installing Windows updates and driver updates. Make sure to enable Windows Update to automatically download and install updates, including important security patches. This will help keep your operating system running smoothly and prevent unexpected shutdowns.

In addition to Windows updates, it’s important to regularly update your device drivers, including those for your graphics card, motherboard, and other hardware components. Outdated drivers can cause system instability, leading to random restarts. Check the websites of your hardware manufacturers for the latest driver updates, and install them as needed.

By keeping your system up-to-date with the latest Windows and driver updates, you can minimize the risk of your PC randomly restarting without warning. This proactive approach to system maintenance can help ensure a more stable and reliable computing experience.

Securing Your PC: Scanning for Malware and Updating Group Policies

Malware scanning and group policy update

To secure your PC and prevent random restarts, it’s essential to regularly scan for malware and ensure that your group policies are updated. Malware can cause unexpected restarts and other issues, so running a thorough scan with reliable antivirus software is crucial. Make sure your group policies are up to date to prevent any conflicts or vulnerabilities that could lead to random restarts. It’s also important to regularly update your operating system and software to patch any bugs or security vulnerabilities that could be causing the issue. Additionally, check for any recent changes in hardware or software, as they could also be the root cause of the problem.

Troubleshooting Tips: Dealing with CPU Overheating and BIOS Issues

CPU temperature monitor

Check the CPU temperature to ensure it is not overheating, which can cause the computer to randomly restart. Use monitoring software to keep an eye on the temperatures and take action if it exceeds safe levels.
– Clean the CPU cooler and ensure proper airflow within the computer case to prevent overheating. Make sure the CPU fan is working properly and consider adding additional case fans if necessary.
– If you suspect BIOS issues, update the BIOS to the latest version provided by the manufacturer. Follow the instructions carefully to avoid any potential issues during the update process.
– Consider resetting the BIOS settings to default if you have made any changes previously, such as overclocking, which could be causing instability and random restarts.
Perform a thorough malware scan to rule out any potential virus or malware that could be causing the random restarts. Use reputable antivirus software to scan the entire system.
– If the issue persists, consider seeking professional help to diagnose any potential hardware issues that may be causing the random restarts.

F.A.Qs

How do I stop my computer from restarting?

To stop your computer from restarting, go to the Advanced tab, click on the Settings button under the Startup and Recovery section, and deselect the Automatically Restart option under System Failure.

How do I find out why my computer restarted?

To find out why your computer restarted, you can open Event Viewer and navigate to the System category under Windows Logs. From there, you can filter the current log to see the events leading up to the restart.

How to fix a PC that keeps restarting again and again automatically?

To fix a PC that keeps restarting automatically, you can start by disabling the automatic restart option in the operating system settings. Check for hardware issues and uninstall any recently installed apps. Scan for malware and consider disabling automatic driver updates to troubleshoot the problem.

Why did my computer just restart on its own?

Your computer may have restarted on its own due to software or driver issues. You can try adjusting the power settings or checking for driver updates to resolve the issue.

Fix Slow Video Streaming with High-Speed Internet

Are you frustrated with slow video streaming despite having high-speed internet? Let’s explore some common causes and solutions to improve your streaming experience.

Check your internet speed using a reliable speed test website to ensure it meets the minimum requirements for video streaming.

Optimize Video Quality Settings

Another way to optimize video quality settings is to close all other applications on your computer or mobile device. This will free up memory and processing power for smoother video streaming. You can also disable any browser extensions or plugins that may be using bandwidth and causing interruptions.

If you are still experiencing slow video streaming, consider using a virtual private network (VPN) to bypass any bandwidth throttling by your internet service provider. This can improve video quality and streaming speed.

By optimizing your video quality settings, you can enjoy high-speed internet without the frustration of slow video streaming.

Pause and Resume Streaming

If you’re experiencing slow video streaming with high-speed internet, one quick fix is to pause the video for a few minutes. This allows the video to buffer and load ahead, reducing the chances of interruptions.

Another tip is to close any unnecessary tabs or applications on your computer or mobile device. This can free up bandwidth and improve the streaming quality.

If the issue persists, try clearing the cache and cookies on your web browser. This can help improve the overall performance of your internet connection.

Restarting your modem and router can also help resolve any potential network issues that may be causing slow streaming.

Lastly, if you suspect that malware or a computer virus is affecting your internet speed, run a scan with your antivirus software to ensure that your device is clean.

Check and Enhance Internet Connection Speed

Internet speed test

To check and enhance your internet connection speed for high-speed video streaming, start by running a speed test on your internet connection. Make sure to close any unnecessary applications and devices that may be using up bandwidth. If you’re using a Wi-Fi connection, try moving closer to the router or using an Ethernet cable for a more stable connection. Restarting your modem or router can also help improve your internet speed.

Additionally, consider upgrading your internet plan with your provider to get higher speeds. It’s also important to keep your antivirus software up to date to prevent malware from slowing down your internet connection. If you’re still experiencing slow streaming, consider contacting your internet service provider to address any potential issues with your connection.

By taking these steps, you can ensure that your internet connection is optimized for high-speed video streaming without any interruptions or buffering.

Limit Bandwidth Usage on Other Applications

Another way to limit bandwidth usage on other applications is to close any unnecessary programs or apps on your computer or device. This will free up more bandwidth for video streaming and prevent other applications from using up valuable resources.

Additionally, you can check for any background downloads or updates that might be taking up bandwidth. By pausing or canceling these downloads, you can ensure that more bandwidth is available for video streaming, leading to a smoother and faster viewing experience.

By implementing these strategies to limit bandwidth usage on other applications, you can optimize your internet connection for high-speed video streaming without interruptions or buffering.

Update Software, Apps, and Drivers

To fix slow video streaming with high-speed internet, it’s important to regularly update your software, apps, and drivers. Outdated software can cause performance issues, so make sure your operating system, web browser, and streaming apps are all up to date. Check for updates in your device’s settings or the app store. Additionally, updating your network drivers can improve your internet connection and streaming quality. Visit the manufacturer’s website to download and install the latest drivers for your network adapter.

Regularly updating your software, apps, and drivers can help to optimize your system for smooth video streaming. By staying current with the latest updates, you can avoid performance issues and ensure a high-quality streaming experience.

Clear Cache and Browser Data

To fix slow video streaming with high-speed internet, one common solution is to clear the cache and browser data. Start by clearing the cache and browser data on your device. This can help improve the performance of your internet browser and remove any stored data that may be causing interruptions in your video streaming. Go to your browser settings and locate the option to clear browsing data. You can usually choose to clear the cache, cookies, and browsing history. After clearing the data, close and restart your browser to see if the video streaming improves.

If you are still experiencing slow video streaming, you may want to consider other factors such as bandwidth throttling or internet access issues. Keep in mind that clearing the cache and browser data is just one step in troubleshooting slow video streaming with high-speed internet.

Switch to Wired Ethernet Over Wi-Fi

Switching to a wired Ethernet connection instead of using Wi-Fi can significantly improve video streaming quality. Connect your device directly to your router using an Ethernet cable to reduce latency and ensure a stable connection. This can help eliminate interruptions and glitches while streaming high-definition content from platforms like Netflix or YouTube.

By bypassing the limitations of Wi-Fi, you can experience smoother playback and faster load times for videos on demand. Wired Ethernet also avoids potential interference from other devices and networks that can impact your internet access.

Additionally, using a wired connection can help prevent data caps from affecting your streaming experience, as well as reduce the risk of computer viruses and other online threats. This can be especially beneficial for streaming on a personal computer or smart TV.

Adjust Streaming Device or Router Position

To fix slow video streaming with high-speed internet, one simple solution is to adjust the position of your streaming device or router. If your device is too far from the router, it may not be receiving a strong enough signal, which can result in slow streaming. Try moving your streaming device closer to the router and see if that improves the speed of your video streaming.

Another option is to reposition your router to a more central location in your home. This can help improve the signal strength throughout your house, leading to faster and more reliable streaming.

If you’re still experiencing slow video streaming after adjusting the position of your devices and router, you may want to consider upgrading your router to a more powerful model that can better handle high-speed internet and multiple devices.

By making these simple adjustments to the position of your streaming device and router, you can help ensure smooth and uninterrupted video streaming, even with high-speed internet.

Consider Upgrading Internet Plan

Consider upgrading your internet plan to a higher speed package to improve slow video streaming. Check with your internet service provider for available upgrade options and pricing. Upgrading to a plan with higher bandwidth can improve the quality and speed of streaming media, reducing interruptions and buffering. This can be especially beneficial for streaming high-definition content such as 1080p videos on platforms like YouTube or Netflix.

A faster internet connection can also help with online and offline video on demand services, as well as streaming through mobile apps. Keep in mind that some internet plans may have data caps, so be sure to inquire about any potential limits when upgrading. Consider satellite internet access as an alternative if cable or DSL options are not available in your area.

Upgrading your internet plan can also help with latency and data buffer issues, providing a smoother streaming experience. Discuss your specific needs and usage with your provider to find the best plan for your situation.

Explore Using a VPN Connection

To fix slow video streaming with high-speed internet, consider using a VPN connection. A VPN can help improve streaming by encrypting your internet connection and routing it through a server in a different location. This can help bypass any bandwidth throttling by your internet service provider and improve streaming speeds.

If you are experiencing slow video streaming, try using a VPN to see if it improves your connection. Download a reputable VPN application and connect to a server location that is known for fast internet speeds. Once connected, test your video streaming to see if there is an improvement in speed and quality.

Keep in mind that using a VPN may also have an impact on your overall internet speed, so it’s important to test different server locations to find the best one for streaming. Additionally, consider the pricing and data cap of the VPN service to ensure it meets your needs for streaming video on demand.

In some cases, using a VPN may not significantly improve your streaming experience, so it’s important to also consider other factors such as your internet connection, router, and device capabilities.

Troubleshoot Excel out of memory, insufficient system resources

Are you experiencing Excel out of memory or insufficient system resources errors? This article will help you troubleshoot and solve these issues.

Recognizing Symptoms and Problematic Patterns

Pay attention to the size of the file you are working with and the complexity of the formulas and functions being used. Large files or complex calculations can lead to memory issues.

If you are using a 32-bit version of Excel, consider upgrading to a 64-bit version if you frequently work with large datasets. This can help alleviate memory issues by allowing Excel to access more RAM.

Consider closing any unnecessary programs or files running in the background to free up system resources for Excel.

It’s also important to keep your operating system and Excel software updated to ensure that any known memory or resource issues have been addressed by Microsoft.

In some cases, using Open XML Paper Specification (XPS) or PDF formats for large documents can help reduce memory usage in Excel.

By recognizing the symptoms and understanding the potential causes of “out of memory” or “insufficient system resources” errors, you can take proactive steps to troubleshoot and resolve these issues in Excel.

Identifying the Cause and Interfering Factors

Another factor to consider is the memory and resources available on your computer. If you are using a 32-bit version of Excel or operating system, you may be limited in the amount of memory that Excel can access. Upgrading to a 64-bit version can help address this limitation.

Check your system’s RAM and available storage space to ensure that it meets the requirements for running Excel. Closing other applications and freeing up system resources can also help alleviate the problem.

Additionally, consider the version of Excel you are using. Updating to the latest version or installing any available updates for Microsoft Office can address potential bugs or issues causing the out of memory error.

Lastly, consider the possibility of a corrupt file or add-in causing the problem. Running a repair on Microsoft Office or disabling any unnecessary add-ins can help resolve these issues.

By identifying the cause and interfering factors, you can take targeted steps to troubleshoot and resolve Excel out of memory and insufficient system resources errors.

Simple Fixes: Updating Software and Adjusting Settings

  • Check for available updates for Microsoft Excel and Windows.
  • Open Microsoft Excel and navigate to the File tab.
  • Select Account and then click on Update Options.
  • Choose Update Now to install any available updates for Excel.
  • Go to the Settings app on your Windows computer.
  • Click on Update & Security and then select Windows Update.
  • Check for any available updates and install them if necessary.

Adjusting Settings

  • Open Task Manager by pressing Ctrl+Shift+Esc.
  • Click on the Processes tab and look for any unnecessary background processes consuming system resources.
  • End any unnecessary processes by selecting them and clicking End Task.
  • Adjust Excel settings by going to the File tab and selecting Options.
    End any unnecessary processes by selecting them and clicking End Task.
Adjust Excel settings by going to the File tab and selecting Options.
  • Under the Advanced tab, adjust the Memory options to optimize performance.
  • Consider increasing Virtual Memory settings in the System Properties of your computer.
    Under the Advanced tab, adjust the Memory options to optimize performance.
Consider increasing Virtual Memory settings in the System Properties of your computer.

Hardware Solutions: Upgrading Physical Memory

RAM memory sticks

To troubleshoot Excel out of memory and insufficient system resources, consider upgrading the physical memory of your computer. Check if your computer is running on a 32-bit or 64-bit operating system to determine the maximum amount of RAM it can support. If you are using a 32-bit system, consider upgrading to a 64-bit system to access more RAM.

Open your computer’s settings to check the current amount of RAM installed. If it is below the recommended amount for running Excel and other applications simultaneously, consider adding more RAM modules to your computer.

Upgrading your computer’s physical memory can improve its overall performance and allow Excel to access more system resources. This can help prevent the out of memory error and insufficient system resources message from appearing.

Consider consulting with a hardware technician or referencing your computer’s manual for instructions on how to upgrade the physical memory. This simple hardware solution can significantly improve Excel’s performance and prevent memory-related errors.

Interactions with Other Applications and Add-ins

Excel add-ins and applications

Additionally, check for compatibility issues with other applications that may be running at the same time as Excel. Some applications may have conflicts with Excel, leading to memory issues. Close any unnecessary applications or processes to free up system resources for Excel.

If you are using 32-bit computing, consider upgrading to a 64-bit system to take advantage of higher memory limits. Consider upgrading to a 64-bit version of Excel if you are consistently running into memory issues.

Finally, regularly update your Microsoft 365 and Windows software to ensure that you have the latest bug fixes and improvements that may resolve memory issues in Excel.

Advanced Solutions: Switching to 64-bit Excel and Adjusting Print Settings

Issue Solution
Out of memory error Switch to 64-bit Excel
Insufficient system resources error Adjust print settings

10 Ways to Fix Windows PC Restarting Frequently

Are you tired of your Windows PC restarting frequently? Here are 10 ways to fix this issue and get your computer running smoothly again.

Troubleshooting Software Conflicts and Malware Infections

Windows error message

To troubleshoot software conflicts and malware infections causing frequent PC restarts, start by running a full system scan with a reliable antivirus program to detect and remove any malicious software and malware infections. Check for any recent software installations or updates that may be causing conflicts, and consider uninstalling or rolling back these changes.

Update Windows to ensure that your operating system has the latest patches and security fixes. Use System Restore to revert your system to a previous state where it was functioning properly, if necessary. Check for device driver updates and ensure that all your drivers are up to date.

If you suspect a hardware issue, check your power supply and clean out any dust that may be affecting your system. Lastly, consider seeking professional help if you are unable to resolve the issue on your own.

Addressing Hardware Failures and Power Supply Issues

A computer with a power supply issue

If your Windows PC is restarting frequently, it could be due to hardware failures or power supply issues. Start by checking the power supply for any issues such as loose connections or overheating. Make sure all hardware components are properly connected and functioning.

Check for any error messages or unusual noises coming from the power supply unit. If you suspect a hardware failure, consider running a hardware diagnostic test to identify the problem.

Ensure that the power supply is supplying enough power to all components, especially if you have recently added new hardware. Overloading the power supply can cause frequent restarts.

Inspect the inside of your PC for dust buildup, as this can cause overheating and hardware failures. Use a can of compressed air to clean out any dust from the computer components.

If you have recently installed new hardware or drivers, consider rolling back to a previous version using System Restore. This can help resolve any compatibility issues that may be causing the frequent restarts.

By addressing hardware failures and power supply issues, you can troubleshoot and fix the frequent restarting of your Windows PC.

Disabling Automatic Reboot Features

Windows automatic reboot settings

To disable automatic reboot features in Windows PC, follow these steps. First, press the Windows key + R to open the Run dialog box. Then, type “gpedit. msc” and press Enter. In the Local Group Policy Editor, navigate to Computer Configuration > Administrative Templates > Windows Components > Windows Update.

Double-click on “No auto-restart with logged on users for scheduled automatic updates installations” and select “Enabled” to prevent automatic reboots. Click “Apply” and then “OK” to save the changes. Finally, restart your computer for the changes to take effect. This should help prevent frequent restarts caused by automatic updates.

Adjusting Advanced Power Settings

To adjust advanced power settings, go to Control Panel and select Power Options. Then, click on Change plan settings next to your selected power plan. After that, select Change advanced power settings to customize options such as sleep, display, and processor power management. Make sure to adjust the settings to optimize your PC’s performance and prevent frequent restarts. Pay attention to settings like hard disk and USB to avoid data loss.

Ensure that your device drivers are up to date to prevent any compatibility issues that could be causing the frequent restarts.

Updating or Reinstalling Graphics and Device Drivers

To update or reinstall your graphics and device drivers, start by accessing the Device Manager. Right-click on the Start button and select Device Manager. Look for the Display Adapters and Sound, Video and Game Controllers sections. Right-click on the device you want to update and select Update Driver. Choose Search automatically for updated driver software. If Windows doesn’t find a new driver, you can manually download and install the latest driver from the manufacturer’s website.

If updating doesn’t work, you can try uninstalling the driver and then reinstalling it. This can help fix issues with corrupted or outdated drivers.

Checking for RAM Errors and Overheating Problems

Method Description
1 Run Windows Memory Diagnostic tool to check for RAM errors
2 Use third-party software to test RAM for errors
3 Clean the computer’s internal components to prevent overheating
4 Check for dust and blockages in the computer’s cooling system
5 Monitor the computer’s temperature using software

Updating BIOS to Resolve Boot Issues

Updating your BIOS can help resolve boot issues on your Windows PC. To do this, visit the manufacturer’s website and download the latest BIOS update for your specific model. Make sure to follow the instructions carefully and back up your data before proceeding. Once the update is complete, restart your computer and check if the boot issues have been resolved.

Keep in mind that updating the BIOS carries some risk, so it’s essential to proceed with caution and ensure that the update is necessary for resolving the frequent restarts.

Windows 10 Update Slowing Computer? Here’s How to Fix It

Is your Windows 10 update causing your computer to slow down? Discover effective solutions to fix this issue.

Check for updates and install the latest drivers: Sometimes, slow performance issues can be resolved by updating the drivers for your computer’s hardware components. Go to the manufacturer’s website and download the latest drivers for your system.

Uninstall the recently installed update

If you’ve recently installed a Windows 10 update and noticed that your computer has become slow, there is a solution. To fix this issue, you need to uninstall the update. Here’s how:

1. Open the Start menu and click on the Settings icon.
2. In the Settings window, click on “Update & Security.”
3. On the left-hand side, click on “Windows Update.”
4. In the Windows Update settings, click on “View update history.”
5. This will open a new window showing all the updates installed on your computer. Look for the recently installed update that is causing the slowdown.
6. Once you’ve identified the update, click on “Uninstall updates” at the top of the window.
7. This will open the Control Panel with a list of installed updates. Locate the problematic update and right-click on it.
8. From the context menu, select “Uninstall.”
9. Follow the on-screen instructions to complete the uninstallation process.
10. After uninstalling the update, restart your computer to apply the changes.

After a Windows 10 update, a slow computer can be incredibly frustrating, but don’t worry, there are steps you can take to fix it.

Repair corrupt system files

Computer with a wrench or repair tool

If your Windows 10 update is slowing down your computer, one possible reason could be corrupt system files. Luckily, there’s a way to fix this issue.

To repair corrupt system files, you can use the built-in System File Checker tool in Windows 10. Here’s how:

1. Open the Command Prompt as an administrator by pressing the Windows key + X and selecting “Command Prompt (Admin).”

2. In the Command Prompt window, type “sfc /scannow” and press Enter. This command will scan your system for corrupt files and repair them if possible.

3. Wait for the scan to complete. This process may take some time, so be patient.

4. Once the scan is finished, you’ll see a message indicating whether any corrupt files were found and repaired.

5. Restart your computer to apply the changes.

By running the System File Checker tool, you can fix any corrupt system files that may be causing your Windows 10 update to slow down your computer. This should help improve the overall speed and performance of your system.

A sluggish computer post-Windows 10 update is not uncommon, but with some troubleshooting and optimization, you can restore its speed.

Clear Windows Update cache

  • Stop Windows Update service: Open Command Prompt as administrator and type “net stop wuauserv”.
  • Delete Windows Update cache: Navigate to C:\Windows\SoftwareDistribution folder and delete all files and folders within it.
  • Restart Windows Update service: Open Command Prompt as administrator and type “net start wuauserv”.
  • Reset Windows Update Components: Open Command Prompt as administrator and run the following commands in sequence:
    • net stop bits
    • net stop wuauserv
    • net stop appidsvc
    • net stop cryptsvc
    • ren %systemroot%\SoftwareDistribution SoftwareDistribution.old
    • ren %systemroot%\system32\catroot2 catroot2.old
    • net start bits
    • net start wuauserv
    • net start appidsvc
    • net start cryptsvc
  • Run Windows Update Troubleshooter: Open Settings, go to Update & Security, select Troubleshoot, and run the Windows Update troubleshooter.

python
import subprocess

def optimize_windows():
# Clear temporary files
subprocess.run('del /q/f/s %TEMP%\*')

# Disable unnecessary startup programs
subprocess.run('tasklist > tasks.txt', shell=True)
with open('tasks.txt', 'r') as file:
for line in file:
if 'SomeStartupProgram.exe' in line: # Replace with the name of unnecessary programs
program_name = line.split()[0].strip()
subprocess.run(f'taskkill /f /im {program_name}')

# Update drivers
subprocess.run('DriverUpdate.exe') # Replace with appropriate driver update mechanism

# Perform disk cleanup
subprocess.run('cleanmgr.exe /sagerun:1')

# Disable unnecessary visual effects
subprocess.run('SystemPropertiesPerformance.exe')

print("Optimization completed successfully.")

# Call the function to optimize the system
optimize_windows()

Optimize disk drives

If your Windows 10 update is slowing down your computer, one possible solution is to optimize your disk drives. This can help improve the performance of your system and make it run smoother.

To optimize your disk drives, follow these steps:

1. Open the Task Manager by pressing Ctrl + Shift + Esc on your keyboard.
2. Go to the “Performance” tab and click on “Open Resource Monitor” at the bottom.
3. In the Resource Monitor window, click on the “Disk” tab.
4. Look for the “Disk Activity” section and sort the processes by “Total (B/sec)” to see which processes are using the most disk activity.
5. Identify any processes that are using a high amount of disk activity and causing your computer to slow down.
6. Right-click on the process and select “End Process” to stop it from running.
7. If you’re unsure about a process, you can search for it online to determine if it’s necessary or if it could be a malware or virus.
8. You can also check the “Disk” tab in the Task Manager to see if any programs are using a high amount of disk usage. If so, you can right-click on the program and select “End Task” to close it.
9. Another way to optimize your disk drives is to clean up your hard drive. You can do this by going to the “Settings” menu, selecting “System,” and then “Storage.” From there, you can click on “Temporary files” and remove any unnecessary files that are taking up space on your disk.
10. Finally, you can defragment your hard drive to improve its performance. To do this, go to the “Settings” menu, select “System,” and then “Storage.” Under the “More storage settings” section, click on “Optimize Drives.” From there, select your hard drive and click on “Optimize” to start the defragmentation process.

Disable background apps

Task Manager

1. Open the Task Manager by pressing Ctrl + Shift + Esc on your keyboard.
2. In the Task Manager window, click on the “More details” option at the bottom if it’s not already expanded.
3. Go to the “Processes” tab and look for any unnecessary or resource-intensive apps running in the background. You can sort the list by clicking on the “CPU” or “Memory” column header to identify the culprits.
4. Select the apps you want to disable by clicking on them and then click on the “End task” button at the bottom right. Be cautious not to close any essential system processes.
5. If you want to permanently prevent an app from running in the background, go to the “Startup” tab in the Task Manager and disable it from starting up with your computer.

Disabling background apps can help free up system resources and improve the overall performance of your computer. Remember to only disable apps that you don’t need running in the background to avoid any unintended consequences.

If you continue to experience performance issues after disabling background apps, it’s recommended to check for other potential causes such as malware, software bugs, or outdated drivers.

Turn off visual effects and transparency

Here’s how to do it:

1. Open the Start menu and type “Performance Options” in the search bar. Press Enter.
2. In the Performance Options window, go to the Visual Effects tab.
3. Select the option for “Adjust for best performance” to disable all visual effects, or manually uncheck specific visual effects that you don’t need.
4. Click Apply and then OK to save the changes.

By turning off visual effects and transparency, you can improve the performance of your Windows 10 computer. This will free up system resources and make your computer run faster.

Scan for viruses

1. Open your antivirus software. If you don’t have one installed, consider downloading a reputable antivirus program from a trusted source.

2. Update your antivirus software to ensure that it has the latest virus definitions. This will help it detect and remove the most recent threats.

3. Perform a full system scan using your antivirus software. This will scan all files and folders on your computer for any potential viruses.

4. If your antivirus software detects any viruses, follow the instructions to remove or quarantine them. This will help protect your computer and speed up its performance.

5. After the scan is complete and any viruses have been removed, restart your computer. This can help clear out any lingering issues and improve overall performance.

Scanning for viruses is an essential step in troubleshooting a slow Windows 10 update. It can help identify and eliminate any potential threats that may be affecting your computer’s performance.

Update device drivers

  • Open Device Manager by right-clicking on the Start button and selecting Device Manager.
  • Expand the category of the device you want to update the driver for by clicking on the arrow next to it.
  • Right-click on the device and select Update driver.
  • Choose the option to Search automatically for updated driver software.
  • If Windows finds an updated driver, follow the on-screen instructions to install it.
  • If Windows doesn’t find an updated driver, you can try searching for one on the manufacturer’s website.
  • Download the latest driver for your device from the manufacturer’s website.
  • Open the downloaded driver file and follow the on-screen instructions to install it.
  • Restart your computer to apply the driver update.

Perform a clean boot

Computer with a broom and dustpan

Performing a clean boot can help resolve issues with a Windows 10 update slowing down your computer. To do this, follow these steps:

1. Press the Windows key + R to open the Run dialog box.
2. Type “msconfig” (without quotes) and press Enter to open the System Configuration window.
3. In the General tab, select the “Selective startup” option.
4. Uncheck the box next to “Load startup items.”
5. Go to the Services tab and check the box next to “Hide all Microsoft services.”
6. Click on the “Disable all” button.
7. Go to the Startup tab and click on “Open Task Manager.”
8. In the Task Manager window, disable any unnecessary startup programs by right-clicking on them and selecting “Disable.”
9. Close the Task Manager and go back to the System Configuration window.
10. Click on the “Apply” button and then click “OK.”
11. Restart your computer.

Performing a clean boot will disable all non-Microsoft services and startup programs, allowing you to identify if any of them were causing the slow performance issue. Once your computer has restarted, check if the Windows 10 update is still slowing down your computer. If the issue is resolved, you can gradually enable the disabled services and startup programs to identify the culprit.

100% Disk Usage Fix for Windows 10 & 11

In my experience with Windows 10 and 11, I have encountered the frustrating issue of 100% disk usage. This article provides effective solutions to fix this problem and improve the performance of your Windows operating system.

Check for resource-intensive processes: Use the Task Manager or Activity Monitor (for Mac) to identify any processes that are consuming a significant amount of disk usage. End or troubleshoot these processes to alleviate the strain on your disk.

Disable SuperFetch to fix high disk usage

If you’re experiencing high disk usage on your Windows 10 or 11 device, disabling SuperFetch can help resolve the issue. SuperFetch is a feature in Windows that aims to improve system performance by preloading frequently used applications into memory. However, in some cases, it may contribute to high disk usage.

To disable SuperFetch:

1. Open the Task Manager by pressing Ctrl + Shift + Esc on your keyboard.
2. Click on the “Processes” tab in the Task Manager.
3. Locate and right-click on the “Service Host: SuperFetch” process.
4. From the context menu, click on “Open Services.”
5. In the Services window, scroll down and locate “SuperFetch” in the list.
6. Right-click on “SuperFetch” and select “Properties.”
7. In the SuperFetch Properties window, go to the “General” tab.
8. Under the “Startup type” section, select “Disabled.”
9. Click on “Apply” and then “OK” to save the changes.

Disabling SuperFetch may result in slightly longer application launch times, but it should help alleviate the high disk usage issue. If you notice any negative impact on performance, you can always re-enable SuperFetch by following the same steps and selecting “Automatic (Delayed Start)” as the startup type.

Remember to regularly update your Windows operating system and keep your antivirus software up to date to protect your device from malware and potential vulnerabilities. Additionally, performing regular backups of your important files and data is always a good practice.

If you continue to experience high disk usage or encounter any other technical issues, Microsoft’s technical support team is available to assist you. You can visit the Microsoft website or contact their support team for further assistance.

A computer disk at 100% is like a marathon runner constantly sprinting – it’s bound to crash and burn eventually.

Update device drivers to resolve 100% disk usage

Update your device drivers to resolve the issue of 100% disk usage on Windows 10 and 11. Outdated or incompatible drivers can often cause high disk usage, leading to slow performance and system freezes. By keeping your drivers up to date, you can ensure optimal functionality and improve overall system performance.

To update your device drivers, follow these steps:

1. Open the Device Manager by right-clicking on the Start menu and selecting “Device Manager” from the context menu.
2. In the Device Manager window, expand the categories to locate the device drivers you want to update. Common drivers that can contribute to high disk usage include storage controllers, network adapters, and display adapters.
3. Right-click on the device driver you want to update and select “Update driver” from the context menu.
4. Choose the option to automatically search for updated driver software. Windows will then search for the latest driver updates online and install them on your system. Alternatively, you can choose to browse your computer for driver software if you have downloaded the updated drivers manually.
5. Repeat steps 3 and 4 for all the device drivers you want to update.
6. After updating the drivers, restart your computer to apply the changes.

Updating your device drivers can help resolve 100% disk usage issues by ensuring compatibility and improving system performance. If you continue to experience high disk usage after updating your drivers, consider performing a full system scan for viruses and malware using a reliable antivirus software. Viruses and malware can also cause high disk usage, so it’s important to ensure your system is clean and secure.

Regularly updating your drivers is essential for maintaining a healthy and efficient system. You can also enable automatic driver updates through Windows Update to ensure you always have the latest drivers installed. Simply go to Settings > Update & Security > Windows Update and click on “Check for updates” to install any available driver updates.

Check for and repair corrupted system files

If you’re experiencing high disk usage on your Windows 10 or 11 computer, it could be due to corrupted system files. Thankfully, Microsoft provides a built-in tool that can help you check for and repair these files. Here’s how:

1. Open the Command Prompt as an administrator. You can do this by searching for “Command Prompt” in the Windows Start menu, right-clicking on it, and selecting “Run as administrator.”

2. In the Command Prompt window, type the following command and press Enter: sfc /scannow

3. The System File Checker (SFC) tool will now scan your system for any corrupted files and attempt to repair them. This process may take some time, so be patient and let it complete.

4. Once the scan is finished, you will see the results displayed in the Command Prompt window. If any corrupted files were found and successfully repaired, you will see a message indicating this. If no issues were found, you will see a message stating that as well.

5. After the scan is complete, restart your computer to apply any repairs that were made.

By using the SFC tool, you can easily check for and repair corrupted system files that may be causing high disk usage on your Windows 10 or 11 computer. This can help improve system performance and resolve any issues you may be experiencing.

If you continue to experience high disk usage after running the SFC tool, there may be other factors contributing to the problem. It’s always a good idea to check for malware or viruses using a reliable antivirus program, and to ensure that your device drivers are up to date. You can also try disabling any unnecessary startup programs or services to see if that helps reduce disk usage.

If you’re still having trouble, you may want to consider reaching out to Microsoft’s technical support for further assistance. They can provide personalized guidance and help you troubleshoot the issue.

Remember, maintaining a healthy and optimized system is crucial for smooth performance. Regularly checking for and repairing corrupted system files is just one step you can take to ensure your Windows 10 or 11 computer is running at its best.

Next: Optimize Windows for better performance

python
import psutil

def get_disk_usage():
disk_usage = psutil.disk_usage('/')
return disk_usage.percent

disk_usage_percent = get_disk_usage()
print(f"Disk usage: {disk_usage_percent}%")

The code above uses the `psutil` library to retrieve the disk usage information of the root directory (‘/’). It then returns the percentage of disk usage. Please note that this code only retrieves the disk usage information and does not control or modify disk usage in any way.

Perform a disk check for disk usage issues

Performing a disk check can help resolve disk usage issues on Windows 10 and 11. To do this, follow these steps:

1. Open Task Manager by pressing Ctrl + Shift + Esc on your keyboard or by right-clicking the taskbar and selecting “Task Manager.”

2. In Task Manager, click on the “Processes” tab and look for any processes that are using a high amount of disk resources. If you find any, you can end those processes by right-clicking on them and selecting “End Task.”

3. If the high disk usage persists, click on the “Performance” tab in Task Manager and then click on “Open Resource Monitor” at the bottom.

4. In Resource Monitor, go to the “Disk” tab and check the “Total” column to see which processes are using the most disk resources. If you find any processes that are using a high amount of disk resources, you can end those processes by right-clicking on them and selecting “End Process.”

5. If the issue still persists, you can try disabling Windows Search temporarily. Open the Command Prompt as an administrator by pressing the Windows key + X and selecting “Command Prompt (Admin).” Then, type the following command and press Enter: net.exe stop “Windows Search”. This will temporarily stop the Windows Search service.

6. If you are using OneDrive, it may also contribute to high disk usage. You can try temporarily disabling it by right-clicking on the OneDrive icon in the taskbar and selecting “Settings.” In the Settings tab, uncheck the “Start OneDrive automatically when I sign in to Windows” option.

7. Another potential solution is to update your device drivers. Outdated or incompatible drivers can sometimes cause high disk usage. To update your drivers, go to the manufacturer’s website and download the latest drivers for your hardware.

8. Lastly, you can try running a disk check to scan and repair any errors on your hard disk drive. Open Command Prompt as an administrator and type the following command: chkdsk /f /r. This will prompt you to schedule a disk check for the next time you reboot your computer. Type “Y” and press Enter. Then, restart your computer to initiate the disk check.

Following these steps should help you identify and resolve any disk usage issues on your Windows 10 or 11 computer. If you continue to experience high disk usage, it may be worth seeking further assistance from Microsoft support or consulting online resources such as Trustpilot for user reviews and recommendations.

Reset virtual memory to optimize disk performance

Virtual memory settings

Resetting virtual memory can help optimize disk performance on Windows 10 and 11.

Virtual memory is a feature in Windows that allows your computer to use a portion of your hard drive as if it were RAM. This can help improve performance when your physical RAM is limited. However, over time, virtual memory can become fragmented or corrupted, leading to disk performance issues.

To reset virtual memory and optimize disk performance, follow these steps:

1. Press Ctrl + Shift + Esc to open Task Manager. Alternatively, you can right-click on the taskbar and select “Task Manager.”

2. In the Task Manager window, click on the “Performance” tab.

3. Under the “Performance” tab, click on “Memory” in the left-hand menu.

4. Locate the section labeled “Virtual Memory” and click on the “Change” button.

5. In the Virtual Memory window, uncheck the box that says “Automatically manage paging file size for all drives.”

6. Select your system drive (usually labeled “C:”) and click on the “Custom size” option.

7. Enter a value for the initial and maximum size of the paging file. The recommended size is typically 1.5 times the amount of physical RAM installed on your computer. For example, if you have 8GB of RAM, you can set the initial and maximum size to 12GB.

8. Click on the “Set” button to save the changes.

9. Click on “OK” to close the Virtual Memory window.

10. Restart your computer for the changes to take effect.

By resetting virtual memory, you can help optimize disk performance and improve overall system responsiveness. This can be particularly useful if you’re experiencing high disk usage or slow performance on your Windows 10 or 11 PC.

Remember to regularly monitor your computer’s performance and adjust virtual memory settings as needed. If you continue to experience disk performance issues, it’s recommended to check for any software bugs, update device drivers, and run a full system scan for viruses and malware.

Additionally, consider implementing regular backups and keeping your operating system up to date with the latest patches and firmware updates. These measures can help ensure the security and stability of your system.

For more troubleshooting tips and tricks, visit the Microsoft website or consult the Windows documentation.

Temporarily disable antivirus software to alleviate disk usage

Temporarily disabling antivirus software can help alleviate high disk usage on Windows 10 and 11.

If you’re experiencing 100% disk usage on your Windows 10 or 11 computer, temporarily disabling your antivirus software can be a potential solution. High disk usage can slow down your system and make it difficult to perform tasks efficiently. Here’s how you can disable your antivirus software to alleviate this issue:

1. Open the Task Manager by pressing Ctrl + Shift + Esc on your keyboard. Alternatively, you can right-click the taskbar and select “Task Manager” from the menu.

2. In the Task Manager, click on the “Performance” tab to view the disk usage details.

3. Identify the antivirus software that is currently running on your system. It might be listed under the “Background processes” section or the “Apps” section, depending on your Windows version.

4. Once you’ve identified the antivirus software, open its interface. This can usually be done by right-clicking the antivirus icon in the system tray and selecting “Open” or “Settings.”

5. Look for an option to temporarily disable the antivirus software. This option might be located in the settings, preferences, or the main interface of the antivirus software. Keep in mind that the exact steps may vary depending on the antivirus program you’re using.

6. After disabling the antivirus software, go back to the Task Manager and monitor the disk usage. If the disk usage has significantly decreased and your system is running smoothly, it indicates that the antivirus software was contributing to the high disk usage.

7. While your antivirus software is disabled, it’s important to exercise caution and avoid visiting potentially harmful websites or downloading suspicious files. This will help prevent any potential security risks during this temporary period.

8. Once you’ve resolved the high disk usage issue, remember to re-enable your antivirus software to ensure the ongoing protection of your system.

By temporarily disabling your antivirus software, you can address high disk usage on your Windows 10 or 11 computer.

Fix StorAHCI.sys driver to address high disk usage

If you’re experiencing high disk usage on your Windows 10 or 11 computer, one possible culprit could be the StorAHCI.sys driver. This driver is responsible for managing your computer’s storage devices, and a malfunctioning or outdated version can lead to excessive disk usage. Fortunately, there are steps you can take to fix this issue.

First, open the Task Manager by pressing Ctrl + Shift + Esc. In the Task Manager window, click on the “Processes” tab. Look for any processes that are using a significant amount of disk resources. If you notice that the “System” process is causing high disk usage, it’s likely related to the StorAHCI.sys driver.

To fix this issue, you’ll need to disable the StorAHCI.sys driver. To do this, follow these steps:

1. Press the Windows key + X on your keyboard and select “Device Manager” from the menu that appears.

2. In the Device Manager window, expand the “IDE ATA/ATAPI controllers” category.

3. Right-click on the “Standard SATA AHCI Controller” and select “Properties” from the context menu.

4. In the Properties window, navigate to the “Driver” tab and click on the “Roll Back Driver” button. This will revert the driver to a previous version, which may resolve the high disk usage issue.

5. If the “Roll Back Driver” option is grayed out or not available, you can try updating the driver instead. In the Properties window, click on the “Update Driver” button and follow the on-screen instructions to search for updated drivers online.

6. After updating or rolling back the driver, restart your computer to apply the changes.

Once your computer has restarted, check the Task Manager again to see if the disk usage has decreased. If the issue persists, you may need to further troubleshoot the problem or seek additional assistance.

It’s worth noting that high disk usage can also be caused by other factors such as malware infections, software bugs, or insufficient system resources. It’s always a good idea to run a thorough antivirus scan and ensure that your computer is running the latest updates and patches.

We hope this guide has helped you address the high disk usage issue on your Windows 10 or 11 computer. If you have any further questions or need additional support, don’t hesitate to reach out to our customer service team.

Switch to ChromeOS for improved disk usage

ChromeOS logo

To make the switch to ChromeOS, follow these steps:

Step 1: Research and choose a Chromebook that meets your needs. Chromebooks are laptops that run on ChromeOS and are designed to be fast and efficient. They come in a variety of models and price ranges, so you can find one that fits your budget and requirements.

Step 2: Transfer your files and data to the cloud. ChromeOS is designed to work seamlessly with cloud storage services like Dropbox. By moving your files to the cloud, you can free up disk space on your Windows device and access your files from anywhere with an internet connection.

Step 3: Install any necessary apps and extensions. ChromeOS has a wide range of apps and extensions available in the Chrome Web Store. Whether you need productivity tools, entertainment apps, or specialized software, you can find it in the Chrome Web Store.

Step 4: Set up your Chromebook and start using ChromeOS. Follow the on-screen instructions to set up your Chromebook and sign in with your Google account. Once you’re logged in, you can start exploring the features and benefits of ChromeOS.

With ChromeOS, you can enjoy improved disk usage and faster performance compared to Windows. ChromeOS is designed to be lightweight and efficient, so it uses less system resources and requires less disk space. This means you can run multiple apps and tasks simultaneously without experiencing slowdowns or disk usage issues.

In addition to improved disk usage, ChromeOS offers a streamlined and user-friendly interface. You can easily navigate through your apps and files, and perform tasks with just a few clicks. The ChromeOS dashboard provides quick access to your most-used apps and settings, making it easy to stay organized and productive.

By switching to ChromeOS, you can also benefit from enhanced security. ChromeOS is built with multiple layers of security to protect your data and personal information from malware, viruses, and other threats. Updates and patches are automatically applied in the background, so you can rest assured that your system is always up to date and protected.

Identify the cause of 100% disk usage in Windows 10

A graph showing disk usage at 100%

Identifying the Cause of 100% Disk Usage in Windows 10

If you’re experiencing 100% disk usage on your Windows 10 or Windows 11 device, it can significantly slow down your system and impact your overall productivity. Fortunately, there are several potential causes for this issue, and we’ll help you identify and fix them.

1. Check Task Manager: Open Task Manager by pressing Ctrl + Shift + Esc and go to the “Processes” tab. Look for any processes that are using a large amount of disk resources. If you find any suspicious processes, try ending them and see if it resolves the issue.

2. Scan for Malware: A computer virus or malware can be the cause of high disk usage. Use a reliable antivirus software to perform a full system scan and remove any detected threats. Additionally, make sure your antivirus software is up to date to protect against the latest threats.

3. Update Windows: Outdated or incompatible Windows updates can also lead to high disk usage. Go to Settings > Update & Security > Windows Update and click on “Check for updates.” Install any available updates and restart your computer.

4. Disable Superfetch: Superfetch is a Windows feature that preloads frequently used applications into memory. However, it can sometimes cause high disk usage. To disable Superfetch, press Win + R, type “services.msc,” and press Enter. In the Services window, find “Superfetch,” right-click on it, and select “Properties.” Change the startup type to “Disabled” and click OK.

5. Adjust Power Settings: Windows power settings can impact disk usage. Open Control Panel and go to “Power Options.” Select the power plan you’re using and click on “Change plan settings.” Then click on “Change advanced power settings.” Expand the “Hard disk” option and set it to a higher value, such as 0 or 1.

6. Check for Faulty Hardware: Faulty hardware, such as a failing hard disk drive (HDD) or outdated device drivers, can also cause high disk usage. Run a diagnostic test on your HDD and update your device drivers to their latest versions.

7. Disable Windows Search Indexing: Windows indexing can use a significant amount of disk resources. To disable it, press Win + R, type “services.msc,” and press Enter. In the Services window, find “Windows Search,” right-click on it, and select “Properties.” Change the startup type to “Disabled” and click OK.

Remember to restart your computer after making any changes to apply the fixes. If the issue persists, you may need to consult with a professional or seek further assistance from Microsoft Support.

Remove viruses and malware causing high disk usage

If you’re experiencing high disk usage on your Windows 10 or 11 computer, it could be due to viruses or malware. These malicious programs can consume a significant amount of your system’s resources, leading to slow performance and high disk usage. To resolve this issue, follow the steps below:

Step 1: Open Task Manager
– Press Ctrl + Shift + Esc to open Task Manager.
– Alternatively, you can right-click on the taskbar and select “Task Manager.”

Step 2: Identify the process causing high disk usage
– In Task Manager, click on the “Processes” tab.
– Look for any processes with high disk usage. These processes will be listed under the “Disk” column.
– If you’re unsure which process is causing the issue, click on the “Disk” column to sort the processes in descending order of disk usage.

Step 3: End the problematic process
– Once you’ve identified the process causing high disk usage, right-click on it and select “End Task.”
– If the process is unresponsive or doesn’t end, you may need to force close it. To do this, right-click on the process again and select “End Task” from the context menu.

Step 4: Run a full system scan
– To ensure that there are no viruses or malware on your computer, run a full system scan using your preferred antivirus software.
– Make sure your antivirus software is up to date with the latest virus definitions before starting the scan.
– Quarantine or remove any detected threats.

Step 5: Enable real-time protection
– To prevent future infections, enable real-time protection in your antivirus software.
– This feature will actively monitor your system for any suspicious activity and block potential threats in real-time.

Step 6: Update your operating system and software
– Keeping your operating system and software up to date is essential for security and performance.
– Install the latest Windows updates by going to “Settings” > “Update & Security” > “Windows Update.”
– Additionally, update your applications, especially those frequently targeted by malware, such as web browsers, media players, and file-sharing programs.

By following these steps, you can remove viruses and malware causing high disk usage on your Windows 10 or 11 computer. Regularly scanning your system for threats and keeping your software up to date will help protect your personal data and ensure smooth performance. If you need further assistance, consult the documentation provided by your antivirus software or seek support from their official website or customer service.

Close background applications to reduce disk usage

When your disk usage is at 100% on Windows 10 or 11, it can significantly slow down your computer’s performance. One way to alleviate this issue is by closing background applications that may be consuming excessive disk resources. Here’s how you can do it:

1. Open the Task Manager by pressing Ctrl + Shift + Esc on your keyboard. Alternatively, you can right-click on the taskbar and select “Task Manager” from the context menu.

2. In the Task Manager window, click on the “Processes” tab to view all the running applications and processes on your computer.

3. Look for any applications or processes that are consuming a high amount of disk usage. You can identify them by looking at the “Disk” column, which displays the percentage of disk resources being utilized by each process.

4. Right-click on the high disk usage application or process and select “End Task” from the context menu. This will close the application and free up disk resources.

5. Repeat this process for any other applications or processes that are using a significant amount of disk resources.

By closing these background applications, you can reduce the overall disk usage on your computer and improve its performance. It’s worth noting that some applications may automatically restart after being closed. If this happens, consider uninstalling or disabling those applications if they are not essential to your workflow.

In addition to closing background applications, there are a few other steps you can take to further optimize your disk usage:

– Run a malware scan: Computer viruses or malware can also contribute to high disk usage. Use a reliable antivirus program to scan your system and remove any potential threats.

– Update your device drivers: Outdated or faulty device drivers can sometimes cause excessive disk usage. Visit the manufacturer’s website for your hardware components and download the latest drivers.

– Perform a disk cleanup: Use the built-in Disk Cleanup tool in Windows to remove unnecessary files and free up disk space. You can access this tool by typing “Disk Cleanup” in the search bar and selecting the appropriate result.

– Disable unnecessary startup programs: Some applications automatically start when you boot up your computer, which can contribute to high disk usage. Use the Task Manager’s “Startup” tab to disable any non-essential programs from starting up with your computer.

Remember to regularly back up your important files and consider updating your operating system to the latest version to benefit from performance improvements and security patches.